
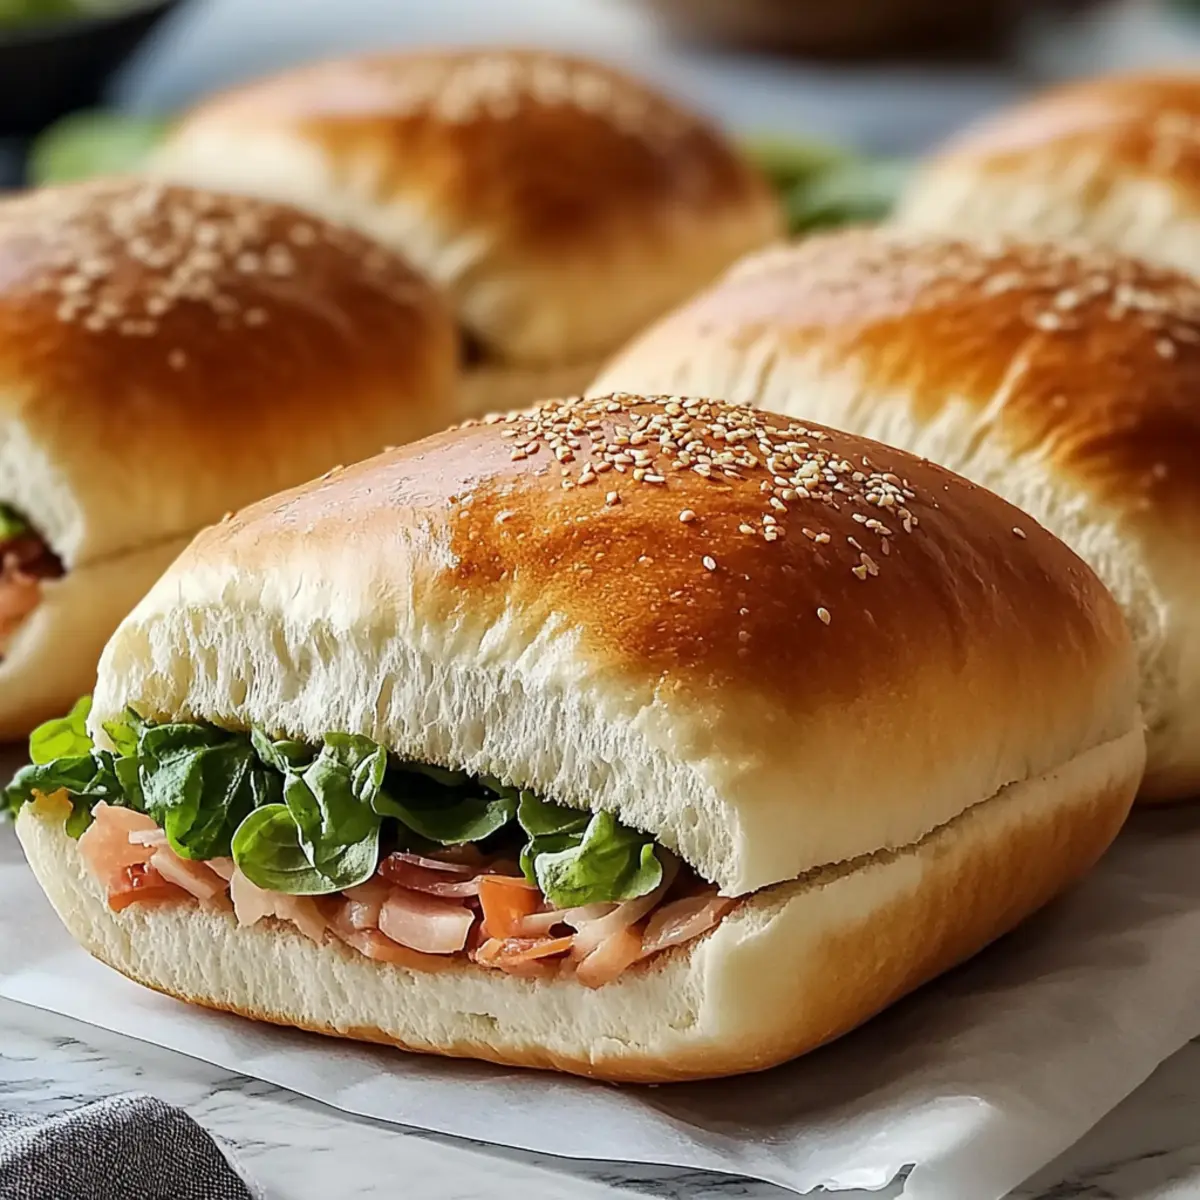
As I stood in my kitchen, the intoxicating aroma of freshly baked bread filled the air, instantly whisking me away to a cozy artisan bakery tucked away in a charming Italian village. Today, I’m sharing my secret to crafting Bakery-Quality Homemade Sub Rolls, the epitome of sandwich perfection. These marvelous rolls boast a golden-brown crust, cradling a warm, airy interior that transforms any lunchtime creation into a gourmet experience. Not only are they surprisingly straightforward to make, but they also allow you to control the ingredients—goodbye, preservatives! Plus, they freeze beautifully, ensuring you always have the ideal base for your favorite fillings on hand. Curious about how to whip up these delightful sub rolls? Let’s dive in!

Why You’ll Love Homemade Sub Rolls
Artisan Quality: These rolls replicate that bakery-fresh taste and texture right in your kitchen. Savory Flavor: With the ability to customize ingredients, each bite bursts with fresh flavors. Easy to Make: Minimal hands-on effort means you can enjoy incredible results without spending all day. Versatile Uses: Perfect for everything from hearty Italian sandwiches to grilled veggie delights, they elevate any meal. Freeze Well: Make a batch ahead and store them for later, ensuring gourmet sandwiches are always just a quick thaw away.
Homemade Sub Rolls Ingredients
-
For the Dough
-
Bread Flour – 4 cups (480g) provide structure and chewiness; substitute with all-purpose flour for a softer texture.
-
Warm Water – 1 1/2 cups (355ml) activates the yeast; ensure it’s 105–110°F for optimal yeast performance.
-
Active Dry Yeast – 2 1/4 tsp (1 packet) is a leavening agent for rise; ensure freshness to avoid a failed dough.
-
Granulated Sugar – 2 tbsp feeds the yeast for better rise and enhances crust color; can be reduced for less sweetness.
-
Olive Oil – 2 tbsp adds richness and keeps the crumb tender; use extra virgin olive oil for the best flavor.
-
Salt – 2 tsp enhances flavor and controls yeast activity.
-
Optional Flavorings
-
Garlic Powder – 1 tsp, enhances aromatic flavor; feel free to omit if desired.
-
Italian Seasoning/Onion Powder/Parmesan Cheese/Rosemary – adds additional flavor; choose according to your preference.
-
For Baking
-
Cornmeal – 2 tbsp for dusting baking sheets, preventing sticking.
-
Egg – 1, beaten, is an egg wash for a shiny crust; optional but recommended.
-
Sesame Seeds – 2 tbsp, adds flavor and texture; can substitute with poppy seeds or omit entirely.
-
Coarse Sea Salt – 1 tsp for sprinkling on rolls before baking to enhance flavor.
These Homemade Sub Rolls are a delightful endeavor in your kitchen, providing a warm, comforting experience that will surely impress!
Step‑by‑Step Instructions for Homemade Sub Rolls
Step 1: Activate Yeast
In a mixing bowl, combine 1 ½ cups of warm water (105–110°F) with 2 tablespoons of granulated sugar. Sprinkle 2 ¼ teaspoons of active dry yeast on top of the water, allowing it to sit undisturbed for 5 to 10 minutes. The yeast should become frothy and bubbly, indicating it’s activated and ready to use in your homemade sub rolls.
Step 2: Mix Dough
Once the yeast is activated, stir in 2 tablespoons of olive oil. In a separate bowl, combine 4 cups of bread flour and 2 teaspoons of salt, adding any optional 1 teaspoon of garlic powder if desired. Gradually mix the dry ingredients into the wet ingredients until a shaggy dough starts to form, showing progress toward crafting your homemade sub rolls.
Step 3: Knead Dough
Turn the dough out onto a floured surface and knead for 8 to 10 minutes, or use a stand mixer on low for 6 to 8 minutes. The dough should become smooth and elastic, bouncing back when pressed. If needed, add a bit of flour to prevent sticking. This critical step develops the gluten essential for the ideal texture of your homemade sub rolls.
Step 4: First Rise
Shape the kneaded dough into a ball and place it in a lightly oiled bowl. Cover it with a clean kitchen towel or plastic wrap, then let it rest in a warm spot until it doubles in size, which should take about 1 to 1.5 hours. This first rise is vital for creating light and airy homemade sub rolls.
Step 5: Shape Rolls
After the dough has risen, punch it down to release excess air, then divide it into 8 equal pieces. On a parchment-lined baking sheet dusted with cornmeal, shape each piece into a 6 to 7-inch oval. This step helps define the shape of your homemade sub rolls, ready for the second rise.
Step 6: Second Rise
Lightly cover the shaped rolls with a towel and let them rise again until puffy, about 45 to 60 minutes. This second rise is essential, as it creates the light texture characteristic of freshly baked homemade sub rolls.
Step 7: Preheat & Bake
Preheat your oven to 425°F (220°C). Just before baking, slash the tops of the rolls with a sharp knife for steam release, then brush with the optional egg wash for a shiny crust. Sprinkle with coarse sea salt or sesame seeds if desired, and bake for 18 to 20 minutes until golden brown and crusty, filling your kitchen with an irresistible aroma of homemade sub rolls.

Expert Tips for Homemade Sub Rolls
-
Check Yeast Freshness: Always use active yeast that’s within its expiration date; if it doesn’t foam, you’ll need a new packet for your homemade sub rolls to rise properly.
-
Weigh Your Ingredients: For the most accurate measurements, use a kitchen scale. This prevents the common mistake of adding too much flour, ensuring your rolls come out perfect every time.
-
Dough Hydration: Adjust water based on humidity. If the dough feels too sticky, adding a bit more flour can help. This balance is crucial for light and airy rolls.
-
Add Steam While Baking: To achieve that artisan crust, place a pan of hot water in the oven as your rolls bake. This technique creates steam, contributing to a beautiful crust texture.
-
Experiment with Flavors: Don’t hesitate to mix in herbs or spices in the dough for unique variations of your homemade sub rolls. A little extra flavor can elevate your sandwiches immensely!
What to Serve with Homemade Sub Rolls
Transforming your kitchen into a comforting eatery begins with these delightful rolls, perfect for any sandwich creation.
-
Classic Italian Meatballs: Serve these flavorful meatballs inside your sub rolls, slathered in marinara, for an irresistible treat.
-
Hearty Cheesesteak: Fill your rolls with sizzling sliced beef, sautéed onions, and melted cheese, creating a warm and gooey masterpiece.
-
Grilled Veggie Medley: Layer roasted zucchini, bell peppers, and eggplant in your rolls for a fresh, smoky flavors that complement the crusty bread.
-
Crispy Fried Chicken: Pair with spicy mayo or slaw for a crunchy delight that takes comfort food to new heights.
-
Caprese Salad Filling: Fresh tomatoes, mozzarella, and basil drizzled with balsamic glaze make for a refreshing sandwich delight, offering a burst of Italian sunshine.
-
Savory Pesto Chicken Salad: Combine tender chicken, creamy mayo, and vibrant pesto for a deliciously rich sandwich filling that brings balance to the crusty rolls.
-
Beer or Wine Pairing: A chilled lager or a light red wine enhances the meal, providing a refreshing balance to the hearty flavors.
Enjoy a variety of fillings that accentuate the warm, airy interior of your homemade sub rolls, turning each sandwich into a memorable dining experience.
Homemade Sub Rolls Variations & Substitutions
Feel free to customize these delicious homemade sub rolls to suit your taste and dietary needs!
- Whole Wheat: Substitute up to half the bread flour with whole wheat flour for a heartier, nutritious roll.
- Extra Herbs: Add fresh herbs like rosemary or thyme to the dough for a burst of fragrant flavor.
- Garlic & Herb Twist: Mix in minced garlic and chopped parsley to transform them into savory garlic rolls.
- Cheesy Rolls: Incorporate grated Parmesan or mozzarella directly into the dough for cheesy goodness.
- Spicy Kick: Sprinkle in red pepper flakes for a touch of heat to elevate your sandwich experience.
- Dairy-Free: Replace the egg wash with almond milk or omit altogether for a vegan-friendly option!
- Flavored Toppings: Experiment with toppings like poppy seeds, dried oregano, or Italian seasoning for a flavor boost.
- Sweet Sub Rolls: Add a spoonful of honey to the dough for subtly sweet rolls, perfect for breakfast sandwiches.
These variations not only provide a chance to explore different flavors but also make your homemade sub rolls the star of any meal. If you’re looking for hearty fillings to pair with your rolls, consider a rich homemade sauce, perhaps from a delicious Homemade Butter Chicken or dive into a bowl of comforting Potsticker Soup Warm. Enjoy baking and enjoy your culinary creations!
How to Store and Freeze Homemade Sub Rolls
Room Temperature: Store rolls in a paper bag at room temperature for up to 3 days. This helps retain their crustiness while allowing them to breathe.
Fridge: If needed, you can refrigerate your rolls for up to 1 week, but this may slightly alter their texture. Wrap them in plastic to keep fresh.
Freezer: For longer storage, freeze rolls individually in an airtight container or zip-top bag for up to 3 months. This keeps them fresh for future sandwiches.
Reheating: To enjoy frozen homemade sub rolls, simply remove from the freezer and thaw at room temperature for an hour, then reheat in the oven at 350°F (175°C) for 10-15 minutes for that freshly-baked warmth.
Make Ahead Options
These Homemade Sub Rolls are perfect for meal prep enthusiasts! You can prepare the dough and let it rise up to 24 hours in advance. Simply follow the instructions up to the first rise, then punch down the dough and cover it tightly with plastic wrap in the refrigerator. This slow fermentation will enhance flavors and help maintain quality. When you’re ready to bake, let the dough sit at room temperature for about 30 minutes, shape the rolls, and proceed with the second rise before baking. By planning ahead, you’ll have fresh, bakery-quality sub rolls ready with minimal fuss for your busy weeknights!
Homemade Sub Rolls Recipe FAQs
How do I select the best bread flour for my sub rolls?
Absolutely! For the best results, choose a high-protein bread flour that contains at least 12-14% protein. This provides the necessary gluten structure for a chewy, airy roll. Look for brands that specify “bread flour” on the label, as they are specifically formulated for yeast bread. Avoid all-purpose flour if you want a sturdy, artisan-quality roll.
What is the best way to store homemade sub rolls?
To keep your homemade sub rolls at their best, store them in a paper bag at room temperature for up to 3 days. This preserves their crustiness. If you have leftovers, wrap them in plastic wrap and refrigerate for up to a week. For even longer storage, freeze them in an airtight container for up to 3 months.
Can I freeze homemade sub rolls?
Yes, you can absolutely freeze your homemade sub rolls! After they have cooled completely, individually wrap each roll tightly in plastic wrap. Place them in an airtight container or zip-top bag to avoid freezer burn. To enjoy them later, simply thaw at room temperature for about an hour, then reheat in a 350°F (175°C) oven for 10-15 minutes to restore their delightful texture.
What should I do if the dough doesn’t rise?
Very important! If your dough isn’t rising, it’s likely due to inactive yeast. First, check if the yeast was fresh; if it didn’t foam when activated (in warm water and sugar), you may need to start over with new yeast. Remember that yeast thrives in warm (105-110°F) environments—if it’s too cool or too hot, it won’t rise. If your kitchen is cold, consider placing the covered dough in a warm spot or turning on the oven for a few minutes and turning it off, placing the dough inside to rise.
Are these sub rolls safe for those with allergies?
Definitely a consideration! This homemade sub rolls recipe contains gluten (from the bread flour) and may include allergens such as sesame seeds or garlic, depending on your choice of optional ingredients. Consider substituting gluten-free flour options designed for bread baking if gluten is an issue. Additionally, always check labels for any specific allergies or intolerances to ensure the safety of your fillings and toppings.

Artisan Homemade Sub Rolls That Will Elevate Your Sandwiches
Ingredients
Equipment
Method
- Activate yeast by mixing warm water and sugar, then adding yeast and letting sit until frothy.
- Mix dough by stirring in olive oil and combining dry ingredients before mixing into wet.
- Knead dough on a floured surface for 8-10 minutes until smooth and elastic.
- Let dough rise in an oiled bowl covered until it doubles in size, about 1-1.5 hours.
- After rising, punch down and divide into 8 pieces, shaping each into an oval on cornmeal dusted sheet.
- Cover shaped rolls and let rise until puffy, about 45-60 minutes.
- Preheat oven to 425°F. Slash tops, brush with egg wash, sprinkle with salt, and bake for 18-20 minutes.
Leave a Reply