
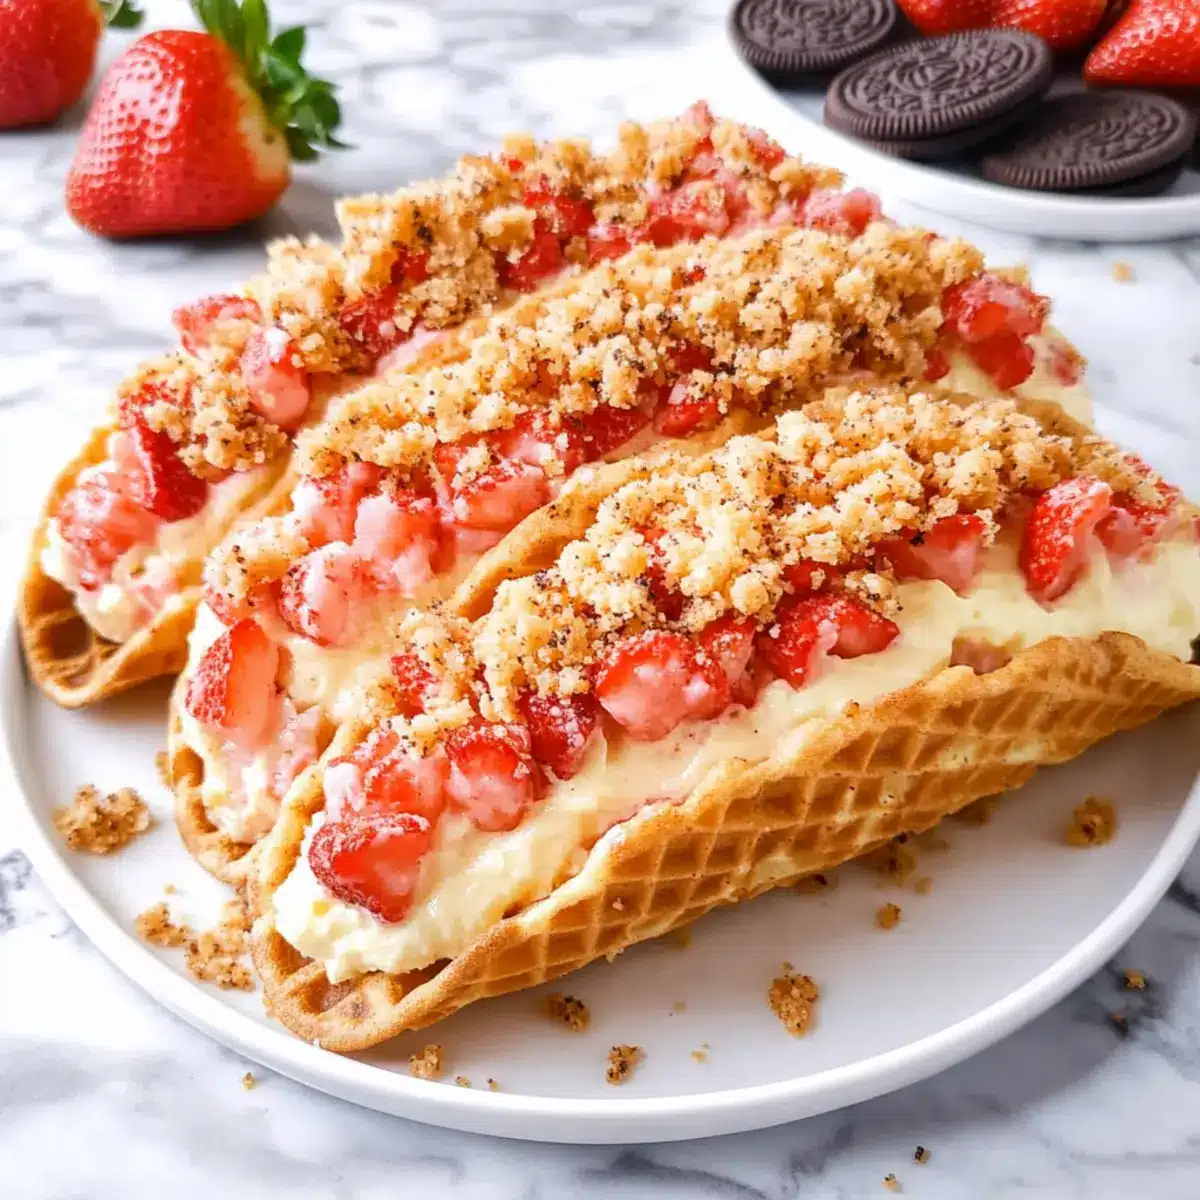
The moment I took my first bite of a Strawberry Crunch Cheesecake Taco, it felt like a summer picnic wrapped in a delicious, crispy shell. These treats are not just a feast for the taste buds; they’re a fun twist on traditional dessert that makes any gathering instantly memorable. What’s even better? This no-bake recipe is incredibly easy to whip up, allowing you to spend less time in the kitchen and more time enjoying the company of friends and family. Plus, with options for vegan swaps and endless variations, anyone can customize their tacos to fit their taste. So, are you ready to bring a little playful flair to your dessert table with these delightful Strawberry Crunch Cheesecake Tacos? I can’t wait to share the secrets behind this edible joy!

Why Are Strawberry Crunch Cheesecake Tacos Special?
Indulgent, creamy flavors: These Strawberry Crunch Cheesecake Tacos offer a decadent twist on classic cheesecake, bringing joy with every bite.
Customizable delight: With variations like chocolate or tropical twist, everyone can find their favorite! Check out ideas that include Pumpkin Cheesecake Truffles for a seasonal treat.
No-bake convenience: Save time in the kitchen with this no-bake recipe—perfect for busy days or quick gatherings!
Crowd-pleaser: Guests of all ages will love the playful taco presentation, making them ideal for parties or family dinners.
Vegan options: Easily switch to vegan ingredients, so no one has to miss out on the fun! Everyone deserves a taste of these delightful tacos.
Strawberry Crunch Cheesecake Tacos Ingredients
For the Taco Shell
• Waffle Cones – These crispy shells hold the delectable filling; flat-bottomed cake cones are best for stability.
For the Cheesecake Filling
• Cream Cheese – Provides that rich, creamy base; opt for vegan cream cheese to make it dairy-free.
• Powdered Sugar – Adds sweetness to balance the flavors; consider using less for a lower-sugar option.
• Whipped Topping – Lightens the filling and adds a fluffy texture; coconut whipped cream works for a dairy-free version.
For the Crunch Topping
• Golden Oreos – Creates a sweet, crunchy topping; substitute with vegan vanilla sandwich cookies to keep it plant-based.
• Freeze-Dried Strawberries – Enhances both the flavor and color of the topping; if unavailable, strawberry gelatin powder can work in a pinch.
• Butter – Binds the crunch together; coconut oil is a great alternative for a dairy-free option.
Step‑by‑Step Instructions for Strawberry Crunch Cheesecake Tacos
Step 1: Prepare the Crunch Topping
Begin by crushing approximately 10 Golden Oreos into fine crumbs using a food processor. In a mixing bowl, combine the cookie crumbs with ½ cup of freeze-dried strawberries and 3 tablespoons of melted butter until well incorporated. This should form a moist mixture that can hold together when pressed. Set it aside while you move on to the cheesecake filling.
Step 2: Make the Cheesecake Filling
In a large mixing bowl, beat 8 ounces of cream cheese and ½ cup of powdered sugar together until the mixture is smooth and creamy, which should take about 2-3 minutes at medium speed. Gently fold in 1 cup of whipped topping until fully mixed, creating a fluffy and light filling. This step is crucial for achieving the creamy texture that complements the Strawberry Crunch Cheesecake Tacos.
Step 3: Assemble Tacos
Take your waffle cones and carefully spoon the cheesecake filling into each one, filling them about three-quarters full. Use a small spatula to ensure the filling is spread evenly, making sure it reaches the edges for the best presentation. Once filled, generously top each cone with the prepared crunch topping, ensuring every taco has a delightful layer of strawberry goodness.
Step 4: Serve Immediately
For the best texture, serve the Strawberry Crunch Cheesecake Tacos right away to keep the waffle cones crispy. If you need to prepare them in advance, fill the cones no more than 30 minutes before serving. This will maintain the delightful crunch of the shells, ensuring your guests savor each delicious bite. Enjoy this no-bake treat at your next gathering!

What to Serve with Strawberry Crunch Cheesecake Tacos
Elevate your dessert experience with delightful accompaniments that enhance the flavors of your delicious tacos.
- Fresh Fruit Salad: A vibrant medley of seasonal fruits adds brightness and a refreshing contrast to the rich cheesecake flavors.
- Chocolate Dipping Sauce: Drizzle this luscious sauce over the tacos for an indulgent sweetness that complements their crunchy texture.
- Coconut Whipped Cream: Serve a dollop of this light, airy topping alongside for a tropical overtone that pairs beautifully with strawberry.
- Mint Sprigs: A sprinkle of fresh mint leaves on top not only enhances the visual appeal but also adds a cool, herbaceous bite.
- Lemon Sorbet: A tangy scoop of lemon sorbet provides a citrusy zing that balances the sweetness of the cheesecake tacos beautifully.
- Sparkling Water: Offer bubbly sparkling water with a twist of lime to cleanse the palate, making each bite of the Strawberry Crunch Cheesecake Tacos even more enjoyable.
- Chocolate-Covered Strawberries: These classic treats bring a burst of flavor and elegance, rounding out your dessert table with style.
- Caramel Sauce: A rich, buttery caramel drizzle can elevate the experience, adding additional sweetness and depth to each bite.
Make Ahead Options
These Strawberry Crunch Cheesecake Tacos are ideal for meal prep, allowing you to spend less time in the kitchen during busy weeknights or gatherings. You can prepare the cheesecake filling up to 2 days in advance; simply store it in an airtight container in the refrigerator to keep it fresh and creamy. The crunch topping can be made and stored at room temperature for 3-4 days, ensuring it’s ready to go when you need it. When it’s time to serve, just fill your waffle cones with the cheesecake filling and top them with the crunchy mixture—this way, you’ll maintain the delightful texture of the shells while enjoying the convenience of prepared components. Enjoy effortless, delicious results with minimal fuss!
Expert Tips for Strawberry Crunch Cheesecake Tacos
• Timing is Key: Fill waffle cones no more than 30 minutes before serving to avoid sogginess. Each refreshing bite should celebrate that delightful crunch!
• Choose the Right Cones: Opt for flat-bottomed cake cones for stability—this makes assembly easier and ensures the cheesecake tacos stand tall and proud.
• Chocolate Barrier: Brush melted white chocolate on the inner sides of the cones and let it set to create a barrier. This prevents moisture from the filling from making your shells soggy.
• Cookie Consistency: Use a food processor for crushing cookies; it ensures even crumbs that will bind perfectly with the melted butter for that irresistible crunch.
• Make Ahead: Prepare the cheesecake filling up to two days in advance and store it in the fridge, making last-minute assembly a breeze for your Strawberry Crunch Cheesecake Tacos.
Strawberry Crunch Cheesecake Tacos Variations
Feel free to let your creativity shine as you customize these delightful tacos to meet your cravings!
-
Chocolate Delight: Swap half the cream cheese for mascarpone, and stir in cocoa powder; top with chocolate wafer cookies for a decadent twist.
Imagine a rich, chocolate-filled treat that will satisfy any sweet tooth. -
Lemon Strawberry Zest: Mix in lemon zest for a refreshing kick and use lemon wafer cookies for the crunch topping.
This vibrant combination balances sweetness with a citrusy punch, making it an invigorating option. -
Tropical Paradise: Fold in crushed pineapple into the cheesecake filling and sprinkle freeze-dried mango in the topping for a taste of the tropics.
Close your eyes, and you might just feel the warm sun on your skin as you enjoy this playful flavor fusion. -
Mixed Berry Medley: Combine various freeze-dried berries such as blueberries and raspberries for a burst of flavors in every bite.
This colorful blend not only tastes amazing but also looks beautiful, adding a vibrant touch to your dessert table. -
Cookies and Cream: Replace Golden Oreos with crushed chocolate sandwich cookies for a classic cookies and cream flavor.
Each crunchy bite will bring back fond memories of childhood desserts, perfect for both kids and adults. -
Nutty Crunch: Add finely chopped nuts like walnuts or pecans to the crunch topping for an extra layer of texture and richness.
This addition will give your tacos a satisfying crunch that complements the creamy filling beautifully. -
Spicy Kick: For the adventurous, mix in a hint of cayenne pepper into the filling for a surprising kick that pairs well with sweetness.
This unexpected twist will make your guests raise their eyebrows in delight! -
Caramel Drizzle: Top your tacos with a drizzle of caramel sauce for an indulgent finish that ties all the flavors together.
The sweetness of the caramel adds an irresistible layer of decadence that everyone will love.
These variations not only enhance the flavors but also allow you to tailor the experience to everyone’s preferences! If you’re in the mood for a twist, consider pairing these with Chocolate Chip Cheesecake Cookies for a delightful dessert spread.
How to Store and Freeze Strawberry Crunch Cheesecake Tacos
Fridge: Store the cheesecake filling in an airtight container for up to 2 days, allowing you to prepare ahead and enjoy the flavors at their best.
Room Temperature: The crunch topping can last 3-4 days at room temperature, so keep it separate until just before serving to maintain its delightful texture.
Freezer: If you plan to freeze the taco shells, place them in a freezer-safe bag after assembly, but avoid filling them; store for up to 1 month.
Reheating: For best results, enjoy the Strawberry Crunch Cheesecake Tacos cold—there’s no need to reheat, as the refreshing taste is half the fun!

Strawberry Crunch Cheesecake Tacos Recipe FAQs
How do I select ripe strawberries for this recipe?
Absolutely! Look for strawberries that are bright red, firm, and fragrant. Avoid any with dark spots or signs of mold, as these indicate overripeness. For optimal flavor, choose strawberries that are in season!
What’s the best way to store leftover cheesecake filling?
You can store the cheesecake filling in an airtight container in the refrigerator for up to 2 days. Just make sure to give it a gentle stir before using it again to redisperse any ingredients that may have settled.
Can I freeze the crunch topping?
Yes, you can! To freeze the crunch topping, store it in a freezer-safe bag or container after it has cooled completely. It will last for up to 3 months in the freezer. When ready to use, just let it thaw at room temperature and add it to your tacos.
What should I do if my filling is too runny?
If your cheesecake filling turns out too runny, try chilling it in the refrigerator for about 30 minutes to firm it up. Alternatively, you can gradually add more powdered sugar or whipped topping until the desired consistency is achieved. Just keep mixing until everything blends seamlessly.
Are these Strawberry Crunch Cheesecake Tacos suitable for vegan diets?
Very! To make a vegan version of these delectable tacos, simply substitute the cream cheese with vegan cream cheese and use plant-based whipped topping. Additionally, choose vegan-friendly cookies for the crunch topping, like vanilla sandwich cookies. Everyone can enjoy this delightful treat without missing out!
How do I prevent sogginess in the waffle cones?
To keep your waffle cones crispy, brush the inner sides with melted white chocolate and let it set before filling. This creates a moisture barrier that protects the cones from becoming soggy. Fill them only about 30 minutes before serving for the best texture!
Strawberry Crunch Cheesecake Tacos: No-Bake Delight Awaits
Ingredients
Equipment
Method
- Crush approximately 10 Golden Oreos into fine crumbs using a food processor. In a bowl, combine cookie crumbs with ½ cup of freeze-dried strawberries and 3 tablespoons of melted butter until well mixed.
- In a large mixing bowl, beat 8 ounces of cream cheese and ½ cup of powdered sugar until smooth. Fold in 1 cup of whipped topping until fully mixed.
- Carefully spoon cheesecake filling into waffle cones, filling them three-quarters full. Top each cone with the crunch topping.
- Serve immediately to keep waffle cones crispy. If preparing in advance, fill cones no more than 30 minutes before serving.
Leave a Reply