
As I unwrapped the twinkling lights and scented candles for the holiday season, a nostalgic flavor memory flooded my mind—the comforting taste of Christmas Trifles enjoyed at childhood gatherings. With the festive spirit pulsing in the air, I’m excited to share my take on these delightful Mini Christmas Trifles. Crafting this easy, no-bake dessert isn’t just about satisfying a sweet tooth; it’s about bringing joy and warmth to your holiday table without spending hours in the kitchen. Ideal for any holiday celebration, this recipe allows you to indulge in layers of sponge cake, vibrant jelly, creamy custard, and fluffy whipped cream. Plus, the added garnish of crushed peppermint or candy canes infuses a fun twist that will impress your guests. Ready to elevate your holiday dessert game? Let’s dive into making these scrumptious Mini Christmas Trifles that embody the spirit of the season!

Why Make Christmas Mini Trifles?
Easy Preparation: These trifles are simple to create, requiring no baking skills—perfect for any home chef!
Layered Deliciousness: Enjoy delightful layers of soaked sponge, luscious custard, and airy whipped cream, all playing together in harmony.
Festive Flair: The addition of peppermint or candy canes adds a fun holiday crunch, making your dessert a cheerful centerpiece.
Quick Assembly: With store-bought ingredients, these festive treats save you time and focus on what matters most—celebrating with loved ones.
Crowd Pleaser: Great for gatherings, these Mini Christmas Trifles are eye-catching and sure to impress guests, leaving them asking for the recipe!
Ready to spread holiday cheer with your own creations? You can explore more festive dessert ideas, like our best no-bake recipes for more inspiration!
Christmas Mini Trifles Ingredients
• Prepare to indulge in the festive layers with these Christmas Mini Trifles!
For the Base
- Sponge Cake – Use homemade or store-bought for a quick and easy base layer.
- Orange Juice or Sherry – This adds moisture and a lovely flavor to soak into the sponge; feel free to swap with your favorite fruit juice.
For the Fruity Layer
- Strawberry/Raspberry Jelly Crystals – Creates a deliciously fruity layer; choose your favorite flavor or mix it up with alternatives like peach or blackcurrant.
For the Creamy Layer
- Vanilla Custard – Offers a rich, creamy taste; you can use store-bought or make your own if you’re feeling adventurous.
- Whipped Cream – Light and fluffy topping that enhances texture; can be substituted with whipped coconut cream for a dairy-free delight.
For the Toppings
- Strawberries – Adds a fresh and fruity aesthetic; feel free to use any seasonal fruits you have available.
- Peppermint or Candy Canes – Gives a festive touch with a crunchy finish; highly recommended for that extra holiday spirit!
Step‑by‑Step Instructions for Christmas Mini Trifles
Step 1: Prepare the Sponge Cake
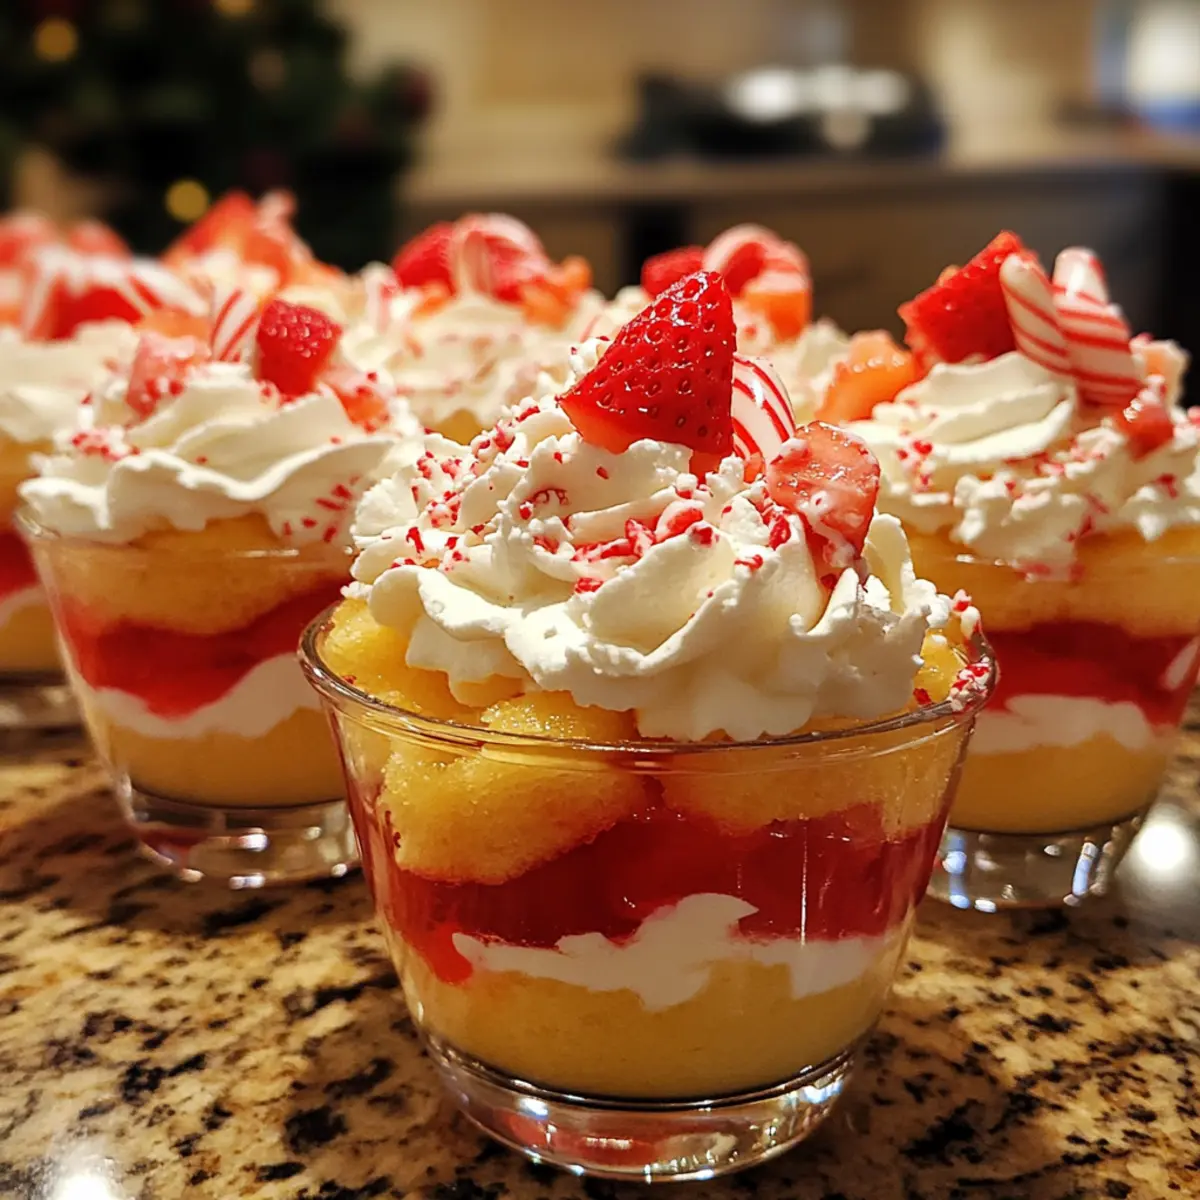
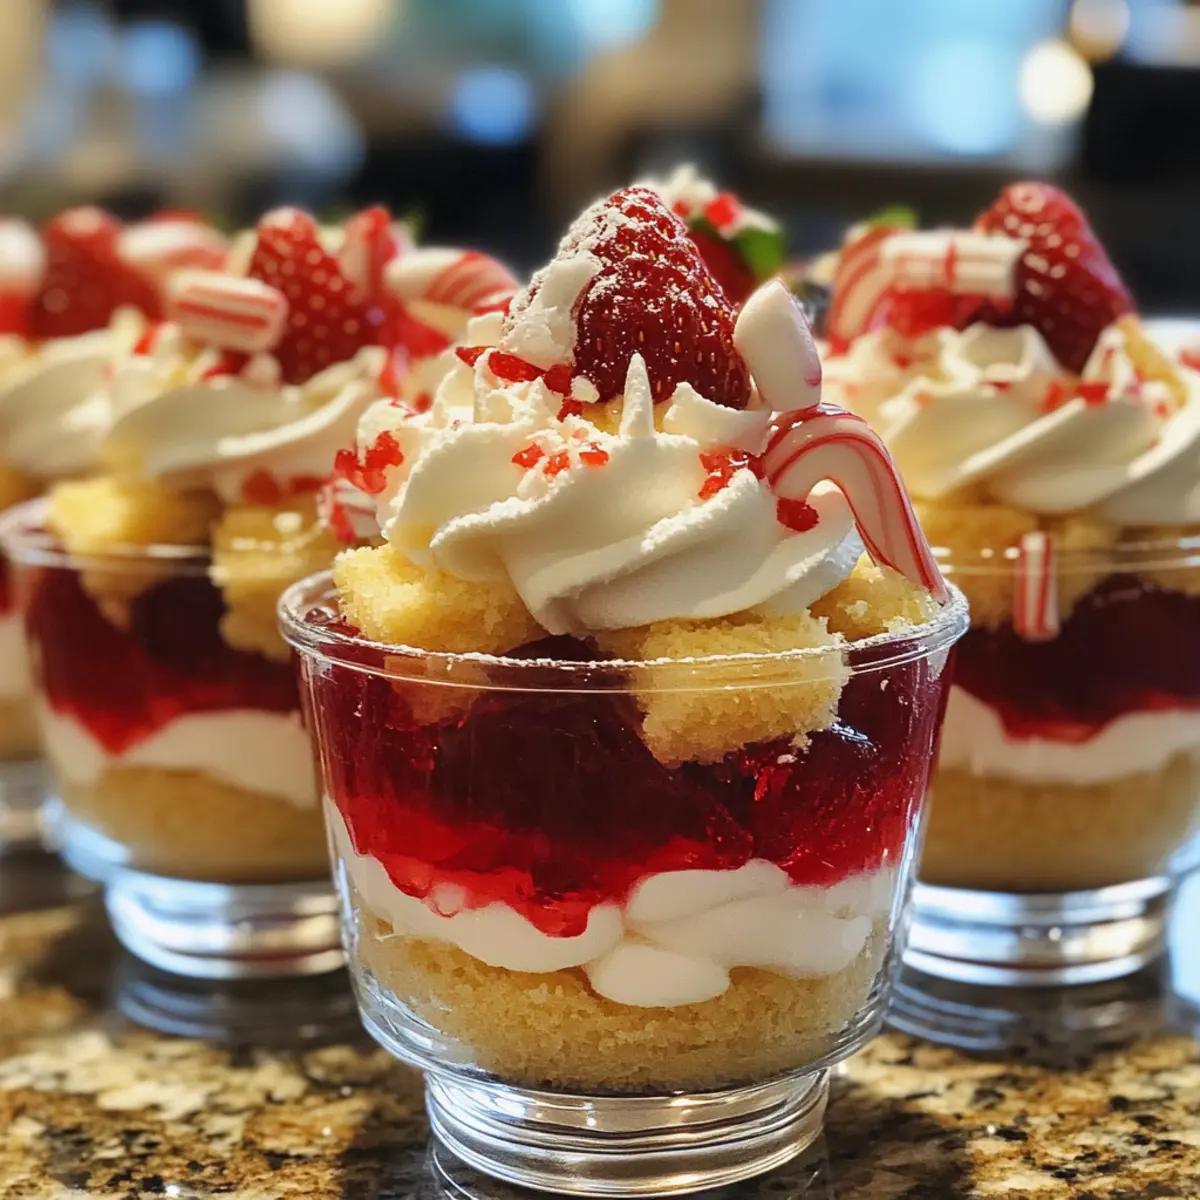
Begin by slicing your sponge cake into small cubes, aiming for about 1-inch pieces. Divide these evenly among 10 mini cups, ensuring you have a nice base layer for each. This step sets the foundation for your Christmas Mini Trifles, so make sure the cubes are packed snugly and look inviting.
Step 2: Soak the Sponge Cubes
Next, pour approximately 2 teaspoons of orange juice or sherry over the sponge cubes in each cup. Allow the liquid to soak in for about 5-10 minutes, giving the sponge a chance to absorb the moisture. You’ll know it’s ready when the cubes look slightly darker and feel moist but not soggy, adding delightful flavor to your trifle.
Step 3: Prepare the Jelly Layer
Following the soaking process, prepare the strawberry or raspberry jelly crystals according to the package instructions, using boiling water. Once it’s fully dissolved, allow it to cool slightly before distributing the mixture evenly among the cups, layering it atop the soaked sponge. Ensure the jelly reaches the edges of each cup for a vibrant look.
Step 4: Chill to Set the Jelly
Now, place the mini cups in the refrigerator for about 3-4 hours, allowing the jelly to fully set. This is crucial for achieving the perfect texture in your Christmas Mini Trifles. You’ll know it’s ready when the jelly is firm to the touch, providing a sturdy yet wobbly layer that will hold up beautifully.
Step 5: Add the Custard Layer
Once the jelly has set, it’s time to top each cup with a rich layer of vanilla custard. Carefully spoon the custard over the jelly, ensuring not to disturb the layers beneath. Aim for a generous covering that fills each cup about three-quarters full, creating a luscious contrast to the vibrant jelly beneath.
Step 6: Whipped Cream Topping
Next, dollop a generous serving of whipped cream on top of the custard in each cup. Use a piping bag or a spoon to create a lovely swirl, enhancing the visual appeal of your Christmas Mini Trifles. The creamy topping should be fluffy and inviting, with a delightful texture that complements the layers below.
Step 7: Garnish with Fresh Fruit
For the final touch, decorate each trifle with sliced strawberries or your choice of seasonal fruits. Sprinkle crushed peppermint or candy canes over the top for a festive finish, adding a touch of crunch and sparkle to your dessert. This garnishing step not only adds flavor but also makes your trifles pop visually, perfect for holiday gatherings.
Step 8: Allow Flavors to Meld
To achieve the best flavor, assemble your Christmas Mini Trifles at least 6-8 hours before serving. This allows the flavors to meld beautifully as the sponge absorbs some of the jelly and custard moisture. Cover the cups with plastic wrap and store them in the refrigerator until they’re ready to be admired and enjoyed by your guests.
Christmas Mini Trifles Variations
Feel free to unleash your creativity and customize these delightful trifles to suit your taste!
-
Dairy-Free: Substitute whipped cream with whipped coconut cream for a light, creamy topping that caters to dairy-free diets.
-
Spice Infusion: Add a dash of cinnamon or nutmeg to the custard for a warm, festive flavor that evokes holiday coziness. It brings a delightful aroma and taste that wraps you in comfort.
-
Fruit Layer Alternatives: Layer in fresh fruits like bananas, pears, or even seasonal citrus slices for a refreshing twist. This not only adds flavor but also introduces new textures to enjoy in each spoonful.
-
Chocolate Lovers: Incorporate a layer of chocolate mousse between the jelly and custard. This decadent addition brings an unexpected rich flavor that chocoholics will adore.
-
Nutty Crunch: Include chopped nuts such as almonds or hazelnuts between the layers for added crunch. This twist not only changes the texture but also enhances the festive feel with delightful surprises.
-
Zesty Flavor: Mix in a teaspoon of orange or lemon zest into the custard for a burst of citrus flavor. This brightens up the dessert and balances the sweetness beautifully.
-
Alcohol Infusion: Use a flavored liqueur instead of orange juice, such as Amaretto or Grand Marnier, to elevate the dessert with a sophisticated touch. This adds a grown-up flavor that makes these trifles even more festive.
-
Savory Touch: For an unexpected treat, consider creating a savory version using layers of herb-infused cream, roasted vegetables, and a light vinaigrette as a whimsical holiday appetizer. It’s a bold twist that can surprise and delight guests at your table!
For more inspiration, don’t forget to check out our best no-bake recipes that are perfect for the holiday season!
Tips for the Best Christmas Mini Trifles
-
Set the Jelly: Ensure the jelly is completely set before adding the custard to maintain distinct layers. A wobbly jelly will enhance the presentation!
-
Flavor Soaking: Soak the sponge cake longer for richer flavor absorption. Orange juice or sherry works wonders; just avoid making it soggy.
-
Fill Generously: When adding the custard, be generous to create a creamy contrast. Leaving enough space for whipped cream will elevate your trifles.
-
Garnish Creatively: Use various toppings like seasonal fruits or sprinkles to brighten up your dessert and make your Christmas Mini Trifles stand out.
-
Prep Ahead: Assemble your trifles a day in advance; this allows flavors to meld together beautifully, making each bite a delightful experience.
Make Ahead Options
These Mini Christmas Trifles are ideal for busy home cooks looking to save time during the holiday rush! You can prepare the sponge cubes and soak them in orange juice or sherry up to 24 hours in advance, simply storing them in an airtight container to keep them fresh. The jelly layer can also be made up to 3 days ahead; once set, ensure it’s covered tightly with plastic wrap to prevent drying out. When you’re ready to serve, just layer the custard and whipped cream on top, garnish with strawberries and crushed peppermint, then enjoy the delightful flavors melded together, just as delicious as if made the same day!
What to Serve with Mini Christmas Trifles?
Elevate your festive dining experience with delightful pairings that complement the sweet charm of these mini desserts.
- Festive Fruit Salad: A refreshing mix of seasonal fruits adds brightness and balances the richness of the trifles.
- Spiced Apple Cider: A warm, spiced drink brings comforting flavors that mingle beautifully with the joyful sweets on your table.
- Gingerbread Cookies: The warm spices in gingerbread provide a perfect contrast to the lightness of the trifles, adding a classic festive touch.
- Chocolate Bark: Crunchy, chocolatey goodness paired with the creamy trifles introduces an exciting texture duo in every bite.
- Vanilla Ice Cream: A scoop of creamy ice cream by the side adds an extra layer of indulgence while enhancing the trifles’ flavors.
- Mulled Wine: This aromatic beverage creates a cozy atmosphere and pairs wonderfully with the sweetness of your mini Christmas trifles.
- Peppermint Hot Chocolate: A rich, chocolatey drink topped with whipped cream and crushed candy canes ties in perfectly with the dessert theme.
- Mini Cheesecakes: These creamy bites can complement the festive layers, providing a delicious alternative without overshadowing the trifles.
- Shortbread Cookies: Buttery and crumbly, they make a delightful accompaniment that guests will love to dip into the trifles’ layers.
How to Store and Freeze Christmas Mini Trifles
Fridge: Store your assembled Christmas Mini Trifles in the refrigerator for up to 2 days. Keep the cups covered with plastic wrap to prevent dryness and maintain freshness.
Freezer: While freezing is not recommended once assembled due to the jelly and custard layers, you can freeze sponge cake cubes separately for up to 3 months. Just ensure they’re tightly wrapped to avoid freezer burn.
Reheating: The custard and jelly are best enjoyed chilled, so there’s no need for reheating. Simply take them out, garnish, and serve right from the fridge for that delightful coolness.
Assembling Tips: If you prepare elements in advance, keep toppings like whipped cream and fruits separate until serving. This way, your Christmas Mini Trifles remain visually appealing and deliciously fresh!
Christmas Mini Trifles Recipe FAQs
How do I choose the right sponge cake for my trifles?
Absolutely! Whether you opt for homemade or store-bought sponge cake, look for one that is light and fluffy. If using a store-bought option, I recommend picking one without dark spots or dryness, as these can affect the texture of your layers.
How long can I store my Christmas Mini Trifles in the refrigerator?
You can keep your assembled Mini Trifles in the refrigerator for up to 2 days. Just make sure they are covered with plastic wrap to prevent any drying out or absorbing other odors from the fridge. Enjoy them cool for the best texture and taste!
Can I freeze the components of the trifle?
Yes! While the fully assembled Christmas Mini Trifles don’t freeze well due to the jelly and custard layers, you can freeze the sponge cake cubes separately for up to 3 months. Just wrap them tightly in plastic wrap and place them in an airtight container. When ready to use, let them thaw in the refrigerator and then prepare the trifle as instructed.
What should I do if my jelly isn’t setting properly?
Very! If your jelly isn’t setting properly, it might be due to not using the right amount of water or not boiling it long enough. Make sure you’re following the package instructions closely. If it’s too late, you can pour the jelly back into a pot, bring it to a boil again, and add a bit more jelly powder to help it firm up. Just allow it to cool and set again before layering!
Are there any allergy considerations for this recipe?
Definitely! If you’re preparing this for someone with allergies, you can easily make substitutions. For dairy allergies, use a dairy-free whipped cream alternative and custard made from coconut milk. Also, be mindful of the orange juice or sherry for anyone with citrus or alcohol sensitivities. Always check ingredient labels to ensure safety!
How can I enhance the flavor of my Christmas Mini Trifles?
To elevate the flavor profile, consider soaking the sponge cake cubes longer—around 15 minutes—using flavored syrups or creative spirit options like rum or almond extract. Another delightful touch is to incorporate a hint of cinnamon in your cream or add zesty lemon juice for a refreshing twist. Let your creativity shine!

Delight in Christmas Mini Trifles: Effortless Holiday Joy
Ingredients
Equipment
Method
- Begin by slicing your sponge cake into small cubes, about 1-inch pieces. Divide evenly among 10 mini cups to create a base layer.
- Pour approximately 2 teaspoons of orange juice or sherry over the sponge cubes in each cup and let soak for 5-10 minutes.
- Prepare the jelly crystals according to package instructions with boiling water. Once dissolved, let cool slightly before pouring over the sponge in each cup.
- Refrigerate the mini cups for about 3-4 hours to let the jelly set completely.
- Spoon a layer of vanilla custard over the jelly in each cup, filling about three-quarters full.
- Dollop whipped cream generously on top of the custard, using a piping bag or a spoon for a decorative swirl.
- Garnish each trifle with sliced strawberries and crushed peppermint or candy canes for a festive touch.
- Assemble your trifles 6-8 hours before serving to allow the flavors to meld.
Leave a Reply