
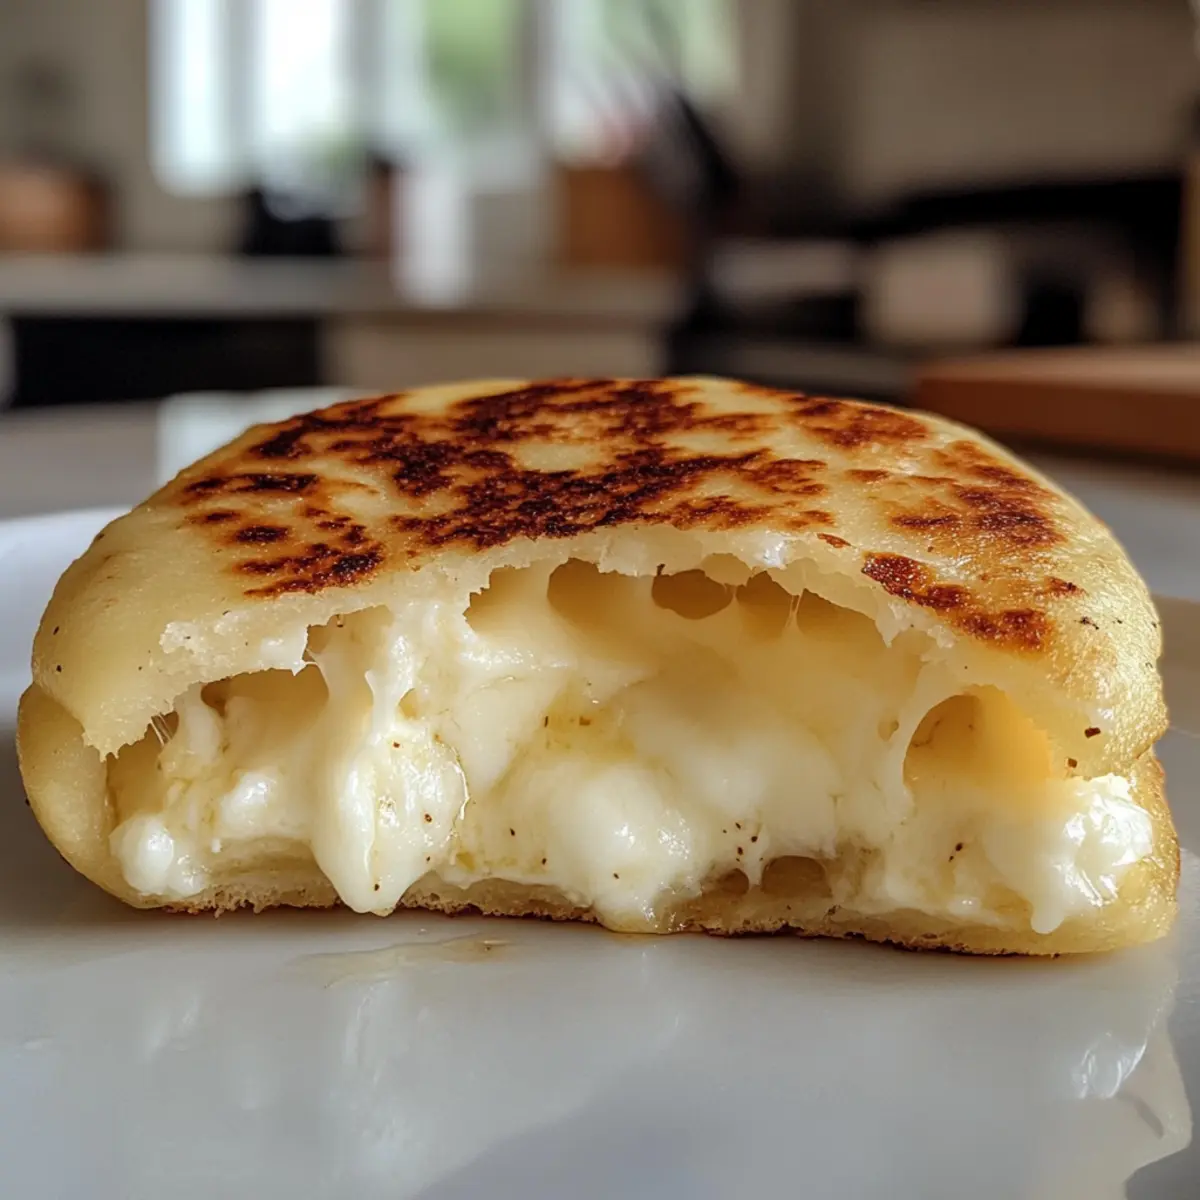
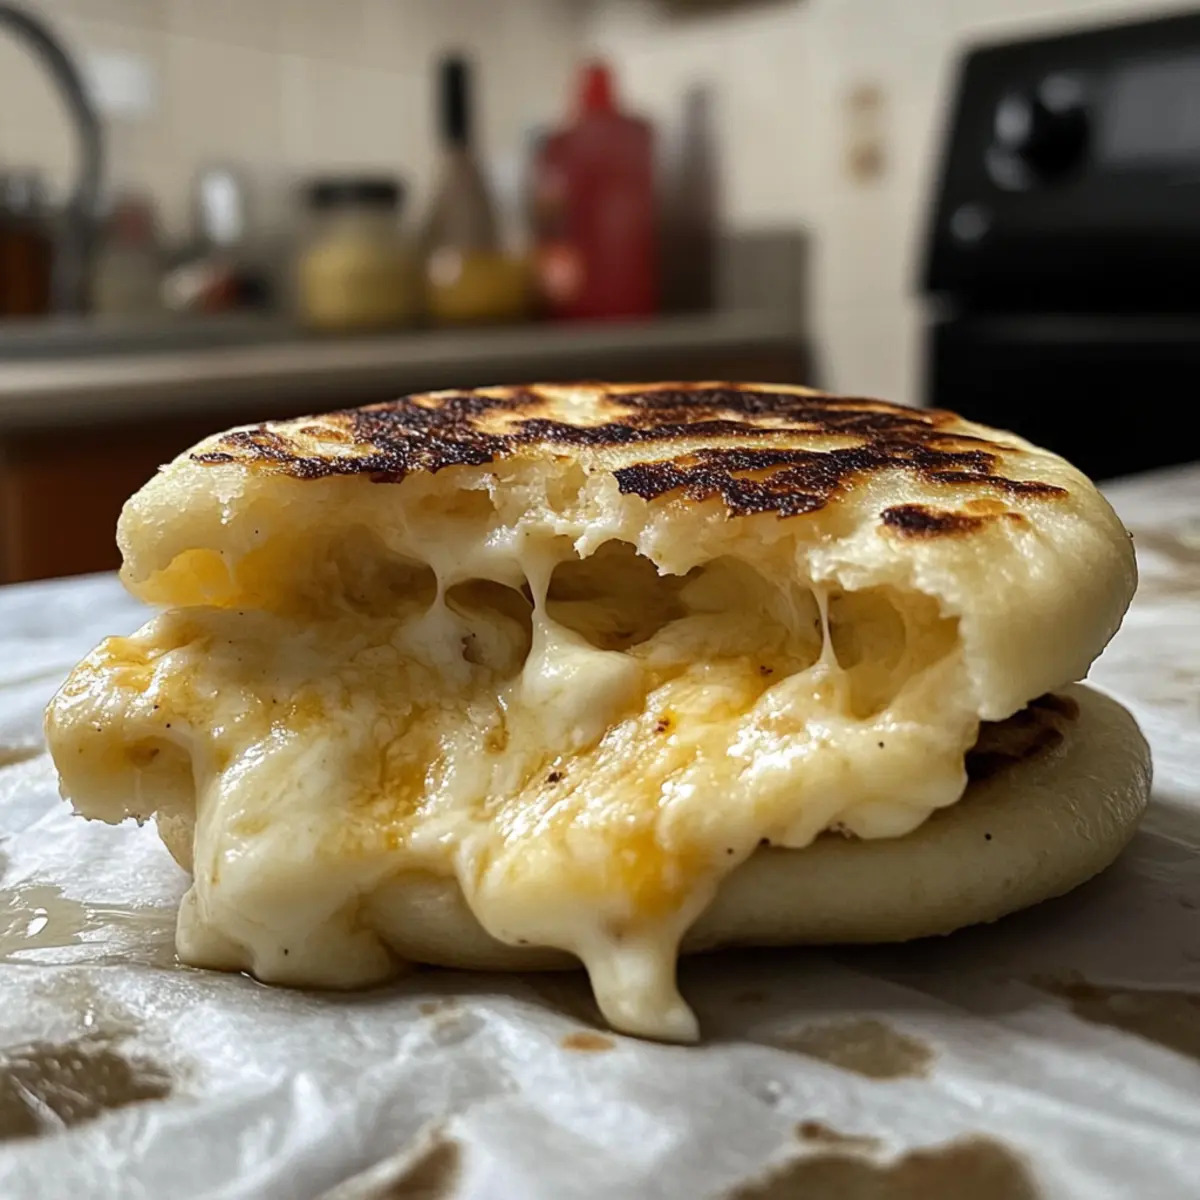
The first time I took a bite of Arepas con Queso, it felt like an embrace from Colombia. These delightful corn cakes, filled with gooey cheese, embody the perfect blend of crispy and tender textures that make them utterly addictive. What I love most about these savory treats is their versatility; they can effortlessly transition from a satisfying snack to a delectable part of any meal throughout the day. With their quick preparation and gluten-free ingredients, making Arepas con Queso at home is not only easy but also a fantastic way to gather friends and family around the table. Ready to bring a taste of Colombian comfort into your kitchen? Let’s dive into this simple yet irresistible recipe together!
Why Arepas con Queso Are Amazing?
Irresistibly Delicious: The marriage of crispy corn and gooey cheese is a culinary love story that will captivate your taste buds.
Quick to Prepare: With just a few ingredients and simple steps, these delightful treats can be on your table in under 30 minutes, perfect for busy weeknights.
Versatile Options: Experiment with different cheeses or even add your favorite fillings like shredded chicken or veggies to create custom flavor combinations.
Gluten-Free Goodness: Made with masarepa, this recipe is naturally gluten-free, making it a safe choice for those with dietary restrictions.
Crowd-Pleasing Snack: Whether served as an appetizer or main dish, they are sure to be a hit at any gathering. If you’re in the mood for more delicious options, check out my Crockpot Coconut Chicken or Chicken Bacon Ranch recipes that will satisfy any craving!
Quick Clean-Up: The straightforward preparation means less time in the kitchen and more time enjoying with family and friends.
Arepas con Queso Ingredients
For the Dough
• Masarepa – This pre-cooked cornmeal is essential for the perfect texture; don’t substitute with regular cornmeal.
• Sea Salt – Enhances the flavors of the arepas; kosher salt is an excellent alternative if needed.
• Cotija Cheese – Brings a savory richness to the dough; feta or queso fresco can work as substitutes.
• Butter – Contributes moisture and richness; consider using oil for a dairy-free option.
• Warm Water – Helps hydrate the masarepa; adjust as necessary for the desired dough consistency.
For the Filling
• Mozzarella Cheese – Melts beautifully to create a gooey filling; feel free to substitute with Monterey Jack for a different flavor.
For Cooking
• Oil or Butter – Needed for frying the arepas to crispy perfection; extra butter can enhance flavor upon serving.
Enjoy making your Arepas con Queso, and let yourself be transported to Colombia with each bite!
Step‑by‑Step Instructions for Arepas con Queso
Step 1: Prepare the Dough
In a medium bowl, combine the masarepa, sea salt, crumbled Cotija cheese, softened butter, and warm water. Mix until a smooth, non-sticky dough forms, roughly 3-5 minutes. The dough should be soft and pliable but hold its shape. Cover the bowl with a towel and let it rest for 10 minutes to allow the ingredients to meld together.
Step 2: Shape the Arepas
After the dough has rested, divide it into 8 equal portions. Roll each portion into a ball, then flatten it into a disk about 5 inches wide and ¼ inch thick. Ensure the edges are smooth and even to help hold the filling later. The texture should be soft yet firm enough to hold its shape, perfect for your Arepas con Queso!
Step 3: Add the Cheese Filling
Place a generous amount of shredded mozzarella cheese in the center of each disk. Carefully top it with another flattened disk, making sure to seal the edges well by pressing them together. The edges should be thicker and tightly sealed to prevent any cheese from leaking out during cooking, ensuring a delicious cheesy center.
Step 4: Heat the Skillet
Heat a medium skillet over medium-low heat and add oil or butter, ensuring it coats the bottom. You can also preheat an electric griddle to 325°F. The skillet needs to be hot enough to achieve a golden crust without burning, creating a lovely contrast with the tender inside of the Arepas con Queso.
Step 5: Cook the Arepas
Place the prepared arepas in the skillet, cooking for 4-5 minutes on each side. Flip them once they turn a golden brown, achieving a crispy exterior. Keep an eye on the color; you’re aiming for a rich golden hue that signifies they are beautifully cooked on the outside and starting to melt on the inside.
Step 6: Serve Warm
Once cooked, remove the arepas from the skillet and place them on a plate. For added flavor, consider spreading a little butter on top while they’re still warm. Enjoy your homemade Arepas con Queso immediately, savoring the fantastic combination of crispy texture and gooey cheese that makes them so irresistible!

Expert Tips for Arepas con Queso
• Use the Right Cornmeal: Always choose pre-cooked masarepa for the dough; other cornmeal types won’t yield the desired texture.
• Adjust Dough Consistency: If the dough feels dry or crumbly, add warm water one tablespoon at a time until smooth and pliable, essential for your arepas con queso.
• Seal Edges Well: Make sure to press the edges firmly after adding the filling to prevent any cheese from leaking out while cooking.
• Perfect Cooking Temperature: Maintain medium-low heat to achieve a golden brown crust without burning the outside while keeping the inside tender and cheesy.
• Next-Day Delight: To reheat leftover arepas, use a toaster or regular oven instead of a microwave to keep them crispy—perfect for a quick snack!
Make Ahead Options
Are you wondering how to make Arepas con Queso ahead of time? These savory corn cakes are perfect for meal prep! You can prepare the dough up to 24 hours in advance; simply mix the masarepa, sea salt, Cotija cheese, butter, and warm water, then cover and refrigerate. The filled arepas can also be shaped and stored in the fridge for up to 3 days. Just ensure they are well sealed to prevent drying out. When you’re ready to serve, cook them from the chilled state using your skillet or griddle just as instructed for that delightful crispy exterior. This way, you’ll enjoy fresh, homemade Arepas con Queso with minimal effort, perfect for busy weeknights!
Arepas con Queso Variations
Feel free to let your creativity shine by customizing these delectable arepas to suit your taste!
- Cheese Variations: Experiment with different cheese fillings like sharp cheddar or pepper jack for an extra kick. Each cheese brings its own unique flavor that enhances the overall dish.
- Meaty Additions: For a heartier meal, add cooked meats such as shredded chicken or beef. This not only enriches the filling but also makes them perfect for a satisfying lunch or dinner.
- Veggie Twist: Incorporate roasted veggies or sautéed onions into the filling for a delightful, earthy flavor. Caramelizing those onions will add a touch of sweetness that beautifully complements the cheesy goodness.
- Spiced Up Dough: Add spices or herbs like cumin, paprika, or chopped cilantro to the dough for an extra flavor punch. The herbs bring freshness, while the spices introduce warmth.
- Saucy Sidekick: Serve these arepas with a zesty sauce like chimichurri or salsa verde on the side. Drizzling some on top can turn each bite into an explosion of flavors!
- Sweet Treat: Try a dessert twist by filling arepas with sweetened cream cheese or chocolate spread, turning them into a delightful treat. The crispy exterior meets the melty sweet interior—a treat your family will love!
- Different Cooking Methods: Instead of frying, try baking the arepas in the oven at 400°F for a lighter option. This method still yields a slightly crispy texture while reducing the oil used.
- Double Cheese Delight: For those true cheese lovers, consider layering two different types of cheese in the filling. Mixing mozzarella with gouda creates a fantastic melt that you’ll crave.
Whether you’re in the mood for something savory or want to try a sweet twist, these variations will surely please everyone at the table. Check out my other favorite recipes, like Maple Chicken Coconut for a unique flavor adventure!
What to Serve with Arepas con Queso?
Arepas con queso are versatile, inviting you to explore delicious pairings that elevate your mealtime experience.
- Guacamole: The creamy texture and fresh flavors of guacamole add a delightful contrast to the crispiness of the arepas. Perfect for scooping or spreading!
- Pico de Gallo: This fresh salsa brings a burst of color and acidity, enhancing the savory richness of the cheesy corn cakes. It’s a refreshing addition!
- Black Bean Salad: Nutty black beans tossed with corn, tomatoes, and avocado create a satisfying balance of flavors and textures—ideal for a hearty side!
- Plantain Chips: Crunchy and slightly sweet, plantain chips provide an excellent snacking element to accompany your comforting arepas. They’re addictive on their own too!
- Spicy Aioli: A drizzle of homemade spicy aioli adds a kick that complements the cheesy goodness. The creaminess helps bind the meal together beautifully.
- Fresh Fruit Salad: A light mix of mango, pineapple, and lime juice brings a sweet and zesty note that contrasts beautifully with the savory arepas.
- Crispy Fried Eggs: Top your arepas with a sunny-side-up or fried egg for an extra indulgent meal. The runny yolk adds richness that is simply irresistible.
- Chilled Horchata: Pair your meal with this cinnamon-infused rice drink for a cooling contrast to the warm, cheesy arepas. Sweet, nutty, and delicious!
- Churros for Dessert: End your meal on a sweet note with churros, which provide a delightful crunch and warmth, perfect for dipping in chocolate sauce.
How to Store and Freeze Arepas con Queso
Fridge: Store leftover arepas con queso in an airtight container for up to 3 days to maintain their flavor and texture.
Freezer: For longer storage, freeze cooked arepas with parchment paper between each to prevent sticking. They can be stored for up to 1 month.
Reheating: When you’re ready to enjoy the arepas again, reheat them in a toaster oven or regular oven at 350°F for 10-15 minutes until warm and crispy. Avoid the microwave to keep them from becoming soggy.
Making Ahead: You can prepare the dough in advance and store it wrapped in plastic in the fridge for up to 24 hours if you want to save time later.
Arepas con Queso Recipe FAQs
What type of cornmeal should I use for arepas con queso?
Absolutely, you’ll want to use pre-cooked masarepa for your arepas. Regular cornmeal or masa harina won’t give you the same texture. Look for a brand labeled specifically for arepas for the best results!
How should I store leftover arepas con queso?
Store any leftovers in an airtight container in the fridge. They will stay fresh for up to 3 days. Just be sure to let them cool completely before sealing. This helps maintain their crispy texture!
Can I freeze arepas con queso?
Yes! For freezing, let the cooked arepas cool down, and stack them with parchment paper in between to prevent sticking. Place them in a freezer bag or container where they can stay fresh for up to 1 month. When you’re ready to enjoy them, just reheat in a toaster oven or regular oven.
What if my dough is too dry or crumbly?
If your dough feels dry while mixing, do not worry! Simply add warm water, one tablespoon at a time, mixing well after each addition. Continue until it reaches a smooth and pliable consistency, which is essential for shaping those delightful arepas.
Are arepas con queso gluten-free?
Very! Since they are made with masarepa, which is gluten-free cornmeal, this recipe is perfect for those with gluten sensitivities. It’s a wonderful way to enjoy a tasty snack without worrying about gluten.
Can I customize the cheese filling?
The more the merrier! Feel free to experiment with different melting cheeses, such as Monterey Jack or pepper jack for a spicy kick. You can also add other fillings like seasoned shredded chicken or sautéed vegetables for variety!

Arepas con Queso: Irresistible Cheesy Corn Cakes You’ll Love
Ingredients
Equipment
Method
- In a medium bowl, combine the masarepa, sea salt, crumbled Cotija cheese, softened butter, and warm water. Mix until a smooth, non-sticky dough forms, roughly 3-5 minutes.
- After the dough has rested, divide it into 8 equal portions. Roll each portion into a ball, then flatten it into a disk about 5 inches wide and ¼ inch thick.
- Place a generous amount of shredded mozzarella cheese in the center of each disk. Carefully top it with another flattened disk, sealing the edges well by pressing them together.
- Heat a medium skillet over medium-low heat and add oil or butter. Ensure it coats the bottom.
- Place the prepared arepas in the skillet, cooking for 4-5 minutes on each side until golden brown.
- Once cooked, remove the arepas from the skillet and place them on a plate. Consider spreading a little butter on top while they’re still warm.
Leave a Reply