
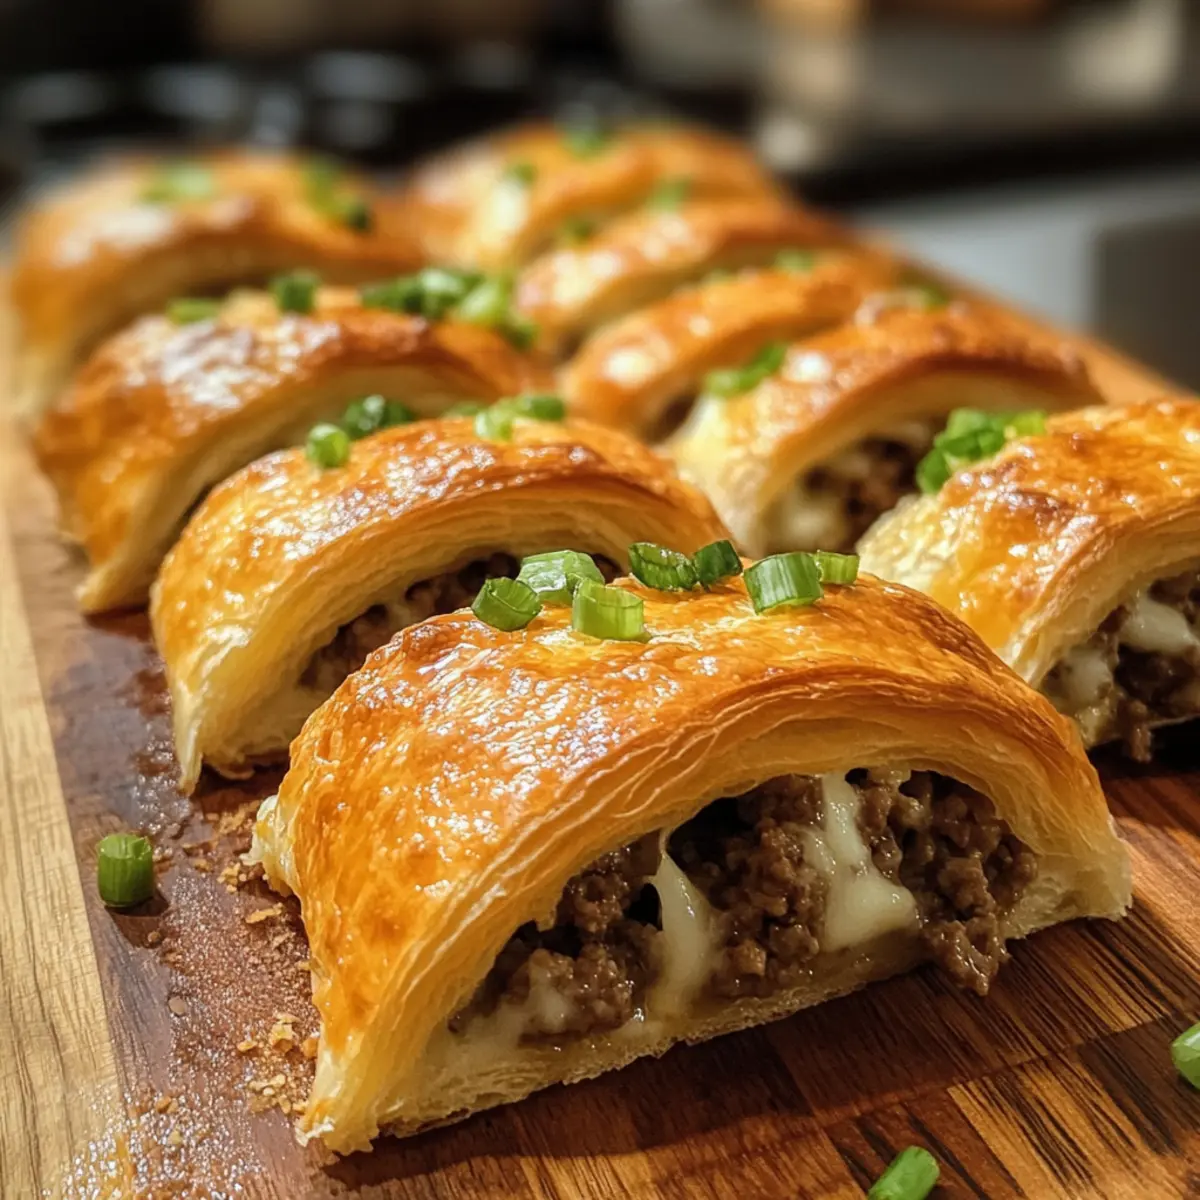
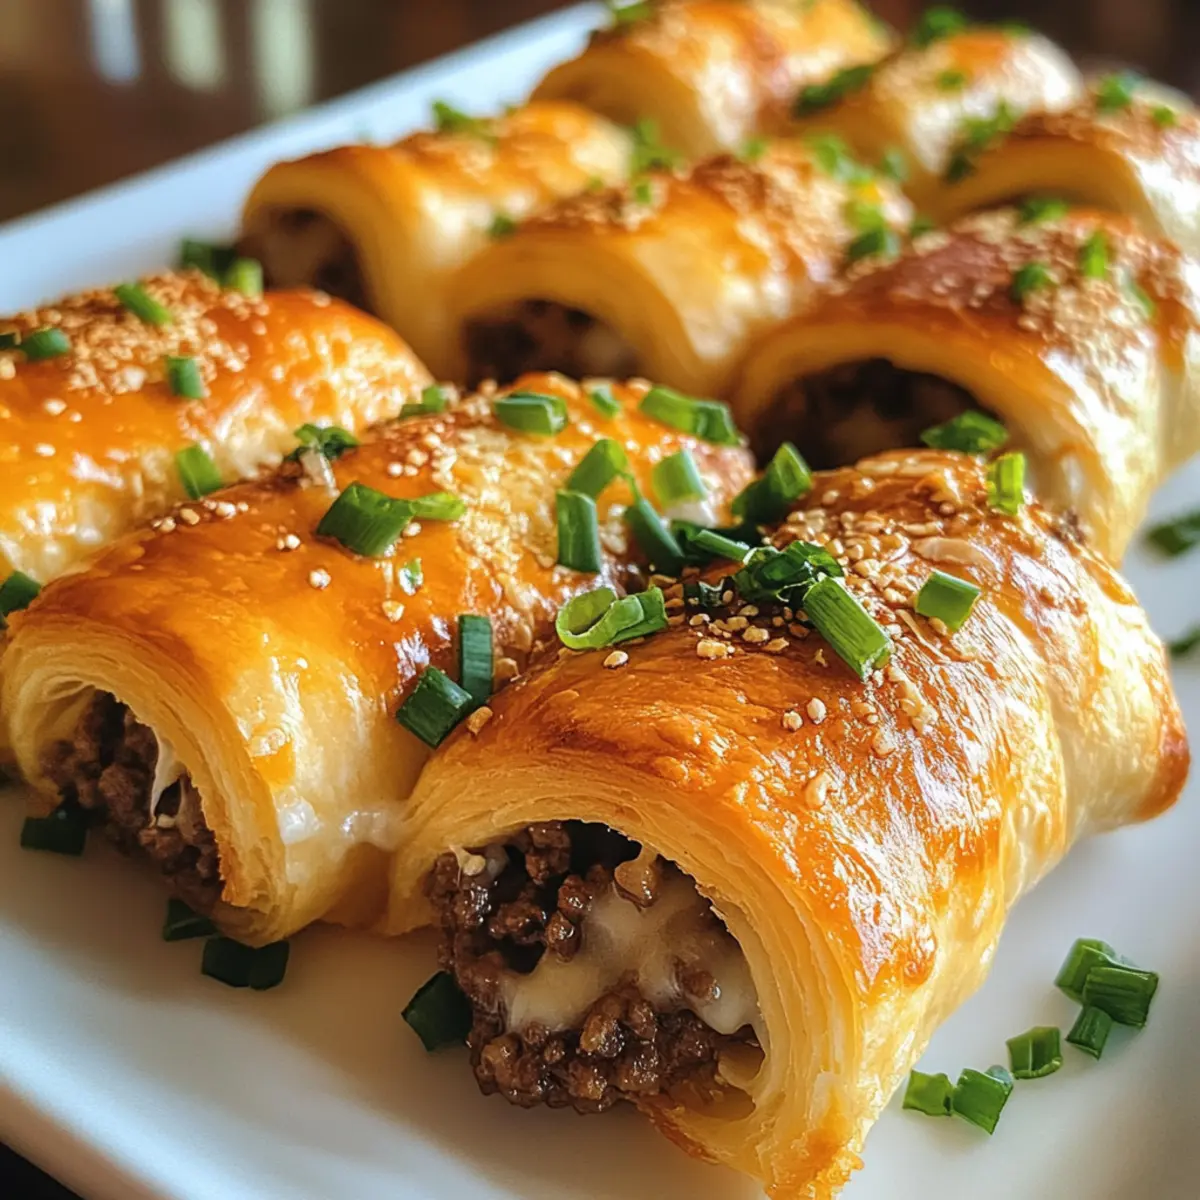
“Quick, what’s for dinner?” I overheard my friend exclaim as she rifled through her fridge, battling against the usual fast-food temptations. If you find yourself in similar culinary predicaments, let me introduce you to my savior: 10-Minute Cheesy Beef Roll Ups. These Easy Cheesy Beef Roll Ups not only come together in a flash but also pack a nutritional punch with lean protein and veggies, making them perfect for busy weeknights. Imagine the delightful crunch of flaky crescent rolls giving way to savory beef and gooey cheese—your family won’t be able to resist! Plus, they’re versatile enough to customize with whatever fillings you have on hand. So, are you ready to roll up some magic in the kitchen?
Why Are These Roll-Ups a Must-Try?
Delightful Flavors: The union of savory beef and melty cheese wrapped in flaky crescent rolls is pure comfort food bliss.
Quick & Easy: Ready in just 10 minutes, you can whip these up even on the busiest nights.
Versatile Options: Customize with your favorite fillings like spinach or different cheeses for endless variations.
Crowd-Pleaser: Perfect for family dinners or gatherings, they’ll impress both kids and adults alike!
If you’re a fan of flavorful, speedy meals, these cheesy roll-ups are a game changer, just like my Cheesy Cajun Garlic and Cheesy Garlic Chicken recipes you’ll adore!
Cheesy Beef Roll-Up Ingredients
For the Filling
- Olive Oil – Cooking fat used for sautéing; can be substituted with canola oil or butter.
- Onion – Adds sweetness and depth of flavor; yellow or sweet onions are recommended for a milder taste.
- Yellow Pepper – Contributes sweetness and color; substitute with bell pepper of any color.
- Guindilla Verde Pepper – Adds heat and a unique flavor; can be replaced with jalapeño or omitted for a milder taste.
- Extra Lean Ground Beef – The main protein source providing flavor and texture; substitute with ground turkey or chicken for a lighter option.
- No-Salt All-Purpose Seasoning – Enhances flavor without added sodium; regular seasoning can be used, adjusting for salt content.
- Green Onions – Adds freshness and crunch; regular onions can be used if green onions are unavailable.
- Neufchâtel Cheese – The creamy element that binds the filling together; cream cheese can be used as an alternative.
For the Roll-Ups
- Crescent Roll Containers – The base for the roll-ups, delivering a flaky texture; can be substituted with puff pastry or homemade dough.
- Sharp Cheddar Cheese – Provides a robust cheesy flavor; substitute with mild cheddar or any preferred melting cheese.
Embrace the deliciousness of these Cheesy Beef Roll-Ups that are as flexible as they are satisfying!
Step‑by‑Step Instructions for Cheesy Beefy Roll-Ups
Step 1: Sauté the Vegetables
In a large skillet, heat 1 tablespoon of olive oil over medium heat. Add finely chopped onion, yellow pepper, and guindilla verde pepper. Sauté for about 3–4 minutes until the onions become translucent and the peppers are tender. Stir occasionally to ensure even cooking. Once done, remove them from the heat and set aside to cool slightly while you prepare the beef mixture.
Step 2: Brown the Beef
In the same skillet, add the extra lean ground beef, crumbling it as you go. Cook over medium-high heat for approximately 5–7 minutes, stirring frequently until it turns browned and no longer pink. Drain any excess fat from the skillet, then return the sautéed vegetables to the pan.
Step 3: Preheat the Oven
While the beef mixture cools, preheat your oven to 350°F (175°C). This step ensures that your Cheesy Beefy Roll-Ups will be perfectly baked and golden brown when they come out, so have your baking sheet ready lined with parchment paper for easy cleanup.
Step 4: Combine Ingredients
In a mixing bowl, combine the cooled beef and vegetable mixture with chopped green onions and the creamy Neufchâtel cheese. Mix well until all ingredients are nicely blended, creating a rich filling for your roll-ups that’s bursting with flavor.
Step 5: Prepare the Crescent Rolls
Roll out your crescent roll containers on a clean surface, separating the triangles. Place a generous tablespoon of the beef-cheese mixture at the broader end of each triangle. Make sure not to overfill, as you need to roll them up neatly.
Step 6: Add Cheese and Roll
Sprinkle a small handful of shredded sharp cheddar cheese over the filling in each crescent triangle. Starting from the wider side, roll up each triangle tightly, tucking in the sides as you go to prevent filling from escaping.
Step 7: Bake to Perfection
Arrange the rolled-ups on your prepared baking sheet, leaving space between each. Place the tray in the preheated oven and bake for about 15 minutes, or until they turn golden brown and flaky. Keep an eye on them towards the end to ensure they don’t over-bake.
Step 8: Serve Warm
Once ready, remove the Cheesy Beefy Roll-Ups from the oven and let them cool slightly on a wire rack. Serve them warm alongside salsa or sour cream for dipping. Enjoy the delightful blend of flavors and textures with your family!

What to Serve with Easy Cheesy Beef Roll Ups?
Elevate your delicious meal experience with the perfect sides and drinks that complement these delightful roll-ups.
-
Creamy Mashed Potatoes: The buttery richness of mashed potatoes adds a comforting, velvety texture that pairs beautifully with the savory beef inside the roll-ups.
-
Crisp Garden Salad: Fresh greens and vibrant veggies provide a refreshing crunch and balance the richness of the roll-ups, making it a light and nutritious choice.
-
Garlic Breadsticks: These soft, buttery sticks bring a delightful aroma and texture contrast, perfect for dipping in marinara sauce or sopping up melted cheese.
-
Steamed Broccoli: Lightly steamed broccoli adds a pop of green and nutrients while its subtle crunch brings an earthy balance to the cheesy beefy flavors.
-
Homemade Salsa: A zesty, fresh salsa can enhance the flavor of the roll-ups, offering a bright, tangy contrast to the savory filling.
-
Pineapple Coleslaw: A sweet and tangy coleslaw brings a refreshing bite, perfectly complementing the warmth and richness of the cheesy beef roll-ups.
-
Classic Lemonade: The citrusy zing of homemade lemonade cuts through the richness of the meal, refreshing the palate between bites.
-
Chocolate Chip Cookies: End your meal on a sweet note; these warm, gooey treats contrast fabulously with the savory roll-ups, adding a touch of nostalgia and comfort.
Each pairing is thoughtfully designed to balance flavors and textures, making your dinner truly unforgettable.
Expert Tips for Cheesy Beefy Roll-Ups
-
Cool the Mixture: Ensure the beef mixture is cooled before adding cheese to maintain the filling’s creamy texture without melting it prematurely.
-
Mind the Baking Time: Keep an eye on the roll-ups while baking; remove them once they’re golden brown to avoid a dry filling.
-
Customize with Care: When adding extra ingredients, like spinach or mushrooms, ensure they’re cooked to prevent excess moisture that could sog the rolls.
-
Use Quality Cheese: Opt for high-quality cheeses for the best flavor. Mixing cheddar with a tangy cheese like goat cheese can elevate your cheesy beefy roll-ups delightfully.
-
Extra Crunch: For added texture, consider sprinkling some panko breadcrumbs on top before baking for a crispy finish.
Cheesy Beefy Roll-Ups Variations
Feel free to let your creativity shine and give these roll-ups a personal touch, making your meal even more inviting and flavorful!
-
Vegetable-Packed: Stir in some cooked spinach or sautéed mushrooms to the beef mixture for a nutritious twist. This adds both flavor and a vibrant color to your roll-ups.
-
Spicy Kick: Swap in pepper jack cheese instead of sharp cheddar for added heat. You can also toss in some chopped jalapeños or crushed red pepper for an extra layer of spice.
-
Herb Infusion: Add fresh herbs like oregano or cilantro to the filling for a burst of freshness. This will brighten the flavors and make each bite irresistible.
-
Cheese Variety: Don’t hesitate to play around with cheese types. Gouda, provolone, or even a blend can create unique flavor profiles that will keep your family coming back for more.
-
Dairy-Free Alternative: Use vegan cheese and a plant-based ground meat substitute to craft a delicious dairy-free version. You can still enjoy that cheesy goodness without the dairy!
-
Crunchy Toppings: Before baking, sprinkle a mix of panko breadcrumbs and Italian herbs on top for a delightful crunch. This adds a wonderful texture that perfectly complements the soft, cheesy interior.
-
Gluten-Free Option: If you need a gluten-free meal, look for gluten-free crescent rolls or puff pastry. They can deliver the same satisfaction without the gluten, ensuring everyone can enjoy this dish!
-
Filling Change-Up: Use cooked shredded chicken or ground turkey instead of beef for a lighter version. The same comforting flavors combined with a different protein can give you a new favorite.
Remember, these roll-ups are as versatile as your imagination allows! For more cheesy inspiration, you might enjoy my Cheesy Cajun Garlic or classic Cheesy Garlic Chicken recipes!
How to Store and Freeze Cheesy Beef Roll-Ups
Fridge: Store leftovers in an airtight container for up to 3 days to keep them fresh and delicious.
Freezer: For longer storage, freeze the unbaked roll-ups in a single layer, then transfer to a freezer-safe bag for up to 2 months.
Reheating: Reheat baked roll-ups in a preheated oven at 350°F (175°C) for about 10 minutes to retain their crispy texture.
Thawing: If frozen, allow roll-ups to thaw in the fridge overnight before reheating, ensuring optimal flavor and consistency.
Make Ahead Options
These Easy Cheesy Beef Roll Ups are perfect for meal prep enthusiasts! You can prepare the beef and vegetable filling up to 24 hours in advance by sautéing the ingredients, then allowing them to cool before storing in an airtight container in the refrigerator. When you’re ready to enjoy, simply roll the filling into the crescent roll dough, add the cheese, and bake as directed. For added convenience, you can also assemble the entire roll-ups and refrigerate them for up to 3 days before baking; just cover them with plastic wrap. To maintain their quality, ensure they are tightly wrapped and bake straight from the fridge for a few extra minutes if needed. Get ready to savor these delightful Cheesy Beef Roll Ups with minimal fuss!
Cheesy Beef Roll Ups Recipe FAQs
What type of meat works best for these roll-ups?
Absolutely! While the recipe calls for extra lean ground beef, you can easily substitute it with ground turkey or chicken for a lighter option. Just ensure that you adjust the cooking time slightly, as some meats may cook faster than others.
How do I store leftover cheesy beef roll-ups?
Very! To keep your roll-ups delicious, store them in an airtight container in the refrigerator for up to 3 days. Reheating can be done in the oven at 350°F (175°C) for about 10 minutes to restore their flaky texture.
Can I freeze cheesy beef roll-ups?
Absolutely! To freeze, prepare the roll-ups but do not bake them. Arrange the unbaked roll-ups on a baking sheet lined with parchment paper and freeze until firm. Afterward, transfer them to a freezer-safe bag, where they can be stored for up to 2 months. When you’re ready to enjoy, bake them straight from the freezer, adding a few extra minutes to the baking time.
What should I do if my roll-ups are soggy?
Very good question! If your roll-ups turn out soggy, it could be due to excess moisture in the filling. To prevent this, make sure to cook any vegetables you add thoroughly and allow them to cool before adding them to the cheese mixture. For a quick fix, try baking them at a higher temperature for a few minutes to help crisp up the exterior.
Can my pets have leftover cheesy beef roll-ups?
While the cheesy beef roll-ups are delightful, it’s best to avoid giving them to your pets due to the high cheese and seasoning content. Always check with your veterinarian before introducing new foods to their diet to ensure it’s safe for them.
How do I select the best peppers for the filling?
When choosing peppers, look for ones that are firm and brightly colored, with no dark spots or blemishes. Bell peppers in various colors can add sweetness and vibrancy, while if you prefer some heat, opt for fresh guindilla verde or jalapeño peppers. Just remember, the more vibrant the pepper, the more flavor it can bring to your roll-ups!

Melt-in-Your-Mouth Cheesy Beefy Roll-Ups in 10 Minutes
Ingredients
Equipment
Method
- In a large skillet, heat 1 tablespoon of olive oil over medium heat. Add finely chopped onion, yellow pepper, and guindilla verde pepper. Sauté for about 3–4 minutes until the onions become translucent and the peppers are tender.
- In the same skillet, add the extra lean ground beef, crumbling it as you go. Cook over medium-high heat for approximately 5–7 minutes until it turns browned.
- Preheat your oven to 350°F (175°C).
- In a mixing bowl, combine the cooled beef and vegetable mixture with chopped green onions and Neufchâtel cheese. Mix well until all ingredients are nicely blended.
- Roll out your crescent roll containers. Place a generous tablespoon of the beef-cheese mixture at the broader end of each triangle.
- Sprinkle a small handful of shredded sharp cheddar cheese over the filling in each crescent triangle. Starting from the wider side, roll up each triangle tightly.
- Arrange the rolled-ups on your prepared baking sheet and bake for about 15 minutes, or until golden brown.
- Remove the Cheesy Beefy Roll-Ups from the oven and let them cool slightly on a wire rack. Serve warm with salsa or sour cream.
Leave a Reply