
As the warm sun begins to peek through the last remnants of winter, I find myself craving a touch of spring in my kitchen. That’s when I created these delightful Easter Egg Cheesecake Jars—a no-bake wonder that offers both charm and simplicity. Perfect for family gatherings, these jars allow for easy prep ahead of time, so you can focus on making memories rather than spending hours in the kitchen. With customizable toppings that add a playful pop of color and vibrant flavors, this dessert is not only a crowd-pleaser but also a unique way to celebrate the season. Are you ready to dive into a world of creamy indulgence and whimsical decor? Let’s get started!
Why Are These Cheesecake Jars So Special?
No-Bake Convenience: Say goodbye to complicated baking! These cheesecake jars are a breeze to whip up, making them perfect for any busy home cook.
Festive Appeal: The vibrant, pastel colors and playful candy toppings bring a cheerful spirit to your table, making your dessert the star of any spring gathering.
Customizable Creations: Whether you love chocolate, fruit, or classic vanilla, feel free to personalize your jars with flavors and toppings that suit your taste.
Family-Friendly Fun: With simple steps that kids can help with, these jars encourage family bonding in the kitchen. Try pairing these with Cheesecake Stuffed Baked Apples for an added touch of excitement!
Make-Ahead Magic: Prepare these delightful desserts in advance and store them in the fridge—perfect for stress-free entertaining!
Easter Egg Cheesecake Jars Ingredients
For the Crust
- Graham Cracker Crumbs – This forms the base structure for the crust; you can easily substitute with crushed Oreos or shortbread cookies for different flavor twists.
- Granulated Sugar – Adds sweetness to the crust; no need for substitution here, it’s perfect as is.
- Unsalted Butter (melted) – Binds the crust ingredients together; clarified butter can be used in place for a different richness.
For the Cheesecake Filling
- Cream Cheese (softened) – Provides that delicious creamy texture for the cheesecake layers; make sure it’s softened for easy mixing.
- Powdered Sugar – Sweetens the cream cheese layer; you can also substitute with alternative sweeteners like maple sugar for a unique taste.
- Vanilla Extract – Enhances the flavor profile beautifully; no substitutions recommended here for the best taste.
- Heavy Cream – Whipped to stiff peaks, this lightens and aerates the filling; avoid using light cream as it won’t give you the same fluffy texture.
- Pink Gel Food Coloring or Freeze-Dried Strawberry Powder – Optional for aesthetic appeal—this adds that festive pop of color; omit for a natural look if you prefer.
For Toppings
- Whipped Cream – Adds creaminess on top; you can use store-bought or whip your own for a fresher taste.
- Pastel Candy Eggs – Wonderful decorative topping to give a festive look; feel free to use alternative candies if desired.
- Rainbow or Pastel Sprinkles – Optional to add a fun visual texture; they make every jar feel like a celebration!
Get ready to create these Easter Egg Cheesecake Jars that are not just delicious but also a feast for the eyes!
Step‑by‑Step Instructions for Easter Egg Cheesecake Jars
Step 1: Prepare the Crust
In a mixing bowl, combine graham cracker crumbs, granulated sugar, and melted unsalted butter until the mixture resembles damp sand. Then, press this mixture firmly into the bottom of each jar, creating a solid crust. This step should take about 5 minutes, and you’ll know it’s ready when the crust holds together when squeezed.
Step 2: Make the Cream Cheese Mixture
In a large mixing bowl, beat the softened cream cheese with an electric mixer on medium speed until it’s smooth and creamy, taking about 2-3 minutes. Scrape down the sides of the bowl as necessary. Once smooth, add the powdered sugar and vanilla extract, mixing until the mixture is light and airy, which usually takes another 2-3 minutes.
Step 3: Whip the Heavy Cream
In a separate mixing bowl, pour in the heavy cream and whip it with a hand mixer on high speed until stiff peaks form. This process may take around 4-5 minutes. You’ll know it’s done when the cream holds its shape and looks fluffy and white. Be careful not to overwhip, as it can turn grainy.
Step 4: Combine the Mixtures
Gently fold the whipped cream into the cream cheese mixture in two parts, creating a light and airy cheesecake filling. Use a spatula and make sure to mix just until there are no visible streaks, which usually takes about 1-2 minutes. This folding technique is key to a creamy texture in your Easter Egg Cheesecake Jars.
Step 5: Color the Cheesecake Filling
Divide the cheesecake filling evenly into two bowls. In one bowl, add a few drops of pink gel food coloring or a sprinkle of freeze-dried strawberry powder, gently mixing until fully incorporated for a lovely pastel hue. The other bowl will remain white. This will create a vibrant contrast for your layers.
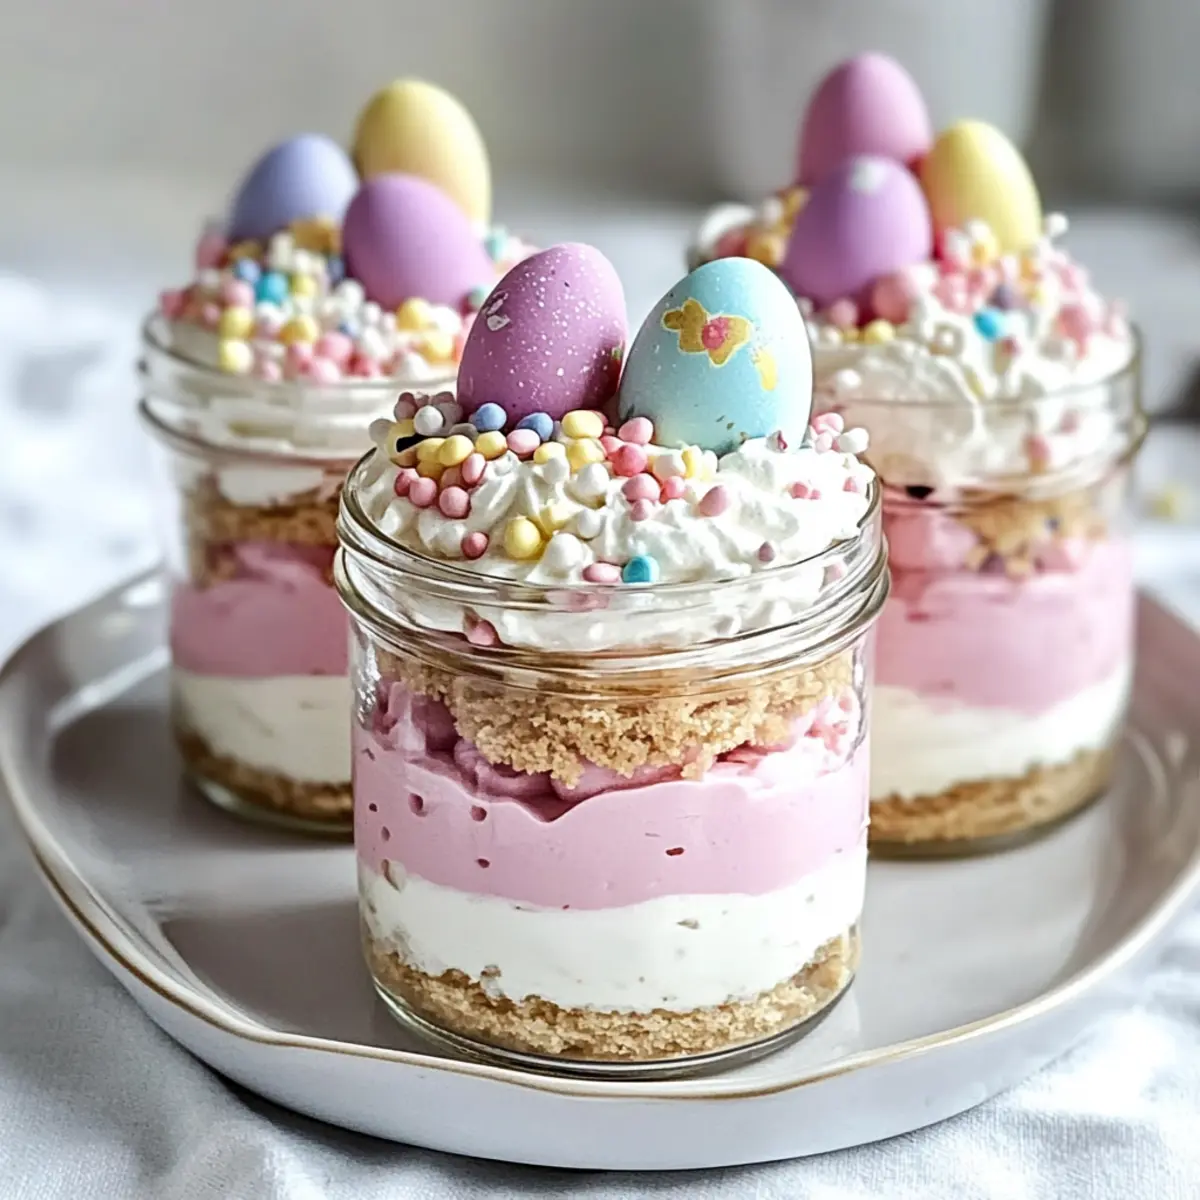
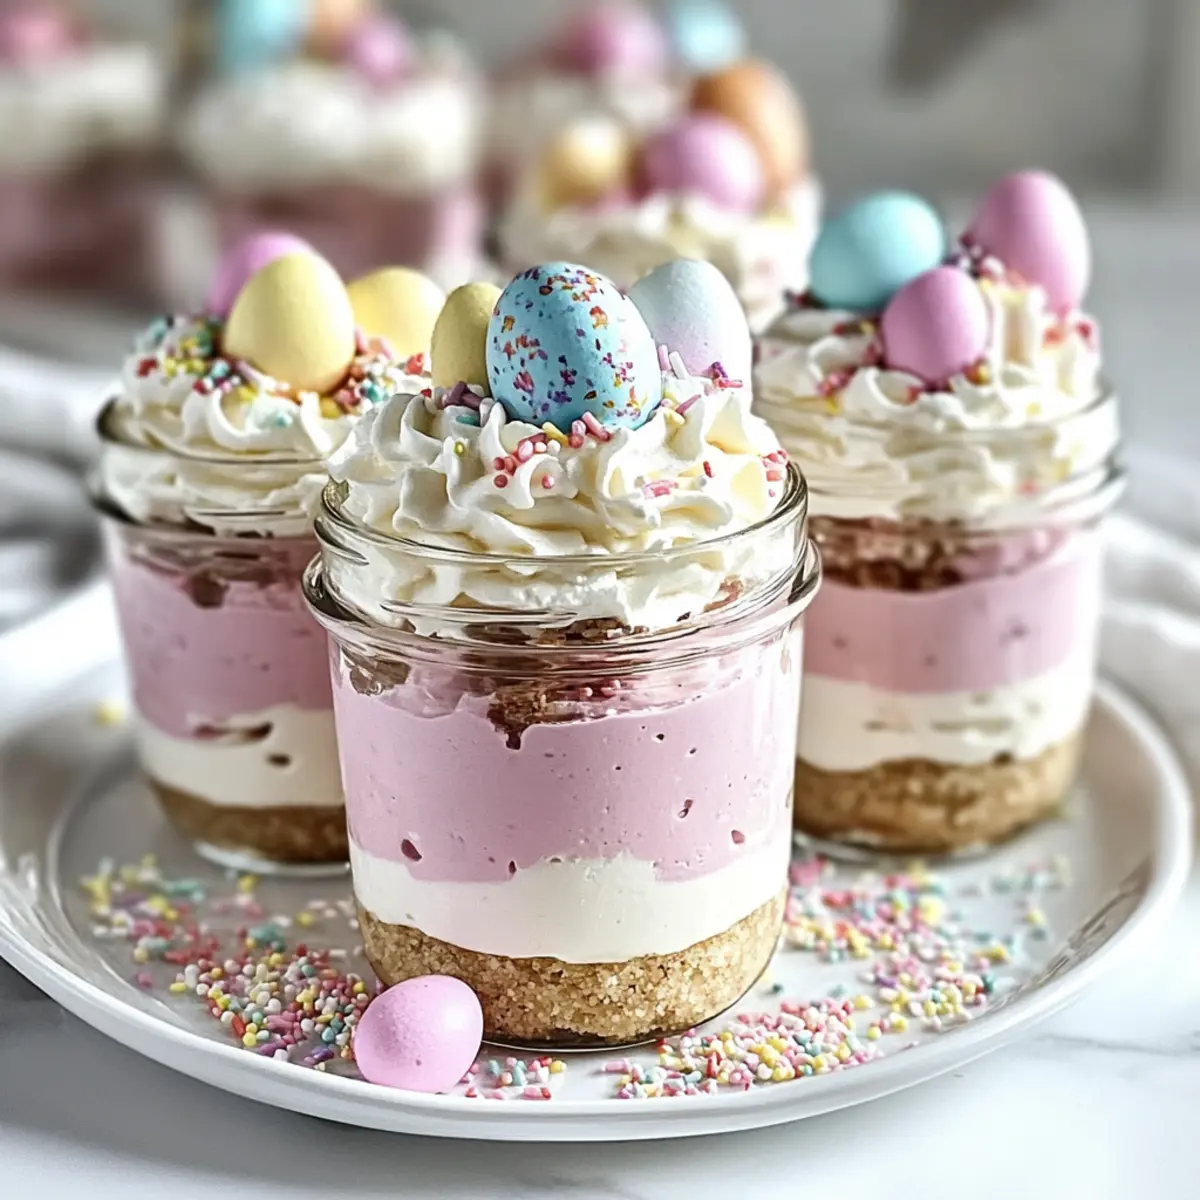
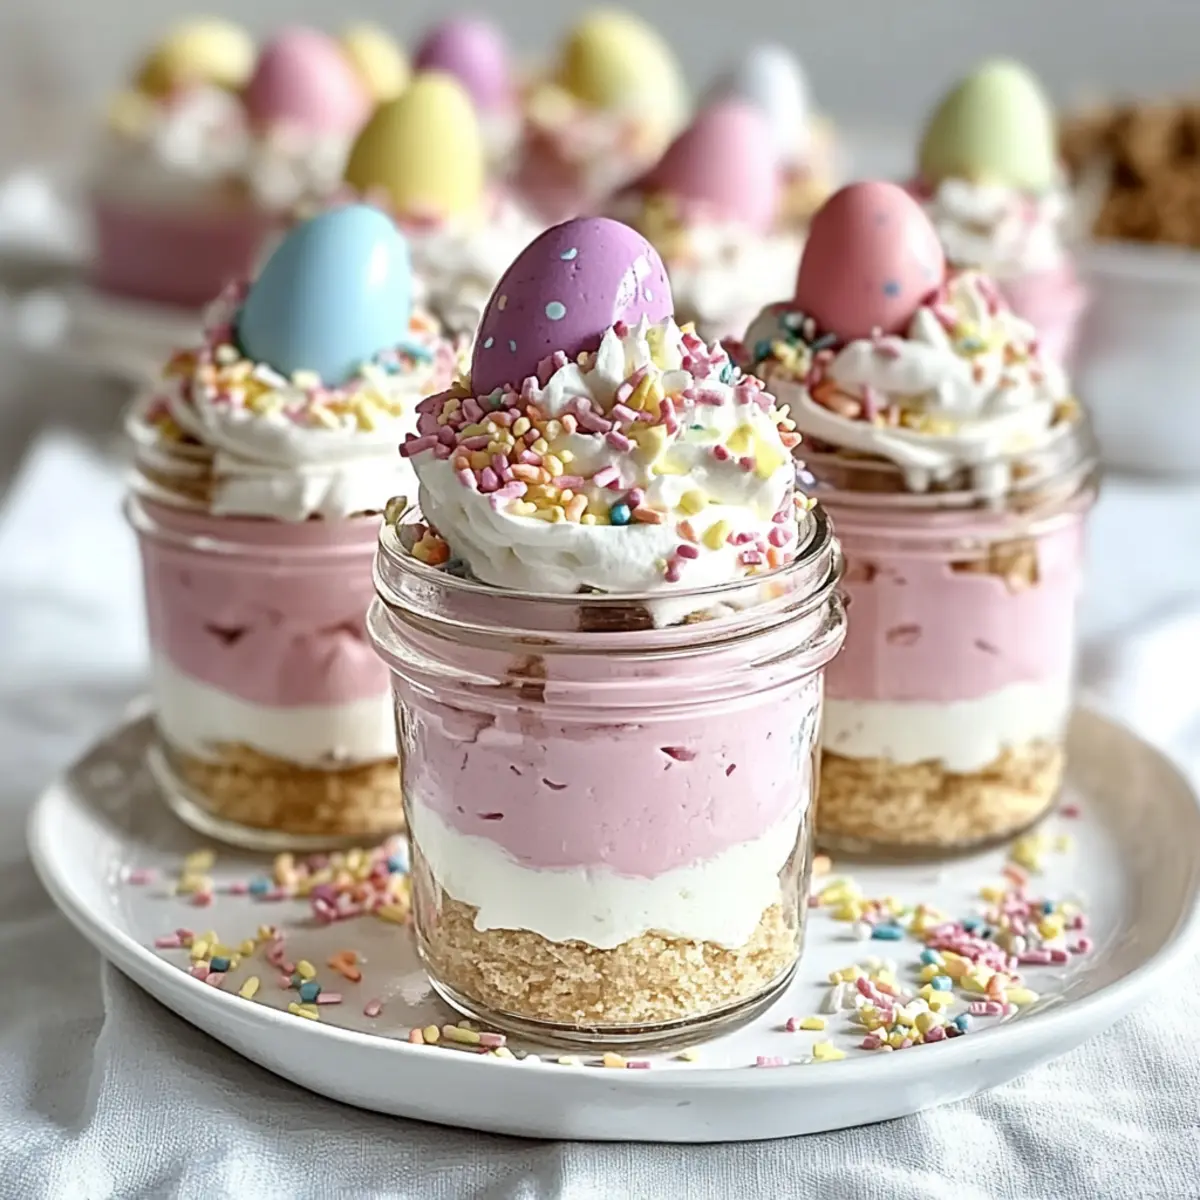
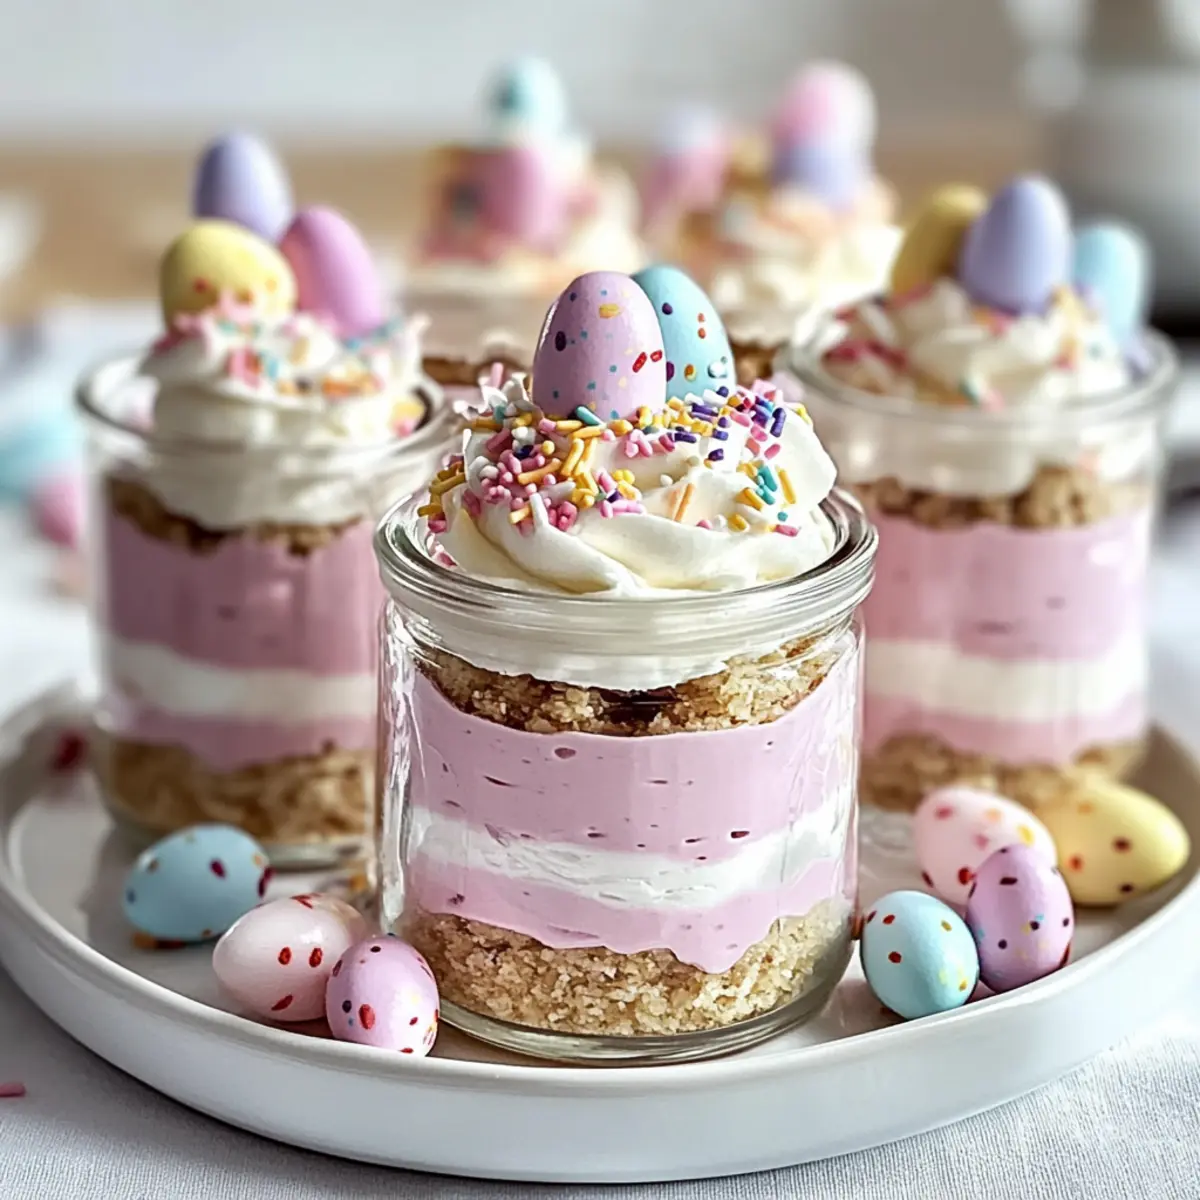
Step 6: Layer the Cheesecake Filling
Using a piping bag (or a plastic bag with a corner snipped off), layer the pink cheesecake filling into the jars first, followed by the white filling. Aim for neat layers by filling each jar to about ¾ full, which gives a lovely visual effect and a delightful mixture of colors as you dig in.
Step 7: Add Toppings
Prior to serving your Easter Egg Cheesecake Jars, pipe dollops of whipped cream on top of the fillings to create a fluffy crown. Then, sprinkle pastel candy eggs and colorful sprinkles over the whipped cream, giving your dessert a festive and cheerful appearance. Allow your creativity to shine with the toppings!
Step 8: Chill and Serve
Place the jars in the refrigerator to chill for at least 2 hours, or longer for a firmer texture. The cheesecake filling will set beautifully during this time. When ready to serve, simply remove them from the fridge and delight your family with these stunning Easter Egg Cheesecake Jars, perfectly chilled and ready for enjoyment.
How to Store and Freeze Easter Egg Cheesecake Jars
-
Room Temperature: Keep the jars at room temperature for no longer than 2 hours to prevent spoilage, especially with cream cheese and whipped cream present.
-
Fridge: Store these Easter Egg Cheesecake Jars in the refrigerator for up to 3 days. Cover each jar tightly with plastic wrap or a lid to maintain freshness.
-
Freezer: For longer storage, freeze the jars (without toppings) for up to 2 months. Allow to thaw in the fridge overnight before enjoying.
-
Reheating: There’s no need to reheat; simply serve chilled directly from the fridge for the best texture and flavor!
Easter Egg Cheesecake Jars Variations
Feel free to play around and make these delightful Easter Egg Cheesecake Jars uniquely yours!
-
Chocolate Twist: Substitute graham cracker crumbs with chocolate cookie crumbs for a rich, chocolatey base that pairs beautifully with creamy layers.
-
Citrus Burst: Add lemon zest to the cheesecake mixture for a refreshing citrus twist that enhances the sweetness and adds a zing to each bite.
-
Flavorful Extracts: Experiment with almond or coconut extract in place of vanilla for a floral or tropical vibe that will surprise and delight.
-
Berry Delight: Incorporate fresh fruit toppings like strawberries or blueberries before adding whipped cream for a burst of juicy flavor and color.
-
Nutty Crunch: Sprinkle in crushed nuts, such as pecans or walnuts, between the layers for an unexpected crunchy texture that contrasts with the smooth cheesecake.
-
Spicy Kick: Add a dash of cinnamon or nutmeg to your cream cheese filling for a warm, cozy flavor that brings a little spice to your sweet dish.
-
Vegan-Friendly: Use vegan cream cheese and coconut whipped cream to make this a delightful plant-based treat that everyone can enjoy.
-
Mini Jars: Create bite-sized versions of these jars using smaller glasses for easy serving—perfect for parties, brunches, or as a fun snack!
Creating variations is a wonderful way to showcase your personal style in the kitchen. If you’re in the mood for even more cheesecake-inspired treats, consider trying our delightful Chocolate Chip Cheesecake Cookies or the creamy Pumpkin Cheesecake Truffles. Ready to get creative? Enjoy every moment of your cooking adventure!
What to Serve with Easter Egg Cheesecake Jars
Elevate your festive gatherings with delightful pairings that perfectly complement the sweetness of your no-bake cheesecake jars.
-
Fresh Berries: The tartness of raspberries or strawberries brightens the creamy layers, offering a pleasing balance that will awaken your taste buds.
-
Lemon Sorbet: This refreshing treat brings a zesty contrast to the rich cheesecake, cleansing the palate while providing a delightful spring flavor.
-
Mini Fruit Tarts: Their buttery crust and fruit toppings create a beautiful dessert table alongside the jars, adding both variety and visual appeal to your spread.
-
Chocolate-Covered Pretzels: The sweet and salty crunch of pretzels pairs wonderfully, offering a delightful textural contrast that complements the soft cheesecake.
-
Iced Tea with Mint: A cool, refreshing drink, this herbal beverage adds a light, aromatic touch that enhances the festive essence of your dessert.
-
Coconut Whipped Cream: For a tropical twist, serve a dollop of coconut whipped cream on the cheesecake jars, enhancing the flavors with its creamy texture and subtle sweetness.
-
Carrot Cake Bites: These decadent bites echo the spring celebration theme, tying in seasonal flavors while providing a unique contrast to the cheesecake jars.
-
Sparkling Lemonade: This bubbly beverage adds a zesty sparkle, making every bite of cheesecake a special occasion, perfect for toasting with family and friends.
-
Chocolate Egg Cookies: For a playful touch, bake these cookies to echo the Easter candy theme, creating a fun and cohesive dessert experience.
-
Fruit Salad: A light, vibrant mix of seasonal fruits adds freshness that balances the richness of the cheesecake, creating a well-rounded meal for any celebration.
Make Ahead Options
These Easter Egg Cheesecake Jars are a fantastic choice for meal prep, allowing you to enjoy sweet treats without the last-minute rush. You can prepare the graham cracker crust and cheesecake filling up to 24 hours in advance—simply store them separately in the refrigerator to keep everything fresh and flavorful. Before serving, layer the crust and filling into jars and refrigerate for at least 2 hours for a nicely set dessert. To ensure the whipped cream and toppings stay at their best, add them right before serving. This way, you’ll present a delightful, beautiful dessert that’s just as delicious and stress-free for your spring celebrations!
Helpful Tricks for Easter Egg Cheesecake Jars
-
Chill for Perfection: Ensure to chill your jars longer for a firmer texture. This will make the layers hold nicely, enhancing the presentation.
-
Piping Precision: Use a piping bag for cleaner layers. This small step can elevate the visual appeal of your Easter Egg Cheesecake Jars, making them look professional.
-
Avoid Over-Folding: When incorporating whipped cream into the cheesecake mix, fold gently. Over-folding can deflate the cream and compromise the airy texture.
-
Customize Wisely: Don’t hesitate to swap out toppings or flavors! Just remember to keep the balance in sweetness, especially when using alternative sweeteners.
-
Presentation Counts: Use clear jars to showcase the delightful layers. This not only draws the eye but adds to the overall experience of enjoying the Easter Egg Cheesecake Jars.
Easter Egg Cheesecake Jars Recipe FAQs
How do I choose the right graham crackers for the crust?
When selecting graham crackers, look for those that are fresh and free from dark spots or brittleness. They should be in a sealed package with a reasonable shelf life to ensure the best flavor in your cheesecake jars. Alternatively, crushed Oreos or shortbread cookies can provide a deliciously different base if you feel like switching things up!
How should I store leftover Easter Egg Cheesecake Jars?
Store your Easter Egg Cheesecake Jars in the refrigerator for up to 3 days. Make sure to cover each jar tightly with plastic wrap or a lid to maintain freshness and prevent unwanted odors from affecting the flavor. Leaving them uncovered can lead to a crusty texture on the whipped cream layer.
Can I freeze Easter Egg Cheesecake Jars?
Absolutely! You can freeze the jars without toppings for up to 2 months. To freeze, simply seal each jar with a tight lid or plastic wrap, then place them in the freezer. When you’re ready to enjoy, allow the jars to thaw in the refrigerator overnight. This method retains the creamy texture of your cheesecake filling.
What if my whipped cream doesn’t whip up properly?
If your heavy cream doesn’t whip to stiff peaks, it could be due to a few factors: the cream may not be cold enough, or it might be overwhipped. Make sure your heavy cream is chilled and start whipping on medium speed. If it curdles, unfortunately, it won’t recover—use fresh cream instead to guarantee the right texture.
Are these cheesecake jars suitable for people with dietary restrictions?
Yes! You can easily customize the ingredients to accommodate various dietary needs. For a gluten-free option, substitute graham cracker crumbs with gluten-free cookies. Additionally, use dairy-free cream cheese and whipped toppings to make it vegan-friendly. Always check labels for potential allergens, especially for toppings like sprinkles and candy.
Easter Egg Cheesecake Jars that Make Spring Celebrations Sweet
Ingredients
Equipment
Method
- Prepare the Crust: In a mixing bowl, combine graham cracker crumbs, granulated sugar, and melted unsalted butter until it resembles damp sand, then press into the bottom of each jar.
- Make the Cream Cheese Mixture: Beat softened cream cheese until smooth, then add powdered sugar and vanilla, mixing until light and airy.
- Whip the Heavy Cream: Whip heavy cream in a separate bowl until stiff peaks form, about 4-5 minutes.
- Combine the Mixtures: Gently fold the whipped cream into the cream cheese mixture until no visible streaks remain.
- Color the Cheesecake Filling: Divide the filling and add pink gel food coloring or freeze-dried strawberry powder to one half, mixing gently.
- Layer the Cheesecake Filling: Layer pink filling first, followed by white filling in jars, filling each to about ¾ full.
- Add Toppings: Pipe dollops of whipped cream on top and sprinkle with pastel candy eggs and colorful sprinkles.
- Chill and Serve: Refrigerate jars for at least 2 hours before serving.
Leave a Reply