
As I sifted through flour and sugar, I felt the familiar excitement of Halloween approaching. These Easy Ghost Cookies are the perfect blend of fun and simplicity, capturing the charm of the season in each soft bite. With an easy sugar cookie base and a delightful icing, they’re a treat that will steal the spotlight at any celebration or quiet evening at home. Beyond their adorable look, these cookies are a breeze to whip up—making them fantastic for family baking sessions or last-minute party contributions. Plus, their slightly crisp edges offer a delightful contrast to the tender interior, ensuring everyone will want one… or two! Ready to conjure up some spooky sweetness? Let’s dive in!
Why Are These Ghost Cookies a Must?
Fun to Make: Get the whole family involved in this delightful project, turning your kitchen into a mini Halloween workshop.
Festive and Flavorful: The nostalgic taste of sugar cookies meets a charming ghostly design, making them ideal for parties and gatherings.
Versatile Options: Try different flavors or decorations for a unique twist—perhaps almond extract instead of vanilla or colorful sprinkles for a playful touch! For more festive cookie ideas, check out my Pecan Pie Cookies or Pumpkin Pie Cookies.
Quick and Easy: With minimal ingredients and simple steps, you can create these spooky delights in no time.
Perfect for Sharing: Their eye-catching design and delightful taste ensure they’ll disappear quickly at any celebration; everyone will want to indulge in these sweet treats!
Ghost Cookies Ingredients
Unleash your baking potential with these easy Ghost Cookies!
For the Cookie Base
- All-purpose flour – Provides structure to cookies; ensure it’s sifted for even mixing.
- Baking powder – A leavening agent that helps cookies rise; do not skip for proper texture.
- Kosher salt – Enhances flavors; try sea salt as a substitute for a different mineral flavor.
- Butter (2 sticks, softened) – Adds richness and tenderness; can use unsalted butter to control saltiness.
- Granulated sugar – The primary sweetener for the cookies; brown sugar can provide a deeper flavor but adjust for moisture.
- Large egg – Binds the ingredients and adds moisture; a flax egg can be used for a vegan option.
- Milk (1 Tbsp, plus more for thinning) – Adds moisture and helps with icing consistency; non-dairy milk can be used.
- Pure vanilla extract – Adds sweetness and depth of flavor; almond extract can be a substitute for a more unique flavor.
For the Icing
- Powdered sugar (3 cups) – Used for the icing, giving a smooth finish; confectioners’ sugar is essential for icing texture.
- Light corn syrup (1/4 cup) – Helps achieve a glossy icing finish; agave syrup can be used as an alternative.
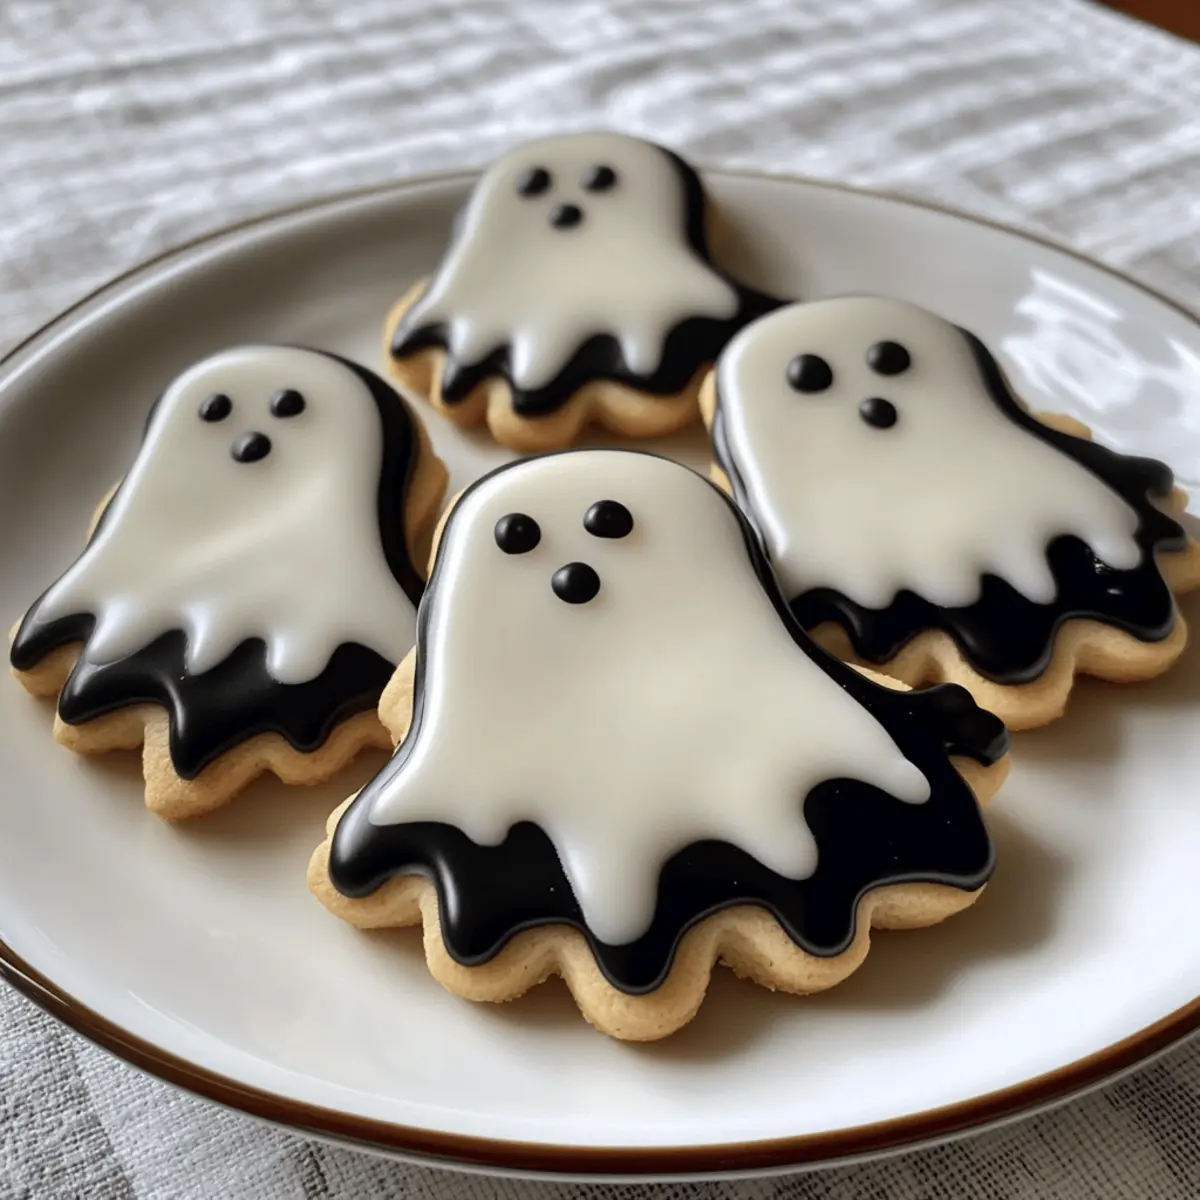
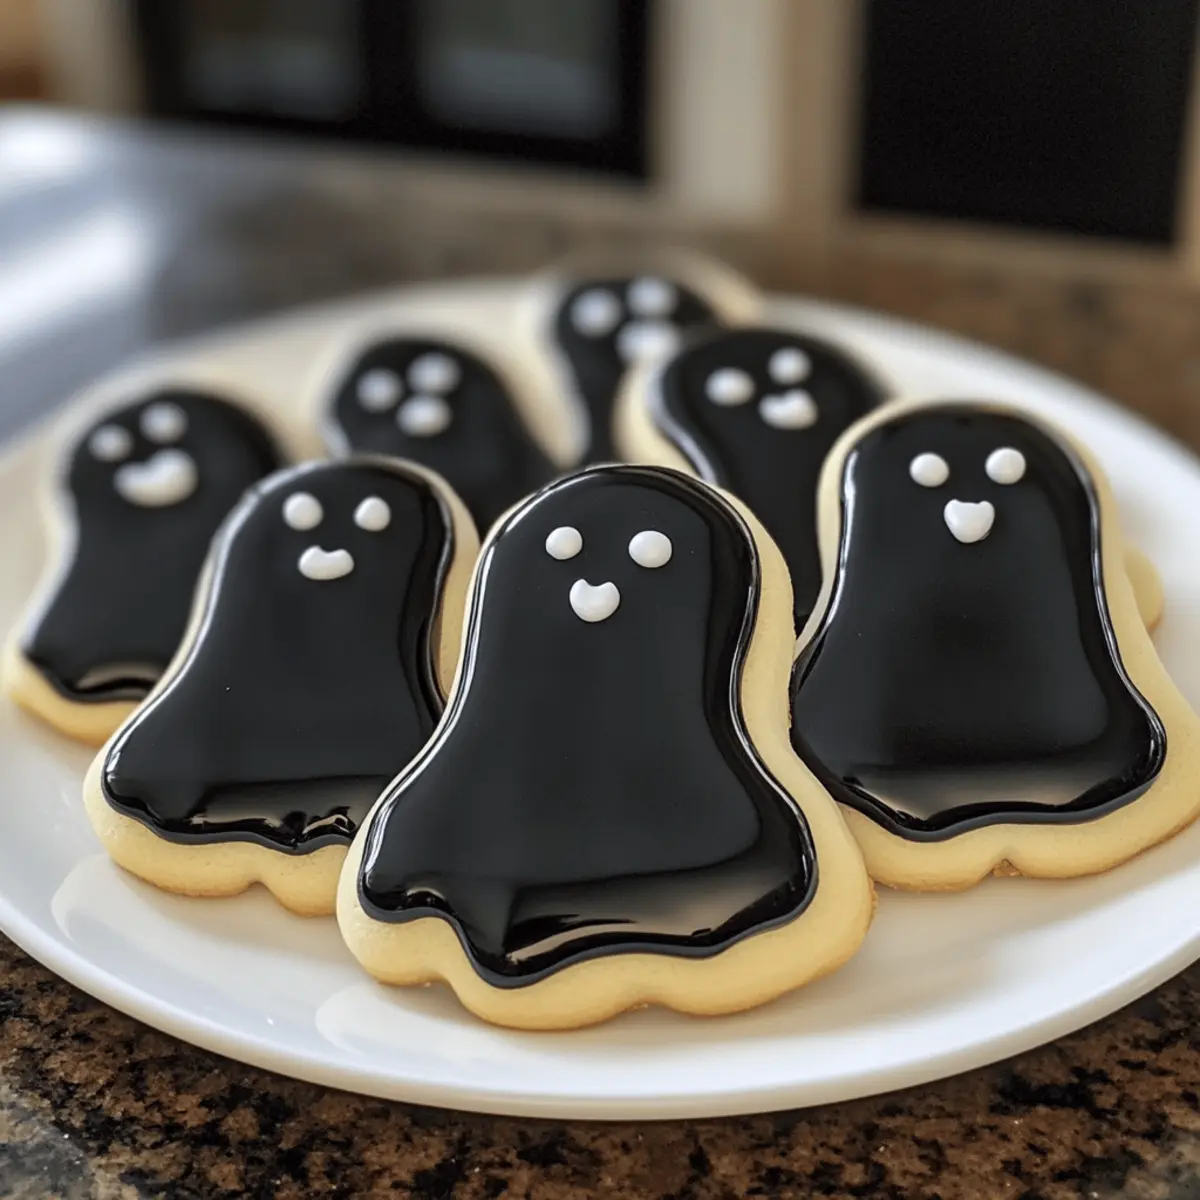
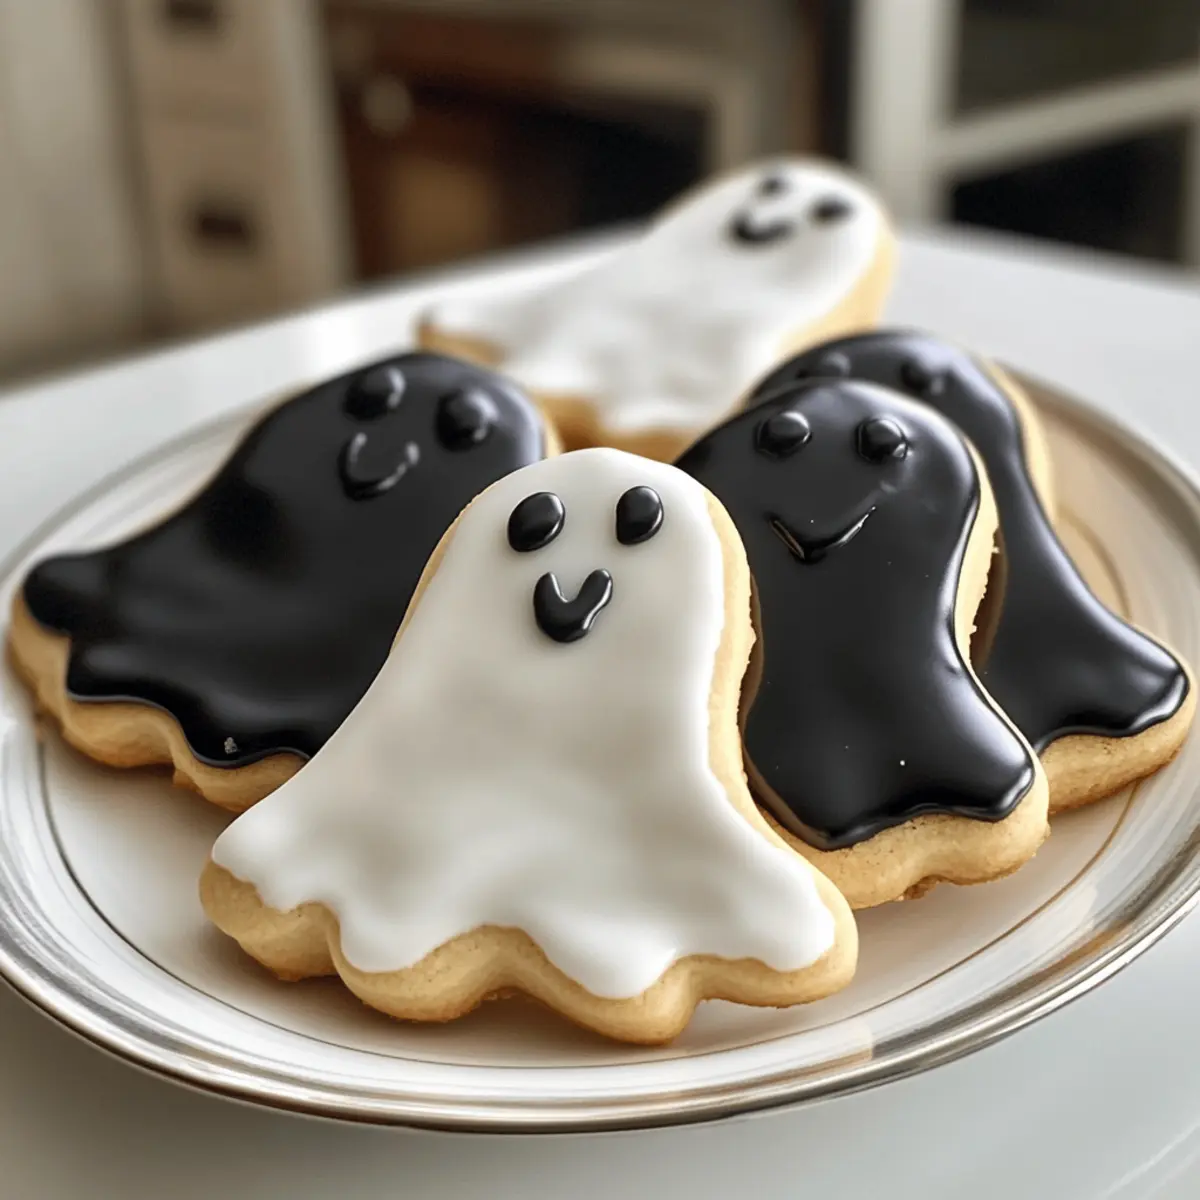
- Black food coloring – For decorating ghosts; optional but recommended for visual impact.
Step‑by‑Step Instructions for Ghost Cookies
Step 1: Prepare Sugar Cookie Dough
In a large mixing bowl, whisk together 2 cups of sifted all-purpose flour, 1 teaspoon of baking powder, and 1/2 teaspoon of kosher salt. In another bowl, cream together 2 sticks of softened butter and 1 cup of granulated sugar until light and fluffy, about 3-5 minutes. Add in 1 large egg, 1 tablespoon of milk, and 1 teaspoon of vanilla extract, mixing until well combined. Gradually add the flour mixture to the wet ingredients, stirring until a stiff dough forms.
Step 2: Chill the Dough
Once your dough is formed, wrap it securely in plastic wrap and place it in the refrigerator. Allow it to chill for at least 1 hour; this helps prevent the cookies from spreading while baking. You’ll know it’s ready when the dough is firm to the touch.
Step 3: Cut and Freeze Cookies
After chilling, dust a clean work surface with flour and roll out the dough to about 1/4 inch thickness. Use a ghost-shaped cookie cutter to cut out your cookies and place them on lined baking sheets. To help maintain their shape during baking, freeze the cut-out cookies for about 10 minutes before proceeding.
Step 4: Bake Cookies
Preheat your oven to 350°F (175°C) while the cookies are in the freezer. Once preheated, remove the cookies from the freezer and bake them for 8-10 minutes, or until the edges are lightly golden. Keep an eye on them; they should have a soft center while the edges take on a hint of color. Let the cookies cool on wire racks after baking.
Step 5: Prepare Icing
In a mixing bowl, combine 3 cups of powdered sugar, 1/4 cup of light corn syrup, and 1 tablespoon of milk. Stir these ingredients together until you achieve a thick yet smooth icing consistency. If desired, thin the icing further by adding additional milk a teaspoon at a time, until it reaches the desired consistency for flooding the cookies.
Step 6: Decorate Cookies
Using a piping bag, outline each cookie with the thicker icing to create a barrier. Following this, flood the center of each ghost cookie with your thinner icing, allowing it to spread. Once the flooded icing is set, add ghostly facial features using black food coloring to complete the look of your delightful Ghost Cookies.
Step 7: Store Cookies
If your sensational Ghost Cookies survive longer than a day, place them in an airtight container at room temperature. They’ll stay fresh for 3-4 days, maintaining their lovely texture and flavor. Enjoy the festive spirit they bring to your home!
How to Store and Freeze Ghost Cookies
Room Temperature: Keep your Ghost Cookies in an airtight container at room temperature for up to 3-4 days to maintain freshness and flavor.
Fridge: For longer storage, place cookies in the fridge, where they can last for about a week. Seal them tightly to prevent them from becoming stale.
Freezer: You can freeze unbaked ghost cookie dough for up to 3 months. Once you’ve cut the shapes, freeze the dough on a baking sheet, then transfer them to an airtight container for storage.
Reheating: If you prefer warm cookies, simply reheat them in the oven at 350°F (175°C) for a few minutes until warmed through. Enjoy the delightful flavors of your homemade Ghost Cookies!
What to Serve with Easy Ghost Sugar Cookies
These delightful treats will become the highlight of your Halloween gatherings, especially when paired with a few festive accompaniments.
-
Chilled Apple Cider: The crisp sweetness of apple cider beautifully complements the sugary goodness of the cookies, creating a classic fall pairing.
-
Vanilla Ice Cream: A scoop of creamy vanilla ice cream served alongside your cookies offers a cool, refreshing contrast to their soft texture.
-
Pumpkin Spice Latte: Warm, spiced coffee enhances the Halloween spirit, balancing the sweetness of the cookies while adding a cozy touch to your celebration.
-
Chocolate Dipped Pretzels: The salty crunch of pretzels dipped in chocolate perfectly offsets the sweetness of the Ghost Cookies, creating a delightful combination.
-
Caramel Sauce: Drizzling a bit of warm caramel sauce over the cookies brings a rich, buttery flavor that elevates this already delightful treat.
-
Spooky Fruit Platter: A vibrant assortment of seasonal fruits like oranges, apples, and berries adds freshness and a pop of color to the table, balancing the sweetness of your cookies.
-
Ghostly Hot Chocolate: A steaming cup of hot chocolate topped with whipped cream and marshmallows will enchant kids and adults alike, adding warmth to your Halloween night.
-
Festive Cupcakes: Sweet additions of ghost or pumpkin-themed cupcakes can create a delightful dessert spread, inviting a festive mood to your celebration.
Make Ahead Options
These Ghost Cookies are a fantastic option for busy home cooks looking to streamline their Halloween festivities! You can prepare the cookie dough up to 24 hours in advance; just wrap it tightly in plastic wrap and refrigerate. Alternatively, you can cut out the ghost shapes and freeze them for up to 3 days. When you’re ready to enjoy these festive treats, simply bake the cookies straight from the fridge or freezer, and allow them to cool completely before icing. This way, you’ll have delightful, homemade Ghost Cookies ready to impress your family and friends, all while saving precious time during the hectic Halloween season!
Ghost Cookies Variations & Substitutions
Feel free to let your creativity take flight and customize these spooky treats to suit your tastes!
-
Almond Extract: Swap vanilla with almond extract for a delightful nutty twist, bringing a warm, aromatic flavor to the cookies. It’s surprisingly delicious!
-
Colorful Decor: Use vibrant food colors to create a variety of ghostly characters—think witches or pumpkins—to add extra fun to your Halloween festivities. Let your imagination run wild!
-
Festive Sprinkles: Top the icing with festive sprinkles for a playful touch; they catch the light beautifully and add a pop of color, making your cookies even more inviting.
-
Cocoa Powder: For a chocolatey twist, replace a portion of the flour with unsweetened cocoa powder and decorate with white icing for ghostly delights. Chocolate lovers will be thrilled!
-
Spicy Twist: Add a pinch of cinnamon or nutmeg to your dough for a warm, spiced flavor that complements the sweetness beautifully. The aroma alone will fill your home with fall magic.
-
Gluten-Free: Substitute the all-purpose flour with a gluten-free blend; just make sure it contains xanthan gum for optimal texture. Everyone can join in the spooky fun!
-
Dairy-Free: Use coconut oil or a dairy-free butter alternative in place of regular butter, and opt for your favorite plant-based milk in the icing. These cookies can cater to everyone’s needs!
-
Pumpkin Spice Version: Incorporate pure pumpkin puree into the dough along with spices like cinnamon and ginger for a festive pumpkin cookie version that screams autumn. A delicious deviation for pumpkin lovers!
For even more cookie inspirations, check out my delightful Chocolate Oat Cookies that bring a crunchy twist, or my delicious Chip Cheesecake Cookies filled with gooey goodness.
Expert Tips for Ghost Cookies
-
Chill the Dough: Ensure you chill the dough properly to maintain the ghost shapes and avoid spreading during baking. This step is crucial for perfect Ghost Cookies.
-
Sift Flour: Always sift your all-purpose flour before measuring. This helps to aerate the flour and ensures even mixing, leading to lighter cookies.
-
Icing Consistency: Pay attention to the icing consistency; it should be thick enough to hold its shape but thin enough to flow smoothly. Too thick will not pipe well, while too thin will run off the edges.
-
Layering Icing: When decorating, allow each layer of icing to set before adding more details. This prevents colors from bleeding into one another and keeps your ghosts looking sharp.
-
Baking Time: Keep an eye on the cookies while they bake! You want the edges to be lightly golden while the centers remain soft for the perfect texture in your Ghost Cookies.
-
Customize Flavors: Don’t hesitate to switch up flavors by using almond extract or adding sprinkles for a personal touch. It can elevate the festive charm of your spooky treats!
Ghost Cookies Recipe FAQs
How do I choose the right ripeness of ingredients?
For the best results, use room temperature ingredients like butter and eggs. Softened butter should be pliable and not melted; this ensures proper creaming with sugar. Eggs should ideally be at room temperature as well; to speed up warming, place eggs in warm water for 10-15 minutes.
How should I store the Ghost Cookies?
Keep your Ghost Cookies in an airtight container at room temperature for up to 3-4 days. If you want to extend their shelf life, refrigerate them in a sealed container, where they’ll stay fresh for about a week. Always ensure they are completely cool before storing to avoid moisture buildup.
Can I freeze the Ghost Cookies?
Absolutely! You can freeze unbaked ghost cookie dough for up to 3 months. After cutting out shapes, freeze the cookies on a baking sheet for about 10 minutes until firm, then transfer them to an airtight container or freezer bag. When you’re ready to bake, just preheat your oven and bake straight from frozen, adding an extra minute or two to the baking time.
What should I do if my icing is too thick or too thin?
If your icing is too thick, add small amounts of milk (1 teaspoon at a time) until you reach the desired consistency. For too thin icing, sift in more powdered sugar until it thickens. Aim for a flooding consistency that holds its shape but flows easily to cover the cookie smoothly.
Are these cookies safe for pets or anyone with allergies?
Ghost Cookies contain common allergens like gluten (from flour) and dairy (from butter), so they are not suitable for those with wheat or dairy allergies. Always check ingredients if serving to someone with allergies. Additionally, keep these cookies away from pets as chocolate or other ingredients like xylitol found in sweeteners can be toxic to them.
Can I make variations of these Ghost Cookies?
Yes, you can customize your Ghost Cookies! Try adding almond extract instead of vanilla for a unique flavor twist, or use vibrant food colors for different festive shapes. You can also add festive sprinkles on top of the icing for an extra pop of color and fun! Enjoy experimenting with flavors that fit your Halloween style!

Spooktacular Ghost Cookies to Sweeten Your Halloween Fun
Ingredients
Equipment
Method
- In a large mixing bowl, whisk together 2 cups of sifted all-purpose flour, 1 teaspoon of baking powder, and 1/2 teaspoon of kosher salt.
- In another bowl, cream together 2 sticks of softened butter and 1 cup of granulated sugar until light and fluffy, about 3-5 minutes.
- Add in 1 large egg, 1 tablespoon of milk, and 1 teaspoon of vanilla extract, mixing until well combined.
- Gradually add the flour mixture to the wet ingredients, stirring until a stiff dough forms.
- Wrap the dough in plastic wrap and refrigerate for at least 1 hour.
- Dust a clean work surface with flour and roll out the dough to about 1/4 inch thickness.
- Use a ghost-shaped cookie cutter to cut out cookies and place them on lined baking sheets.
- Freeze the cut-out cookies for about 10 minutes before baking.
- Preheat your oven to 350°F (175°C) and then bake cookies for 8-10 minutes.
- Let the cookies cool on wire racks after baking.
- In a mixing bowl, combine 3 cups of powdered sugar, 1/4 cup of light corn syrup, and 1 tablespoon of milk.
- Stir these until you achieve a thick yet smooth icing consistency, adjusting with more milk if necessary.
- Using a piping bag, outline each cookie with thicker icing, then flood the center with thinner icing.
- Add ghostly facial features with black food coloring once the flooded icing sets.
- Store cookies in an airtight container at room temperature for up to 3-4 days.
Leave a Reply