
Every craving for comfort food can be satisfied with a warm, cheesy bite, and there’s nothing quite like the magic of a Grilled Cheese Burrito to ignite that passion. Inspired by the iconic Taco Bell version, this scrumptious wrap arrives straight from my kitchen to yours, bringing a symphony of seasoned beef, gooey nacho cheese, and spicy chipotle sauce wrapped in a perfectly grilled tortilla. Best of all, this delightful recipe is not only quick to whip up in under 30 minutes but also fully customizable to suit every palate, making it a fantastic choice for family dinners or a fun weekend treat. Whether you prefer savory beef or a hearty vegetarian twist, you’ll find a version that feels just right. Are you ready to take your taste buds on a cheesy adventure? Let’s dive in!

Why will you crave this burrito?
Bold flavors combine in the Grilled Cheese Burrito, creating a delicious twist on a classic favorite, ideal for satisfying cravings. Customizable options make it perfect for everyone—choose between beef, black beans, or tofu for a vegetarian delight. Kid-approved and ready in under 30 minutes, this recipe is a great way to inspire family dinners. Pair it with a refreshing salsa or creamy guacamole for a complete meal, or for another twist on comfort food, try making a Pizza Grilled Cheese or enjoy a cozy Philly Cheese Steak Soup.
Grilled Cheese Burrito Ingredients
-
For the Filling
-
Ground Beef – Provides protein and flavor; for a vegetarian option, replace with black beans or tofu.
-
Taco Seasoning – Adds spice and flavor; feel free to use store-bought or whip up a homemade version.
-
Cooked White Rice – Offers bulk and texture; try brown rice for a healthier twist.
-
Sour Cream – Delivers creaminess and tang; use dairy-free sour cream for a vegan-friendly version.
-
Nacho Cheese Sauce – Infuses cheesiness and flavor; opt for homemade cheese sauce to keep it wholesome.
-
Chipotle Sauce – Brings smoky heat; substitute with salsa or skip it for a milder burrito.
-
For the Cheese
-
Shredded Cheddar Cheese – Melts beautifully and adds depth of flavor; you can mix in other cheeses if you like.
-
Shredded Mozzarella – Adds stretch and creaminess; a Mexican cheese blend works well, too.
-
For the Wrap
-
Large Flour Tortillas – Acts as the base for this delicious burrito; alternative: whole wheat or gluten-free tortillas.
-
For Grilling
-
Butter or Oil – Essential for grilling, providing that crispy, golden exterior.
Enjoy the delightful taste of this Grilled Cheese Burrito and make it your own with various combinations to satisfy every craving!
Step‑by‑Step Instructions for Grilled Cheese Burrito
Step 1: Cook the Beef
In a large skillet, heat over medium heat and add the ground beef. Cook for about 8–10 minutes, stirring occasionally until browned. Drain excess grease, then sprinkle in taco seasoning with an equal amount of water. Let it simmer for 5 minutes, stirring occasionally, until well combined and fragrant. This marinated beef will be the savory star of your Grilled Cheese Burrito.
Step 2: Warm the Tortillas
While the beef is simmering, warm your large flour tortillas. You can do this in a dry skillet over low heat for about 30 seconds on each side, or pop them in the microwave for about 10-15 seconds until they’re flexible. This step helps prevent tearing while assembling your delicious Grilled Cheese Burrito.
Step 3: Assemble the Burrito
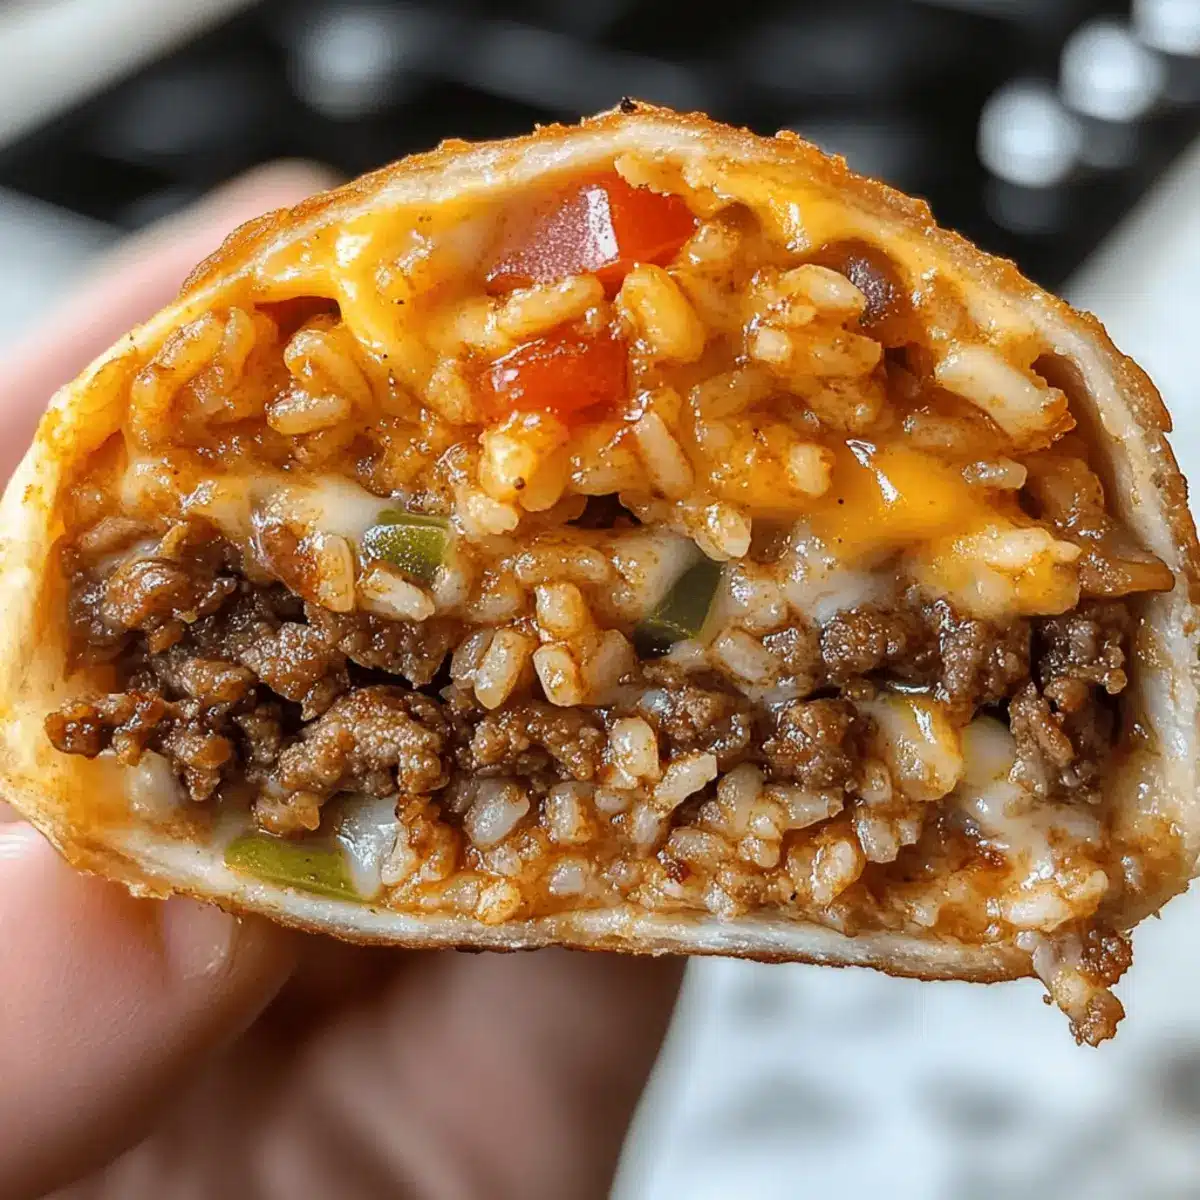
Once the tortillas are warm, lay one flat on a clean surface. Start layering your ingredients: first, add a scoop of cooked white rice, then the seasoned beef, a generous drizzle of nacho cheese sauce, a dollop of sour cream, and a swirl of chipotle sauce for that smoky flavor. Finally, sprinkle a mix of shredded cheddar and mozzarella cheeses on top, adding a melty aspect to each bite.
Step 4: Grill the Burrito
Next, heat a clean skillet over medium heat and add a little butter or oil. Sprinkle some shredded cheese directly into the skillet and place the burrito seam-side down onto the cheese. Grill for about 3–4 minutes until the bottom is golden and the cheese is melted. Gently press down on the burrito while cooking to help it crisp up beautifully.
Step 5: Flip and Finish
Carefully flip the burrito using a spatula, adding more cheese to the skillet if desired. Cook the other side for an additional 3–4 minutes until it turns golden brown and crispy. The Grilled Cheese Burrito should be perfectly melted inside with a crunchy exterior, a delightful combination that will leave everyone craving more.
Step 6: Serve and Enjoy
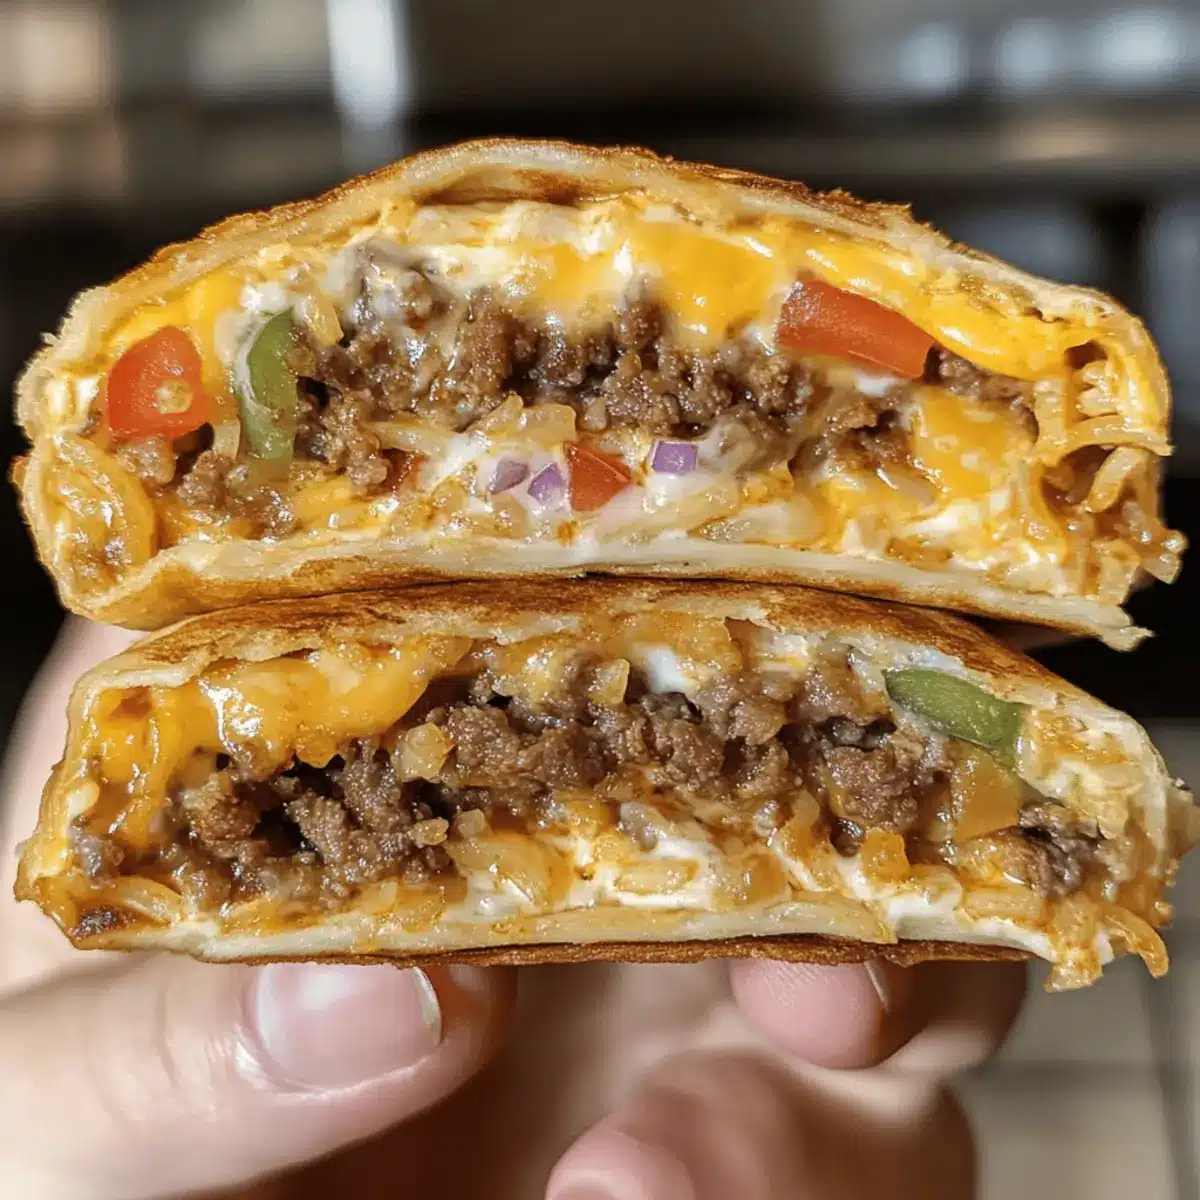
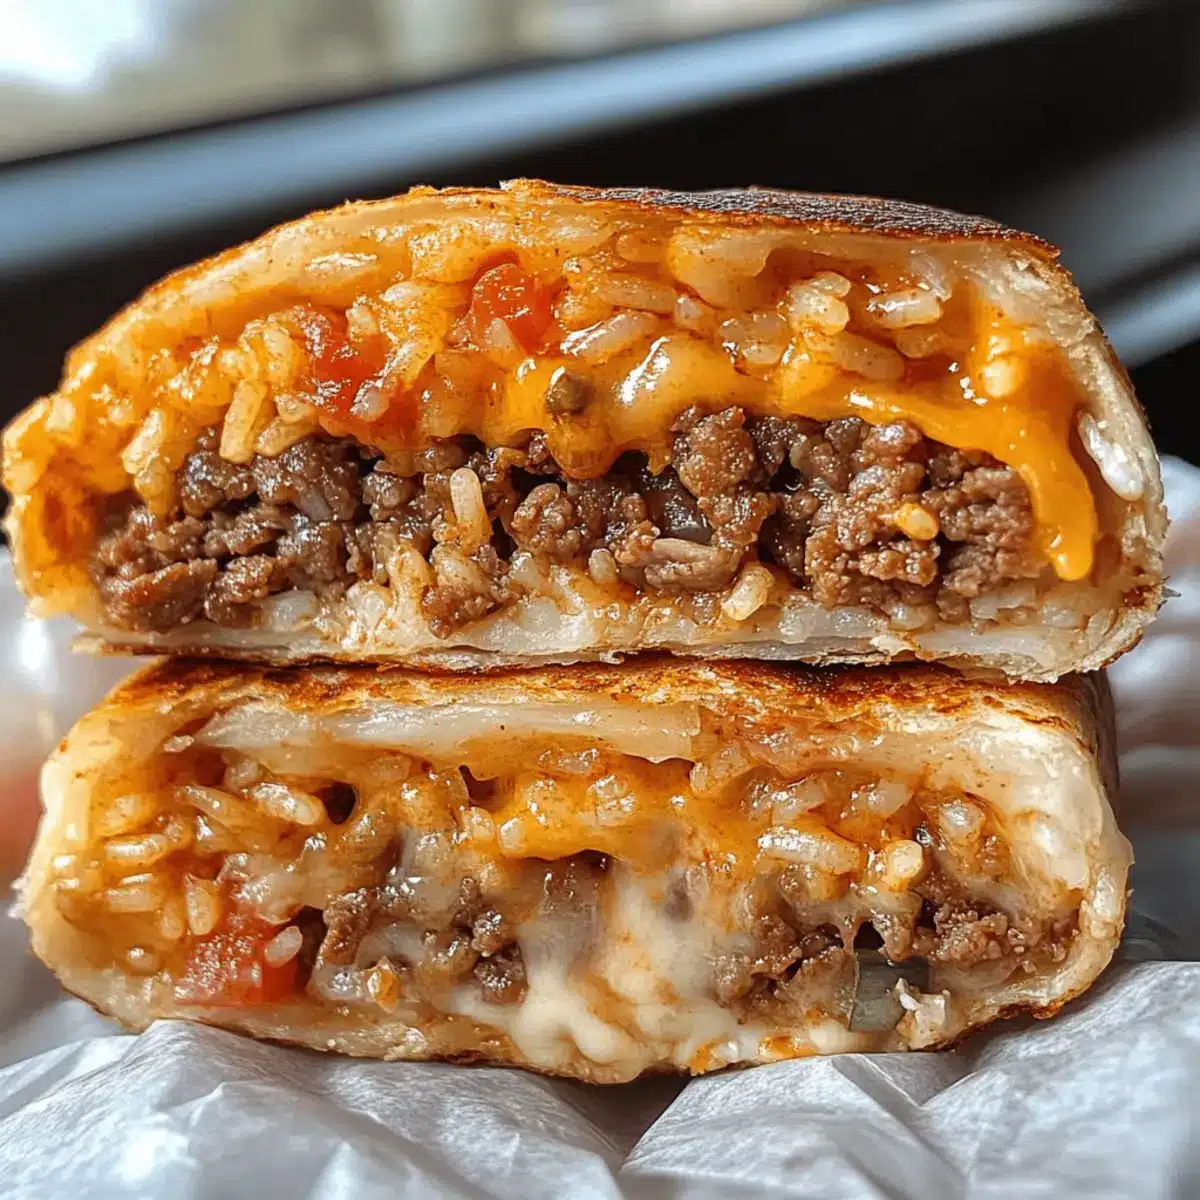
Once both sides of your Grilled Cheese Burrito are grilled to perfection, remove it from the skillet and cut it in half for a dramatic presentation. Serve immediately with your favorite dipping sauces such as salsa, guacamole, or more sour cream on the side. Enjoy this cheesy, comforting delight hot from the pan!
Expert Tips for Grilled Cheese Burrito
-
Cheese Quantity: Use a generous amount of cheese when grilling; it helps create a delicious, crispy crust while keeping the burrito intact.
-
Proper Heating: Ensure your skillet is preheated adequately; this prevents the tortilla from becoming soggy and helps achieve that perfect golden exterior.
-
Avoid Overstuffing: Don’t overfill your burrito! Less is more; too many ingredients can make rolling difficult and lead to spills while grilling.
-
Let It Rest: After grilling, allow the burrito to rest for a couple of minutes. This helps the melted cheese to settle and enhances the overall texture.
-
Perfectly Customizable: Feel free to experiment with various fillings and toppings to make this Grilled Cheese Burrito your own; consider adding jalapeños or different vegetables for extra flavor!
How to Store and Freeze Grilled Cheese Burrito
Fridge: Store leftover Grilled Cheese Burrito in an airtight container for up to 3 days. Keep it away from strong-smelling foods to maintain its flavor.
Freezer: For longer storage, wrap the burrito tightly in aluminum foil or freezer-safe plastic wrap, then place it in a zip-top freezer bag. It can be frozen for up to 3 months.
Reheating: To reheat, thaw overnight in the fridge if frozen. Use a skillet to re-crisp the exterior, cooking over medium heat for about 5–7 minutes on each side until heated through and crispy.
Note: If reheating in the microwave, wrap the burrito in a damp paper towel and heat for 30 seconds to 1 minute, but understand this may soften the tortilla.
Grilled Cheese Burrito Variations & Substitutions
Get ready to explore exciting twists and customizable options for your Grilled Cheese Burrito!
-
Vegetarian Delight: Replace ground beef with black beans or tofu for a hearty meatless option that’s packed with flavor.
-
Dairy-Free Twist: Swap sour cream for dairy-free alternatives and use a vegan cheese blend to keep it creamy without the dairy.
-
Healthy Swap: For a lighter version, substitute white rice with cauliflower rice, adding a boost of vegetables in every bite.
-
Extra Crunch: Add crushed tortilla chips inside the burrito for an irresistible layer of crunch that will elevate your texture game. The satisfying crunch complements the gooey cheese perfectly.
-
Spicy Kick: Toss in sliced jalapeños or a dollop of hot sauce for an exciting heat level that will tantalize your taste buds and make every bite more interesting.
-
Flavor Varietals: Experiment with different sauces such as green salsa instead of chipotle sauce for a fresh, zesty alternative. Topping your burrito with guacamole or fresh pico de gallo also adds vibrant flavor!
-
Cheesy Combination: Utilize a blend of cheeses—try mixing cheddar, Monterey Jack, and pepper jack for a melty masterpiece. Combining different cheeses enhances richness while keeping it deliciously cheesy.
-
Wrap It Up: Use whole wheat or gluten-free tortillas if you want a healthier or alternative option, allowing everyone to enjoy this tasty treat!
Get creative and make this Grilled Cheese Burrito your own, whether you’re in the mood for something simple or a flavor-packed adventure! Consider enjoying it alongside a delightful Cheesecake Stuffed Baked apple for a sweet finish or maybe some Chocolate Chip Cheesecake cookies for dessert.
What to Serve with Grilled Cheese Burrito
Elevate your meal experience with delightful sides that complement the cheesy goodness of your burrito.
- Fresh Guacamole: Adds a creamy, rich contrast to the spicy burrito; it’s a staple that pairs perfectly for dipping.
- Crisp Garden Salad: A light salad filled with fresh veggies provides a refreshing crunch that balances the burrito’s richness. Toss in some lime vinaigrette for brightness.
- Spicy Salsa: A zesty, homemade or store-bought salsa gives an exciting kick, enhancing each bite of your cheesy masterpiece.
- Refried Beans: Creamy refried beans offer a hearty, comforting side that aligns with the burrito’s flavors and provides additional protein.
- Corn on the Cob: Sweet, buttery corn brings a delightful contrast, especially when grilled and seasoned with lime and chili powder.
- Chips and Cheese Dip: Serve some crunchy tortilla chips alongside a warm nacho cheese dip for an appetizer that extends the burrito experience.
- Chilled Horchata: For drinks, a glass of sweet horchata cools down the spice and rounds out the meal with its creamy sweetness.
- Fried Plantains: Their sweetness pairs beautifully with savory dishes, offering a unique flavor combo that complements the burrito nicely.
These complementary sides not only enhance flavor but also create a festive atmosphere, perfect for sharing with family and friends!
Make Ahead Options
These Grilled Cheese Burritos are perfect for meal prep enthusiasts! You can prepare the filling, including the seasoned beef and cheese sauce, up to 3 days in advance and simply refrigerate them in an airtight container. When you’re ready to enjoy your burritos, warm the tortillas and layer the prepped filling as instructed. Grill the burritos just before serving to ensure they remain crispy and delicious. For optimal quality, reheat gently on the stovetop, allowing those cheesy layers to meld together while maintaining that delightful crunch. This way, you can savor a satisfying meal in no time—perfect for busy weeknights!
Grilled Cheese Burrito Recipe FAQs
How do I choose the best ingredients for my Grilled Cheese Burrito?
Absolutely! For the best results, select ripe, fresh ingredients. Choose ground beef with around 80% lean content for flavor, and make sure your tortillas are soft and pliable—look for those made with simple ingredients. If opting for vegetarian, ensure your black beans or tofu are fresh. Always check for dark spots or any signs of spoilage!
How should I store leftover Grilled Cheese Burrito?
Very simply! Place any leftover burritos in an airtight container in the refrigerator for up to 3 days. If you prefer them nice and fresh, keep them away from strong-smelling foods to avoid flavor transfer. Let them cool to room temperature before sealing for optimal freshness!
Can I freeze Grilled Cheese Burritos for later?
Yes, you can! To freeze, wrap each burrito tightly in aluminum foil or freezer-safe plastic wrap, then place them in a zip-top freezer bag. This method ensures they stay fresh for up to 3 months. When you’re ready to enjoy one, simply thaw in the fridge overnight and reheat as outlined in the reheating section!
What if my burrito is falling apart when grilling?
Don’t worry; it happens! If your burrito becomes messy, you might be overstuffing it. Stick to 2-3 tablespoons of filling to keep it neat. Additionally, when grilling, press down gently using a spatula to help the cheese melt and adhere to the tortilla, creating a cohesive wrap.
Is this recipe suitable for people with dietary restrictions?
Absolutely! The Grilled Cheese Burrito can easily accommodate various dietary preferences. For a vegetarian option, swap the ground beef for black beans or tofu. If you’re looking for a dairy-free version, simply use vegan cheese and dairy-free sour cream. Always double-check labels for any allergies, especially with pre-packaged ingredients.
How can I reheat my Grilled Cheese Burrito while keeping it crispy?
To reheat while retaining crispiness, use a skillet! After thawing, heat your skillet over medium heat and add a touch of oil or butter. Cook the burrito for about 5-7 minutes on each side until golden and heated through. This method keeps the exterior crispy while warming the inside nicely. Enjoy that delightful crunch!
Melty Grilled Cheese Burrito for Ultimate Comfort Food Bliss
Ingredients
Equipment
Method
- In a large skillet, heat over medium heat and add the ground beef. Cook for about 8–10 minutes, stirring occasionally until browned. Drain excess grease, then sprinkle in taco seasoning with an equal amount of water. Let it simmer for 5 minutes, stirring occasionally, until well combined and fragrant.
- While the beef is simmering, warm your large flour tortillas in a dry skillet over low heat for about 30 seconds on each side, or microwave for about 10-15 seconds until flexible.
- Lay one warmed tortilla flat, add a scoop of cooked white rice, then the seasoned beef, a generous drizzle of nacho cheese sauce, a dollop of sour cream, and a swirl of chipotle sauce. Sprinkle a mix of shredded cheddar and mozzarella cheeses on top.
- Heat a clean skillet over medium heat and add a little butter or oil. Sprinkle some shredded cheese directly into the skillet and place the burrito seam-side down onto the cheese. Grill for about 3-4 minutes until the bottom is golden and the cheese is melted.
- Carefully flip the burrito using a spatula, adding more cheese to the skillet if desired. Cook the other side for an additional 3-4 minutes until it turns golden brown and crispy.
- Once both sides are grilled to perfection, remove the burrito from the skillet and cut it in half for presentation. Serve immediately with salsa, guacamole, or sour cream.
Leave a Reply