
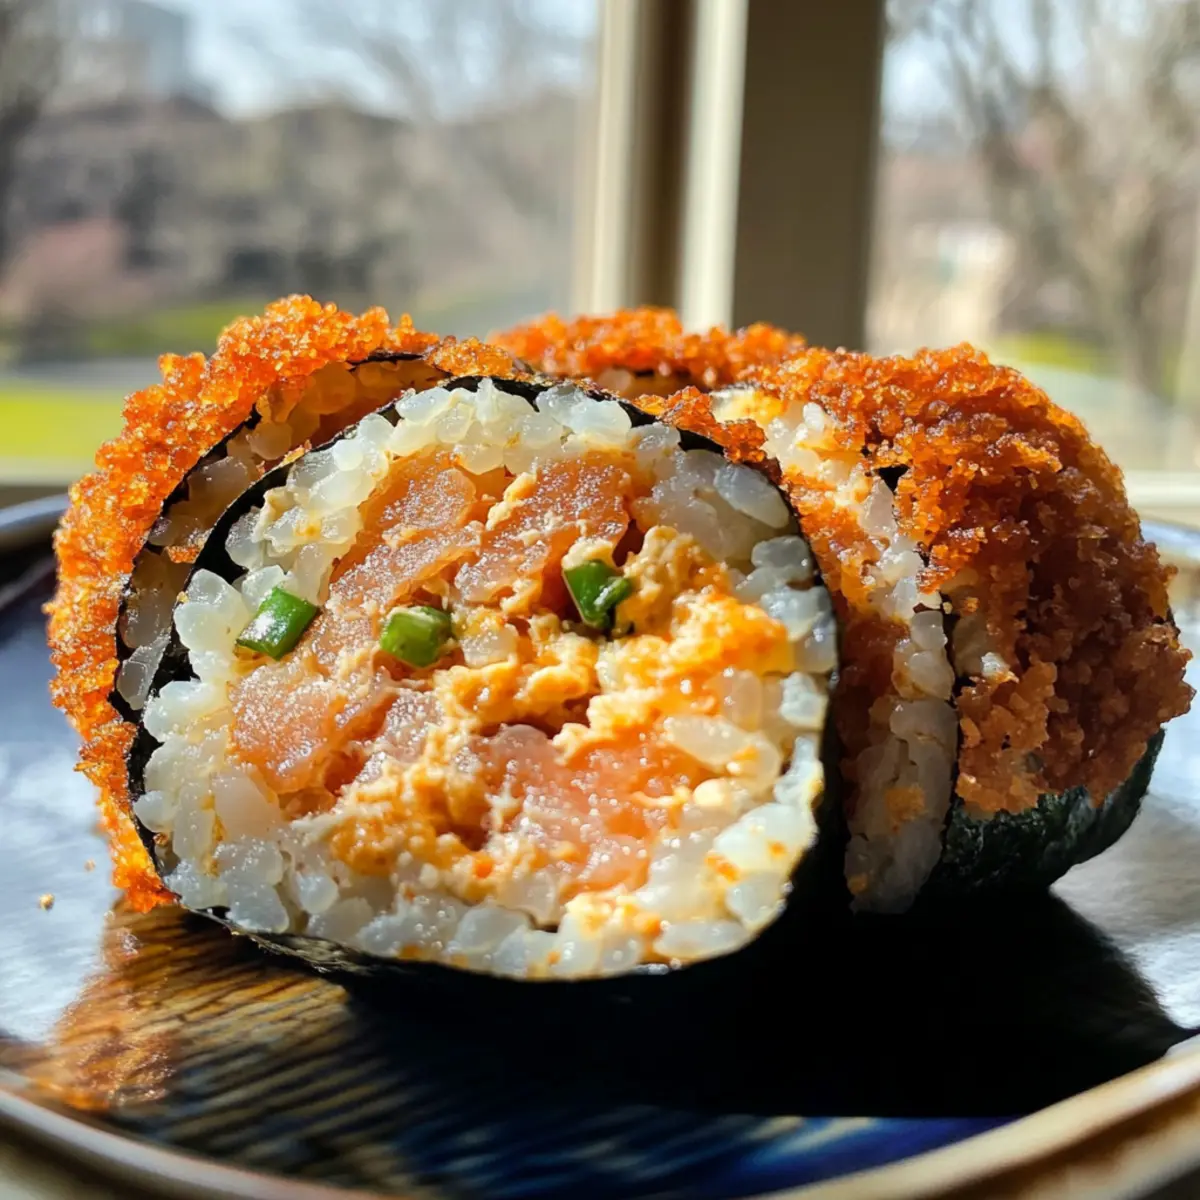
As I flipped through my favorite Japanese cookbooks, I stumbled upon a recipe that sparked a culinary adventure: Spicy Tuna Yaki Onigiri. These crispy grilled rice balls filled with creamy, zingy tuna quickly became a go-to in my kitchen. The satisfying contrast of the golden crunch on the outside and the soft, flavorful rice inside makes each bite a mini celebration—perfect for those busy days when a quick and delicious snack is a must. Not only is this recipe a breeze to whip up, but it’s also a surefire crowd-pleaser that will keep you from reaching for fast food ever again. Are you ready to dive into this delightful twist on a classic Japanese treat?
Why Choose Spicy Tuna Yaki Onigiri?
Quick and Easy: This recipe utilizes simple ingredients and straightforward methods, making it a breeze to prepare after a long day.
Flavors That Pop: The blend of spicy tuna, Kewpie mayo, and umami-packed furikake delivers a lively taste in every bite.
Versatile Filling Options: Customize your Yaki Onigiri with fillings like salmon or veggies for delightful variations that suit any palate.
Perfect for Meal Prep: These rice balls can be made ahead of time, stored in the fridge, and enjoyed as a ready-to-eat snack or lunch, ideal for those busy days.
Crowd-Pleasing Snack: Serve these crispy bites at gatherings or as a fun alternative to regular finger foods and watch them disappear!
Consider pairing them with a warm bowl of miso soup for a complete meal, and if you’re in the mood for more Japanese flair, check out my other recipes like Yaki Udon Noodle and Teriyaki Ground Beef.
Yaki Onigiri Ingredients
• Everything you need for crispy perfection.
For the Tuna Filling
- Canned Tuna (5 oz) – Provides protein and flavor; feel free to use your favorite brand.
- Kewpie Mayonnaise (¼ cup) – Adds creaminess and tang; opt for Kewpie for an authentic taste.
- Sriracha (2 tbsp) – Provides spiciness and depth; adjust to suit your heat preference.
For the Rice Balls
- Cooked Sushi Rice (2 cups) – Serves as the base; using Japanese short-grain rice ensures a perfect stickiness.
- Rice Vinegar (1 tbsp) – Enhances flavor and helps shape the rice; optional, but enhances the taste.
- Furikake (2 tbsp) – A Japanese rice seasoning mix that adds umami flavor; any variety will do.
For Grilling
- Cooking Oil – Helps achieve that lovely crispy exterior; choose a neutral oil like vegetable or canola.
- Light Soy Sauce (2 tbsp) – Adds a savory glaze and enhances flavor; can be substituted with tamari for a gluten-free option.
For Serving
- Nori Seaweed Strips (6 pieces) – Adds flavor and texture; wrap around the onigiri for finishing touches.
Step‑by‑Step Instructions for Spicy Tuna Yaki Onigiri
Step 1: Prepare Tuna Filling
Begin by draining a 5 oz can of tuna thoroughly. In a bowl, combine the drained tuna with ¼ cup of Kewpie mayonnaise and 2 tablespoons of Sriracha. Mix well until the ingredients are fully integrated and creamy. This spicy tuna filling is the heart of your Yaki Onigiri, so ensure it’s evenly blended for maximum flavor.
Step 2: Prepare Rice
In a separate bowl, take 2 cups of cooked sushi rice and add 1 tablespoon of rice vinegar along with 2 tablespoons of furikake. Gently fold the rice mixture until the seasoning is evenly distributed and the rice becomes slightly sticky. This seasoned rice will serve as the essential base of your Spicy Tuna Yaki Onigiri, ready to encapsulate that delightful filling.
Step 3: Mold Onigiri
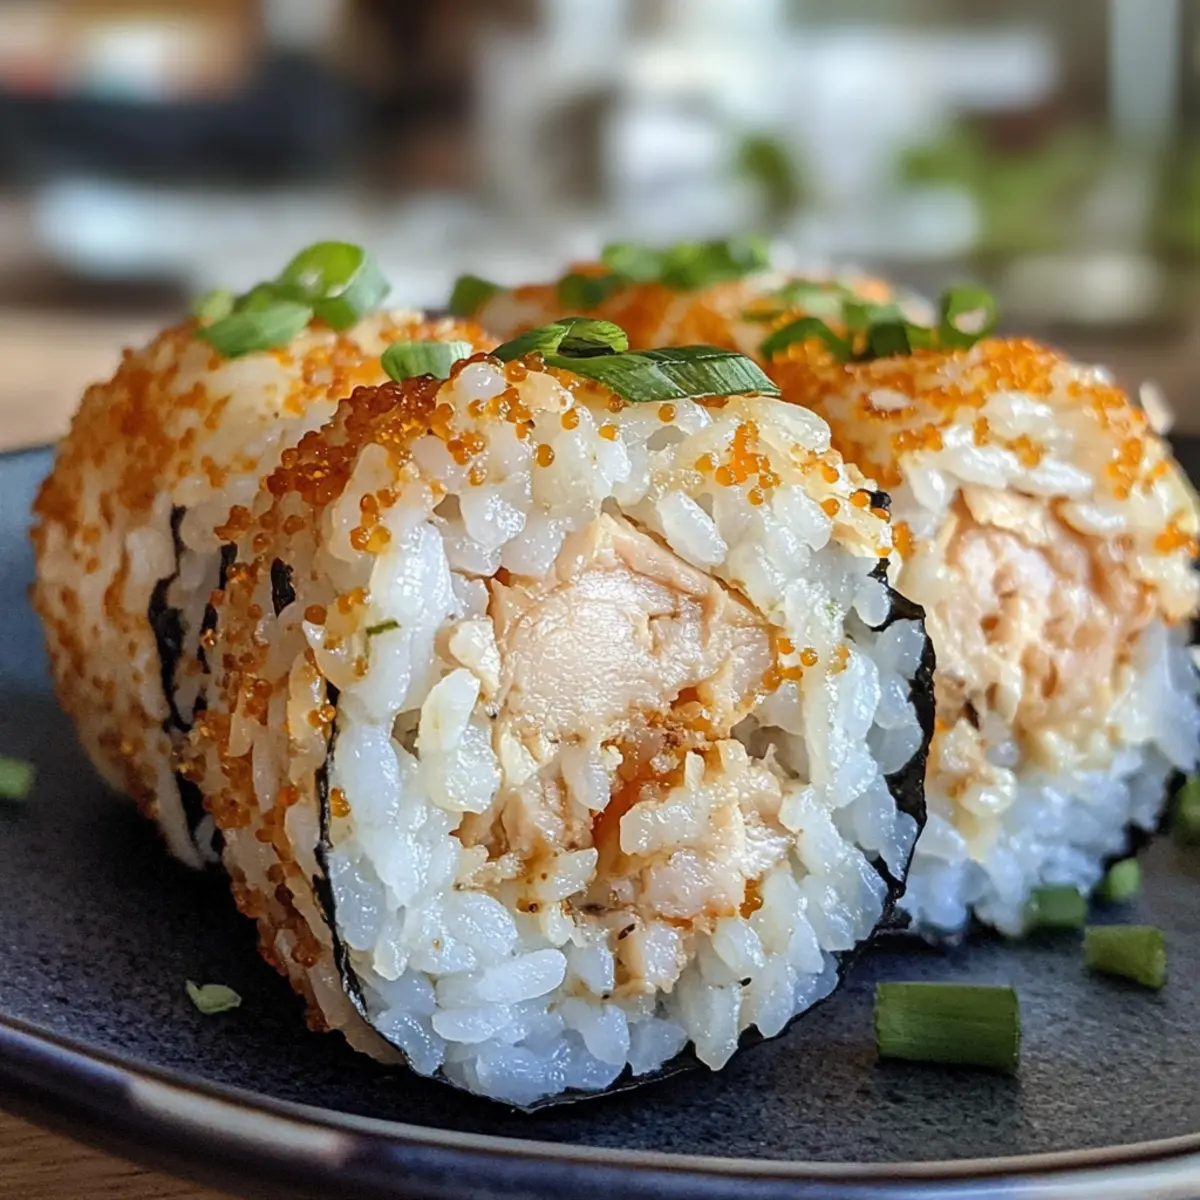
Using an onigiri mold or your hands, fill half the mold with the seasoned rice. Create a small indention in the center and generously add a spoonful of the spicy tuna filling. Cover the filling with more rice, press down firmly to shape into a triangle, ensuring it sticks together well. Carefully remove the onigiri from the mold, or shape it by hand, making sure they’re compact and ready for grilling.
Step 4: Grill Onigiri
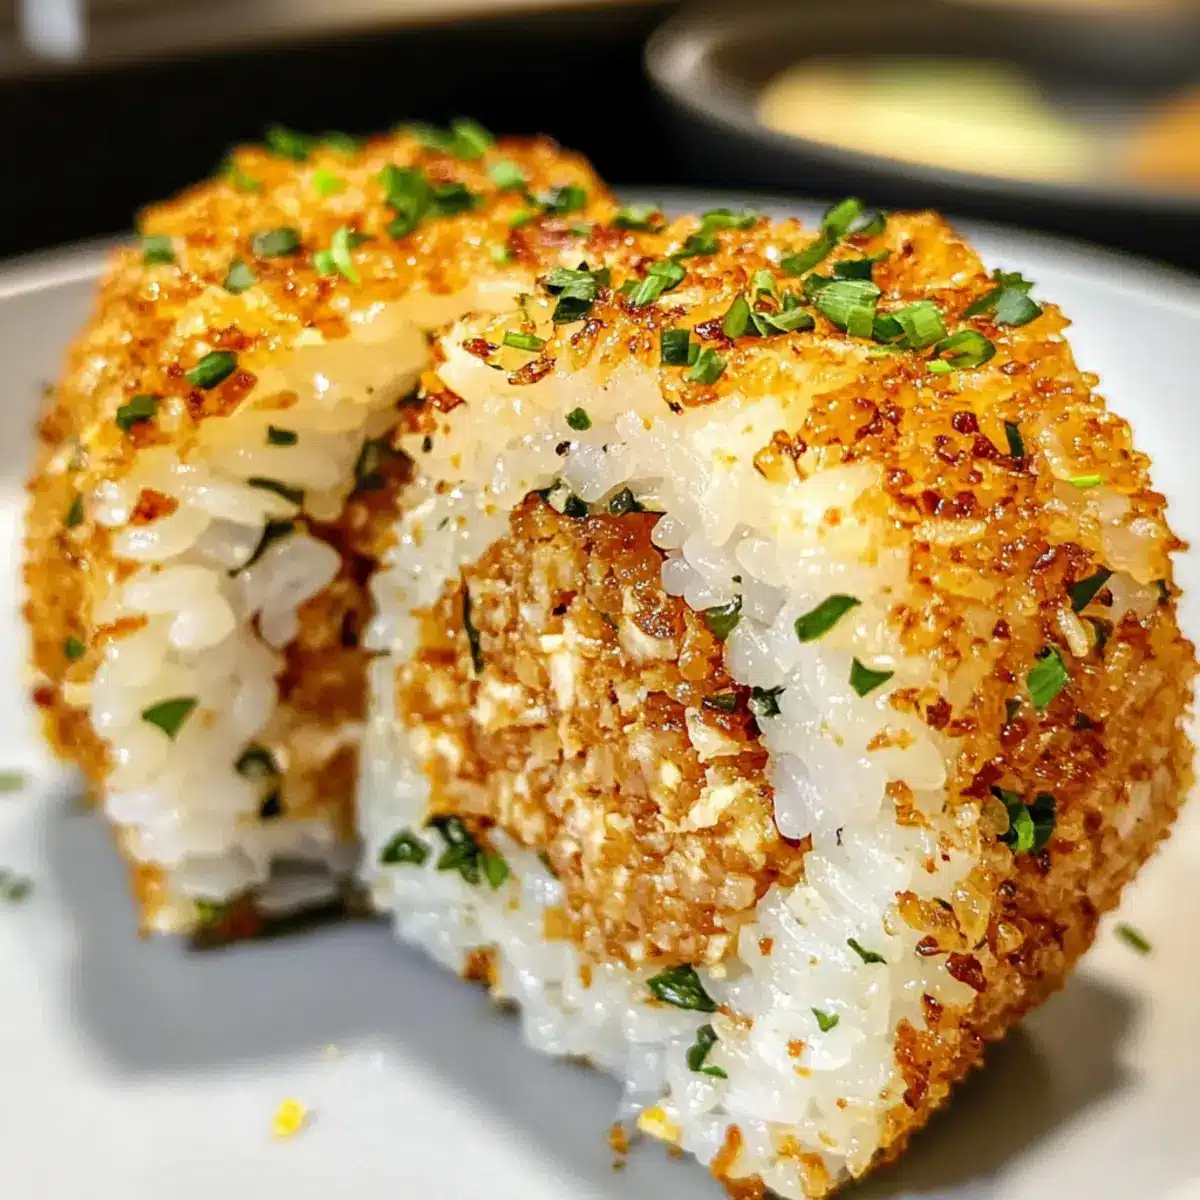
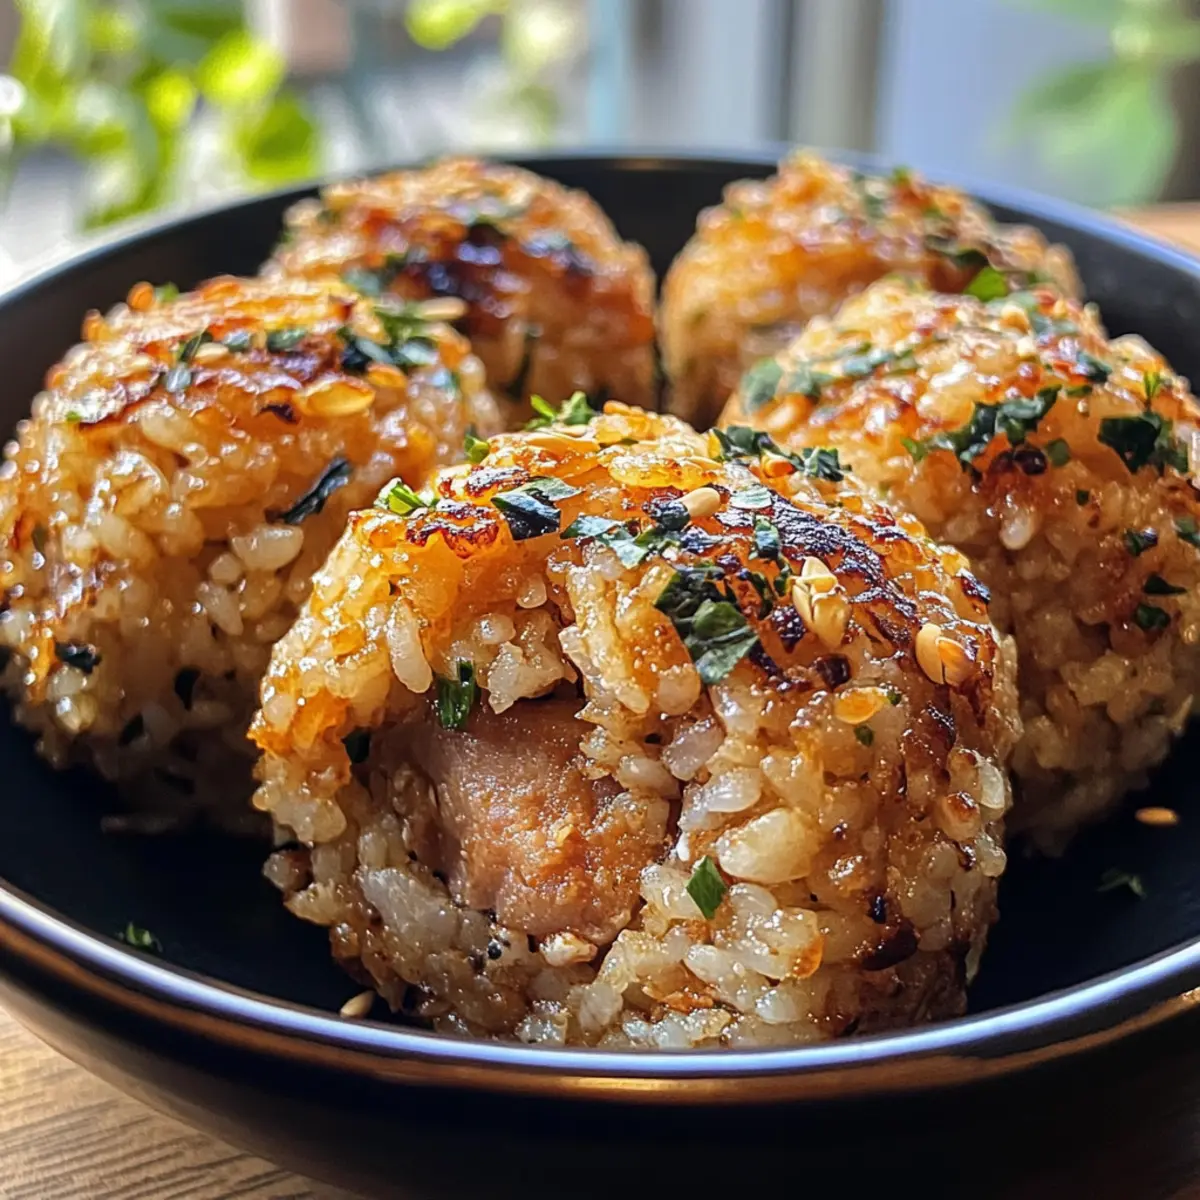
Heat a nonstick skillet over medium heat and add a small amount of cooking oil. Once the skillet is hot, place each molded Yaki Onigiri in the pan. Grill for about 3-4 minutes on each side, brushing lightly with 2 tablespoons of light soy sauce to create a savory glaze. The goal is to achieve a crispy, golden-brown exterior while keeping the insides soft and flavorful.
Step 5: Serve
Once all sides are beautifully grilled, remove the crispy Yaki Onigiri from the skillet. Wrap each one with a strip of nori for added flavor and texture. Serve your Spicy Tuna Yaki Onigiri immediately for the best taste and crunch. You can also accompany them with a dipping sauce or a side of miso soup for a complete meal experience.
Expert Tips for Spicy Tuna Yaki Onigiri
-
Sticky Rice: Ensure your sushi rice is adequately sticky to hold its shape. If it’s too dry, a splash of rice vinegar can help.
-
Even Grilling: Keep an eye on the onigiri as they grill. It’s crucial to turn them gently to avoid burning and to achieve an evenly crispy exterior.
-
Customizing Spice: Adjust the amount of Sriracha in the filling according to your heat tolerance. Start with less, and add more to suit your taste.
-
Freshness is Key: For the best flavor and texture, serve the Yaki Onigiri fresh from the skillet. Reheating may sacrifice that delightful crispiness.
-
Wrapping Tips: When wrapping with nori, do it just before serving to prevent it from becoming soggy. This keeps each bite nicely crisp.
-
Storage Secrets: If you have leftovers, store them in an airtight container in the fridge. A quick reheat in an air fryer can restore some of that crispy goodness!
Make Ahead Options
These Spicy Tuna Yaki Onigiri are perfect for meal prep and can save you time during those busy days! You can prepare the spicy tuna filling and mold the rice balls up to 24 hours in advance. Store the molded onigiri in an airtight container in the refrigerator to maintain freshness and prevent drying. When you’re ready to enjoy, simply grill the onigiri for about 3-4 minutes on each side in a nonstick skillet until crispy and golden. This process makes for a quick snack or lunch, ensuring your Yaki Onigiri remain just as delicious when served fresh with minimal effort.
Yaki Onigiri Variations & Substitutions
Feel free to personalize your Yaki Onigiri adventure with these tasty twists and swaps, perfect for any palate!
- Seafood Swap: Substitute the tuna with cooked salmon or crab for a delightful seafood twist that complements the crispy rice.
- Vegetarian Delight: Use tofu or a mix of sautéed mushrooms for a satisfying vegetarian filling that doesn’t skimp on flavor.
- Extra Crunch: Add chopped nuts or seeds to the rice for an unexpected texture boost; it will add a nutty flavor that elevates each bite!
- Dairy-Free Option: Swap Kewpie mayo with a plant-based alternative for a creamy consistency without dairy; it’s just as delicious!
- Spicy Adventure: Amp up the heat by incorporating diced jalapeños into the tuna mix if you’re craving a fiery kick.
- Herb Infusion: Mix in fresh herbs like cilantro or green onions to brighten the filling and bring a fresh twist to the traditional flavor.
- Umami Boost: Consider adding a splash of sesame oil to the rice mixture for an added depth of flavor that enhances the overall taste profile.
- Sweet and Savory: Balance the spice with a touch of honey or sugar in the filling; it’ll take your taste buds on a delightful journey!
These variations can elevate your Yaki Onigiri experience and keep it exciting! Once you’ve mastered the basics, consider pairing them with a warm bowl of miso soup or enjoy with my recipes for Yaki Udon Noodle and Teriyaki Ground Beef for a complete meal!
What to Serve with Spicy Tuna Yaki Onigiri?
Elevate your meal experience by adding a few delightful sides that complement the bold flavors of Japanese rice balls.
-
Miso Soup: A warm bowl of miso soup adds comforting depth and umami, balancing out the spiciness of the onigiri perfectly.
-
Edamame: These lightly salted, steamed soybeans offer a fresh, crisp texture that contrasts beautifully with the creamy tuna filling.
-
Cucumber Salad: A light cucumber salad with rice vinegar and sesame dressing provides a refreshing crunch, cutting through the richness of the onigiri.
-
Tamagoyaki: Sweet, fluffy Japanese omelette slices add a delightful contrast in flavor and texture, making for an exciting plate.
-
Seaweed Salad: The briny flavors and chewy texture of seaweed salad bring a delightful addition that enhances the overall Japanese dining experience.
-
Green Tea: Pair your meal with a cup of warm green tea to cleanse the palate and complement the savory bites of Yaki Onigiri.
-
Shortbread Cookies: For dessert, consider Japanese-style shortbread cookies. Their buttery sweetness rounds off the meal nicely without overpowering the tastes.
How to Store and Freeze Yaki Onigiri
Fridge: Keep leftover Yaki Onigiri in an airtight container for up to 3 days. This will help maintain their flavor and texture for your next snack.
Freezer: If you want to save them for later, freeze the grilled Yaki Onigiri in a single layer on a baking sheet until solid, then transfer to a freezer bag. They can be frozen for up to a month.
Reheating: For best results, reheat from frozen in an air fryer at 350°F (175°C) for 3-5 minutes to restore crispiness. Alternatively, reheat in a skillet over medium heat until warmed through.
Wrap Tips: Avoid wrapping Yaki Onigiri in nori until ready to serve, as this will keep the seaweed crisp and prevent it from becoming soggy during storage.
Spicy Tuna Yaki Onigiri Recipe FAQs
What type of rice should I use for Yaki Onigiri?
For the best results, use Japanese short-grain sushi rice, as it has the perfect amount of stickiness, helping the rice balls to hold their shape. If that’s unavailable, go for a medium-grain rice, but avoid long-grain varieties, as they won’t bond together nicely.
How do I store leftover Yaki Onigiri?
Store any leftover Yaki Onigiri in an airtight container in the refrigerator for up to 3 days. This helps maintain their flavor and texture. When you’re ready to enjoy them again, I recommend reheating them gently in a skillet or air fryer to restore their crispy exterior.
Can I freeze Yaki Onigiri?
Absolutely! To freeze your grilled Yaki Onigiri, place them in a single layer on a baking sheet until fully frozen. After that, transfer them to a freezer-safe bag. They can be frozen for up to 3 months. When you’re ready to eat, simply reheat from frozen, preferably in an air fryer at 350°F (175°C) for 3-5 minutes for that crispy texture.
How can I prevent Yaki Onigiri from becoming soggy?
To keep your Yaki Onigiri crisp, avoid wrapping them in nori until just before serving. If you have leftovers, store them without the nori and wrap them at the time of serving. Additionally, make sure to cool the onigiri completely before placing them in an airtight container.
What can I use instead of Kewpie mayonnaise?
If you don’t have Kewpie mayo on hand, you can substitute it with regular mayonnaise. However, since Kewpie has a unique flavor profile that enhances the recipe, I recommend adjusting the seasoning slightly with a dash of vinegar or sugar to mimic its taste.
Can I make Yaki Onigiri vegetarian-friendly?
Definitely! You can replace the spicy tuna filling with ingredients like sautéed mushrooms, pickled vegetables, or even mashed avocado for a vegetarian option. For protein, try incorporating tofu or tempeh mixed with the same seasonings for extra flavor.
Crispy Yaki Onigiri: Your New Favorite Snack Adventure
Ingredients
Equipment
Method
- Prepare Tuna Filling: Drain a can of tuna and mix with Kewpie mayonnaise and Sriracha until creamy.
- Prepare Rice: Mix cooked sushi rice with rice vinegar and furikake until evenly seasoned.
- Mold Onigiri: Fill onigiri mold with rice, add tuna filling, cover with rice, and shape into triangles.
- Grill Onigiri: Heat a skillet with oil and grill onigiri for 3-4 minutes per side, brushing with soy sauce.
- Serve: Remove from skillet, wrap with nori, and enjoy immediately for the best taste and crunch.
Leave a Reply