
As I flipped through my treasured old cookbook, a wave of nostalgia hit me—the aroma of melting chocolate and sweet ricotta filled the air, making me yearn for a delightful treat from my childhood. That’s when I decided to whip up these Easy Classic Cannoli Squares, a dish that effortlessly captures the heart of Italian dessert culture. Perfect for gatherings, these squares boast minimal prep time while delivering maximum flavor, making them an ideal choice when you want to wow your guests. Plus, they’re versatile enough to adapt to various dietary preferences, from a gluten-free crust to a dairy-free filling. Curious about how to bring a slice of Italy to your kitchen? Join me as we create these creamy squares that will surely become a family favorite!
Why are Classic Cannoli Squares so special?
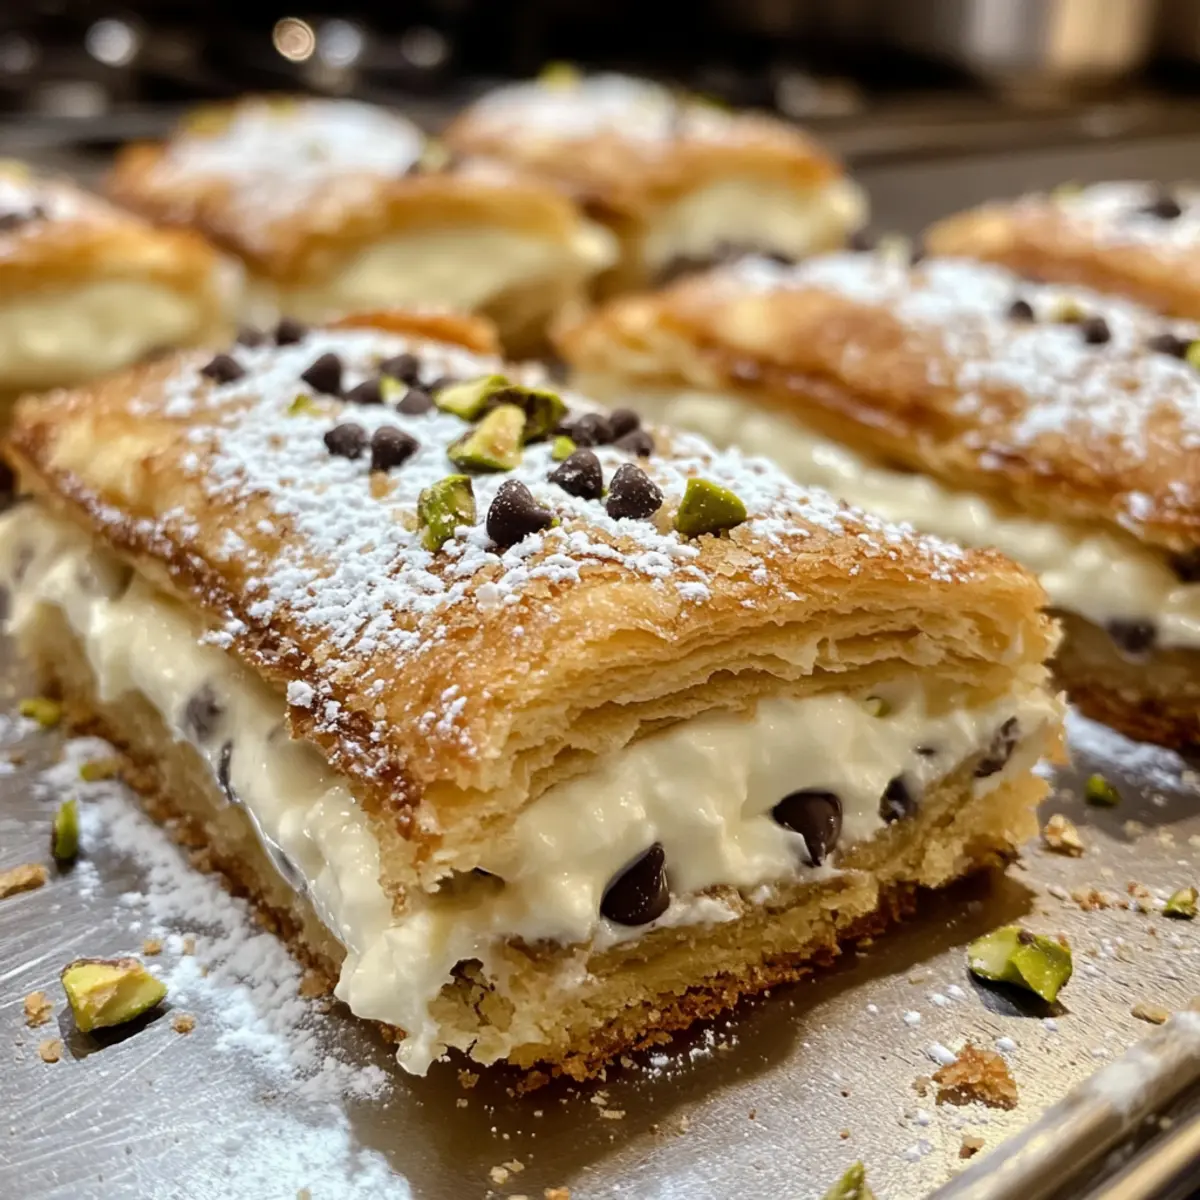
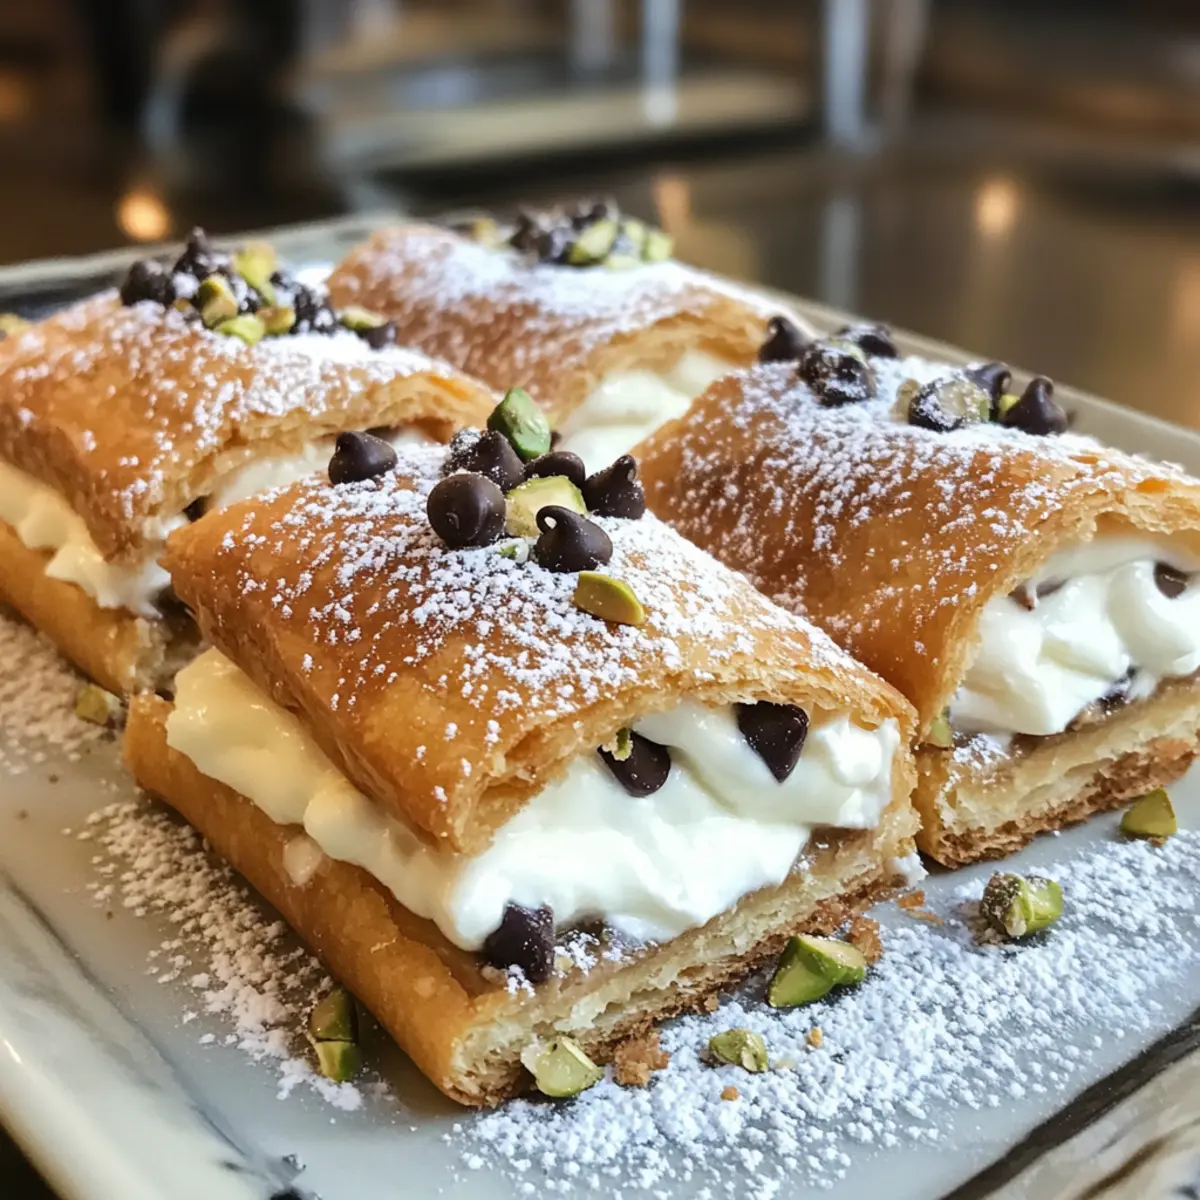
Irresistible Flavor: These squares combine a creamy ricotta filling with a crispy crust for an authentic Italian treat, bringing delightful nostalgia with every bite.
Easy Preparation: With just a few simple steps and minimal cooking skills required, you can create a showstopper dessert in no time.
Versatile Options: Customize your squares to suit dietary needs, whether you prefer a dairy-free, gluten-free, or zesty twist.
Make-Ahead Magic: They can be prepared ahead of time, making them the perfect dessert for gatherings or busy weeknights.
Crowd-Pleaser: Everyone loves a sweet treat! These Classic Cannoli Squares are bound to please any audience, making you the star of your next dinner party. If you’re looking for more delicious ideas, check out my Bbq Chicken Fried recipe for another crowd-pleasing option!
Classic Cannoli Squares Ingredients
• You’re just steps away from creating these delightful treats!
For the Filling
- Ricotta Cheese – Creamy base for the filling; using whole milk ricotta enhances the richness.
- Powdered Sugar – Provides sweetness and smooth texture; you can swap it for coconut sugar for a healthier twist.
- Vanilla Extract – Elevates flavor; choose pure vanilla for the best taste.
- Cinnamon – Adds warmth and depth; feel free to omit for a more classic cannoli flavor.
- Mini Chocolate Chips – Introduces a touch of chocolatiness; dark chocolate can elevate the richness.
For the Crust
- Pre-made Pie Crusts – Forms the base and top layer; homemade crust will also work beautifully.
- Large Egg – Used for egg wash to create a glossy finish on top.
- Sugar (for sprinkling) – Sprinkled on top for an extra sweet crunch.
Optional Garnishes
- Chopped Pistachios – Adds delightful crunch and vibrant color.
- Maraschino Cherries – Serves as a decorative touch with a hint of sweetness.
- Extra Chocolate Chips – Perfect for chocolate enthusiasts and as decoration.
This Classic Cannoli Squares recipe is not just a treat; it’s an experience that unites taste and tradition!
Step‑by‑Step Instructions for Classic Cannoli Squares
Step 1: Prepare the Filling
In a mixing bowl, combine smooth ricotta cheese, powdered sugar, vanilla extract, and cinnamon, stirring until well blended and creamy. Fold in mini chocolate chips for added sweetness. Set the filling aside so the flavors can meld together while you prepare the crusts.
Step 2: Preheat Oven
Preheat your oven to 375°F (190°C) to ensure it reaches the ideal temperature for baking. This step is crucial for achieving a golden-brown crust that perfectly contrasts the creamy filling of your Classic Cannoli Squares.
Step 3: Roll Out the Pie Crust
Carefully fit one pre-made pie crust into a 9×9-inch baking dish, pressing it into the corners and ensuring it covers the bottom evenly. This will create a sturdy base for the filling, ready to hold all the delicious flavors.
Step 4: Add Filling
Spread your prepared ricotta filling evenly over the bottom crust, making sure to leave some space along the edges to seal the top layer later. The filling should look lush and inviting, hinting at the delightful taste of these Classic Cannoli Squares.
Step 5: Top Crust
Place the second pie crust over the filling, gently pressing around the edges to seal it tight. Use a fork to crimp the edges, creating a decorative finish while brushing the top with a beaten egg and sprinkling sugar for a sweet crunch.
Step 6: Bake
Slide the prepared dish into the oven and bake for 30-35 minutes, watching closely for a golden-brown crust and bubbling filling. The luscious aroma will fill your kitchen, signaling that these Classic Cannoli Squares are almost ready.
Step 7: Cool and Serve
Once baked, remove the dish from the oven and let it cool for at least 30 minutes on a wire rack. Allowing it to cool will help the squares set, making it easier to cut into servings without losing that creamy filling.
Make Ahead Options
These Easy Classic Cannoli Squares are perfect for busy cooks looking to save time! You can prepare the filling and store it in an airtight container in the refrigerator for up to 3 days. Be sure to drain any excess moisture from the ricotta beforehand to maintain the richness of the filling. Additionally, you can assemble the entire dessert (including the crusts) and refrigerate it for up to 24 hours before baking. This not only enhances the flavors but also allows for a quick baking session when you’re ready to serve. When you’re set to bake, just pop it in the oven, and enjoy restaurant-quality results with minimal effort!
Expert Tips for Classic Cannoli Squares
- Quality Ingredients: Use whole milk ricotta and pure vanilla for the best flavor. The right ingredients make a significant difference in your Classic Cannoli Squares.
- Drain Ricotta: To achieve a thicker filling, drain excess moisture from ricotta by placing it in a fine-mesh sieve before mixing it with other ingredients.
- Watch the Bake: Ovens vary greatly in temperature, so monitor your baking closely to avoid over-browning and ensure a perfect golden crust.
- Cool Before Slicing: Allow the squares to cool for at least 30 minutes before cutting to prevent the filling from spilling out.
- Customize Wisely: When adapting the recipe for dietary needs, ensure substitutions complement the flavors; dairy-free options like silken tofu and gluten-free crusts work beautifully!
How to Store and Freeze Classic Cannoli Squares
Fridge: Store leftover Classic Cannoli Squares in an airtight container in the fridge for up to 3 days. This helps maintain the creamy texture and flavor.
Freezer: If you want to keep them longer, freeze the squares for up to 2 months. Wrap them tightly in plastic wrap and place them in a freezer-safe container to prevent freezer burn.
Reheating: To enjoy frozen squares, thaw them in the fridge overnight. Reheat gently in the oven at 350°F (175°C) for about 10-15 minutes to revive their fresh-baked taste.
Make-Ahead Magic: These squares can be prepared the day before an event, saving you time and stress while ensuring a delightful dessert awaits your guests!
Classic Cannoli Squares Variations
Feel free to infuse your Classic Cannoli Squares with unique twists that suit your taste and dietary needs.
-
Dairy-Free: Substitute ricotta with blended silken tofu for a delicious plant-based option. It’s creamy and still captures the essence of the classic filling.
-
Gluten-Free: Use gluten-free pie crusts available on the market to enjoy the same great taste without the gluten. Perfect for accommodating dietary preferences!
-
Extra Zesty: Add lemon zest to the filling for a refreshing citrus kick. The bright flavor makes each bite even more delightful!
-
Flavor Boost: Incorporate almond extract instead of vanilla for a nutty depth. This simple swap elevates the overall flavor profile beautifully.
-
Nutty Crunch: Fold in chopped pistachios or almonds into the ricotta filling for a delightful crunch. They add texture and a wonderful nutty aroma.
-
Spicy Sweet: For a surprising twist, sprinkle a pinch of cayenne pepper into the filling. The warmth contrasts perfectly with the richness of the creaminess.
-
Layered Delight: Garnish with fresh fruits such as strawberries or raspberries for added flavor and color. They’ll bring a lightness that complements the sweetness wonderfully.
Not to mention, if you’re intrigued by more delicious ideas, my Bbq Chicken Fried recipe is another easy, crowd-pleasing dish worthy of your time!
- Chocolate Lovers’ Dream: Use dark chocolate chips or even a chocolate ganache drizzle for a rich chocolate experience. When it comes to indulgence, why not go all out?
What to Serve with Classic Cannoli Squares
Indulge in a mealtime experience that complements your dessert with perfect harmony.
- Creamy Gelato: This rich and velvety treat pairs beautifully, offering a cool contrast to the warm cannoli squares.
- Fresh Berries: Add a burst of freshness with strawberries or raspberries; their tartness balances the sweetness.
- Espresso: A strong Italian coffee enhances the experience, cutting through the creaminess and elevating flavors.
- Whipped Cream: A dollop of light, airy whipped cream adds a luscious touch, making each bite even more divine.
- Chocolate Sauce Drizzle: A drizzle of melted chocolate can enhance the dessert’s richness and add a touch of elegance.
- Toasted Nuts: Sprinkle chopped pistachios or almonds on top for added crunch and visual appeal, giving delightful texture.
- Mint Leaves: Fresh mint brings a refreshing note that brightens the dish and adds a lovely pop of color.
- Maraschino Cherries: Place them on top for a nostalgic twist, reminiscent of classic desserts that evoke childhood memories.

Classic Cannoli Squares Recipe FAQs
How do I choose ripe ingredients for Classic Cannoli Squares?
Absolutely! When selecting ricotta cheese, aim for fresh, whole milk ricotta for the creamiest filling. Check for any dark spots or a sour smell, which can indicate it’s past its prime. If using mini chocolate chips, opt for high-quality chocolate to enhance the overall flavor of your dessert.
What is the best way to store leftover Classic Cannoli Squares?
Very! Store your leftover Classic Cannoli Squares in an airtight container in the fridge for up to 3 days. This keeps the filling creamy and the crust from becoming soggy. Make sure they’re completely cooled before sealing the container to avoid condensation.
Can I freeze Classic Cannoli Squares? If so, how?
Absolutely! To freeze your Classic Cannoli Squares, wrap them tightly in plastic wrap after they have completely cooled. Place the wrapped squares in a freezer-safe container or a resealable freezer bag, ensuring to remove as much air as possible. They can be stored in the freezer for up to 2 months.
What should I do if my filling is too runny?
Oh no! If you find that your ricotta filling is too runny, you can drain excess moisture by placing the ricotta in a fine-mesh sieve lined with cheesecloth and letting it sit for about 30 minutes. This will help achieve a thicker consistency. Another option is to add a tablespoon of powdered sugar, mixed in, to help absorb any extra moisture.
Are there any dietary considerations for Classic Cannoli Squares?
Yes! For those with dietary restrictions, you can easily adapt this recipe. For a dairy-free version, replace the ricotta cheese with blended silken tofu. If gluten is a concern, simply use gluten-free pie crusts available in stores. Just ensure that all alternatives match the flavors you desire to maintain the delightful cannoli essence!
How long do Classic Cannoli Squares last at room temperature?
It’s recommended to keep Classic Cannoli Squares at room temperature for no longer than 2 hours, especially if the weather is warm. After that, it’s best to refrigerate them to ensure food safety and to help maintain their joyous, creamy texture.

Classic Cannoli Squares - An Easy Italian Treasure
Ingredients
Equipment
Method
- In a mixing bowl, combine smooth ricotta cheese, powdered sugar, vanilla extract, and cinnamon until creamy. Fold in mini chocolate chips.
- Preheat your oven to 375°F (190°C).
- Fit one pre-made pie crust into a 9x9-inch baking dish.
- Spread the ricotta filling evenly over the bottom crust.
- Place the second pie crust over the filling and seal the edges.
- Bake for 30-35 minutes, watching for a golden-brown crust.
- Let the dish cool for at least 30 minutes before slicing.
Leave a Reply