
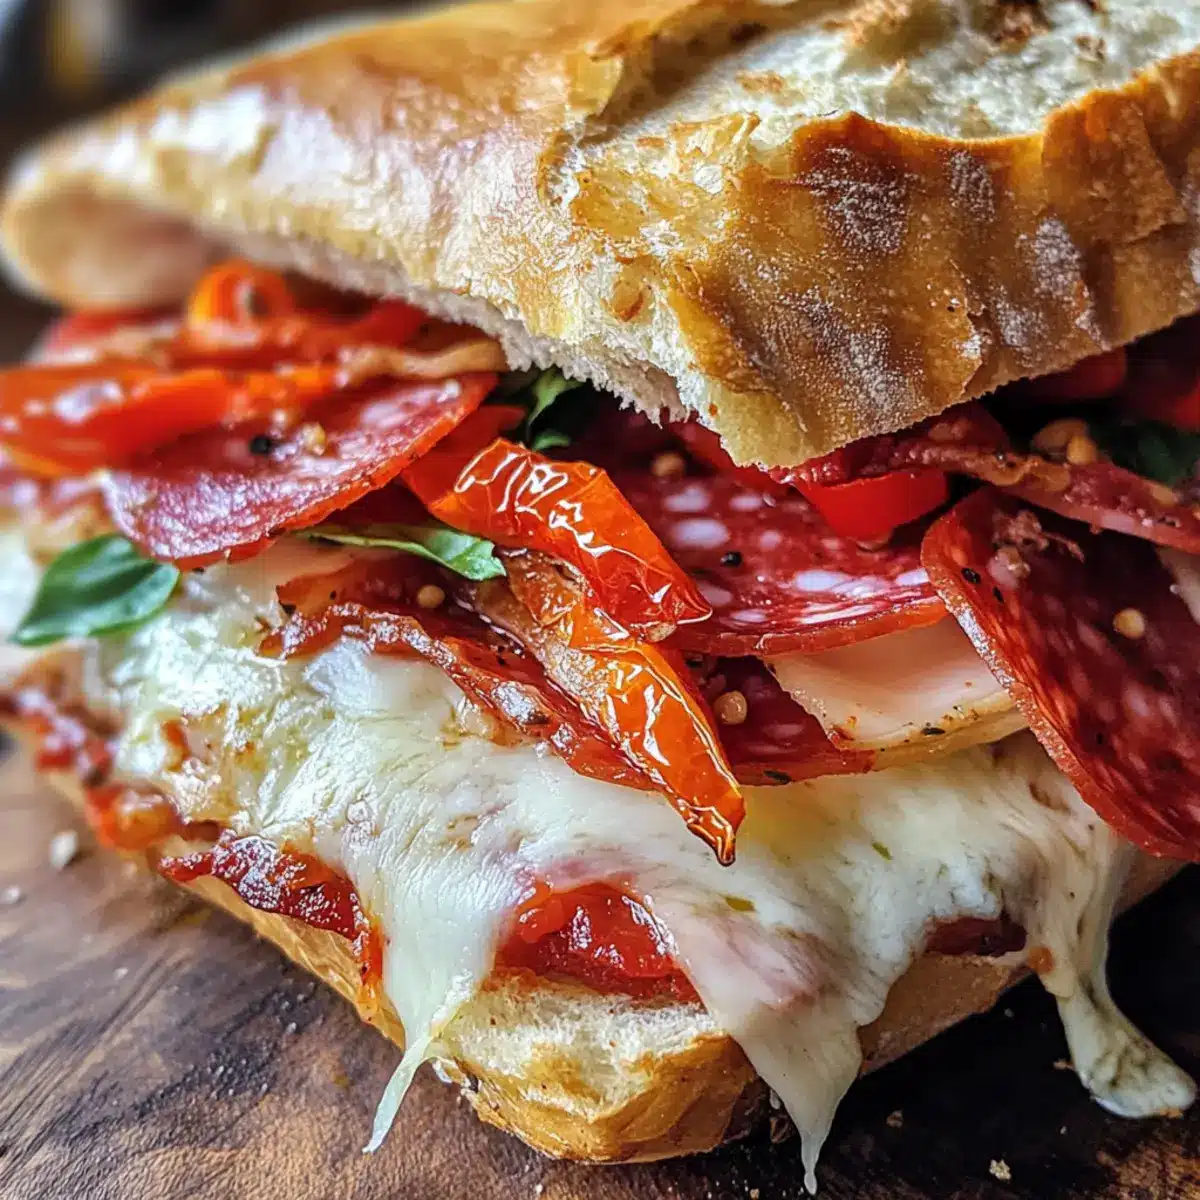
The enticing scent of garlic and melted cheese wafting through the kitchen is a surefire way to get anyone’s mouth watering. Today, I’m thrilled to share my recipe for baked Italian grinder sandwiches that will bring a taste of Italy right to your home. These easy Italian grinder sandwiches feature layers of savory deli meats, rich provolone cheese, and zesty roasted red peppers, all hugged by a perfectly crispy roll. Whether you’re wrapping them up for a weekend lunch, serving them at game day gatherings, or just craving some hearty comfort food, these sandwiches are sure to delight. Plus, they’re incredibly simple to whip up, making them perfect for busy evenings or a festive get-together. Are you ready to dig into a warm, gooey bite that’s bursting with flavor? Let’s get started!

Why Are These Sandwiches a Must-Try?
Irresistible aroma: The moment you start baking, the delightful scent of garlic and melted cheese fills your kitchen, setting the stage for a cozy meal.
Layers of flavor: Each bite combines savory deli meats with rich cheeses and vibrant roasted red peppers, creating a mouthwatering experience.
Quick and easy: Perfect for any night of the week, these baked Italian grinder sandwiches require minimal prep without compromising on taste.
Endless customization: Feel free to swap ingredients based on your preferences—try using turkey or roasted veggies for a lighter option.
Crowd pleaser: Whether for a family dinner or a game day party, these sandwiches are sure to impress your guests and leave them asking for more. For more delicious ideas, check out my Italian Penicillin Soup or Italian Sausage Potato.
Baked Italian Grinder Sandwiches Ingredients
For the Sandwich Filling
• Italian sub rolls – Perfectly pillowy, these rolls create a crispy crust once baked.
• Deli-sliced salami – Adds a robust and slightly spicy bite that’s classic in Italian grinders.
• Deli-sliced ham – Infuses a sweet and smoky essence to balance the savory meats.
• Deli-sliced pepperoni – Delivers a bold and tangy flavor, making your sandwiches truly Italian.
• Deli-sliced mozzarella cheese – Melts beautifully, adding creamy comfort to every bite.
• Deli-sliced provolone cheese – Introduces sharpness that enhances the overall cheesy goodness.
• Grated Parmesan cheese – Creates a savory, crispy topping when baked, adding texture.
• Roasted red peppers, sliced – Adds a sweet, vibrant layer that brightens the sandwich.
• Sliced black olives – Brings a briny contrast to the richness of the meats.
• Banana peppers, sliced – Offers a tangy crunch, elevating the sandwich experience.
• Fresh basil leaves – Provides a burst of freshness that ties all the flavors together.
For the Seasoning Butter
• Unsalted butter, melted – Ensures a rich, golden crunch on the sandwich crust.
• Garlic powder – Infuses the bread with a deep, savory flavor that’s hard to resist.
• Onion powder – Complements the richness of other ingredients for a well-rounded taste.
• Dried oregano – Brings the classic Italian flavor we all love to this easy dish.
• Dried basil – Adds a slightly sweet taste that pairs wonderfully with savory elements.
• Red pepper flakes – Introduces a spicy kick that balances the creaminess of the cheese.
• Salt – Essential for enhancing the overall flavor and ensuring everything pops.
• Black pepper – Contributes a subtle sharpness and a hint of warmth.
Dive into making these baked Italian grinder sandwiches, and let your kitchen be filled with mouthwatering memories!
Step‑by‑Step Instructions for Baked Italian Grinder Sandwiches
Step 1: Preheat the Oven
Begin by preheating your oven to 375°F (190°C). This ensures that by the time you assemble your baked Italian grinder sandwiches, the oven will be perfectly ready to create a golden, crispy crust. While the oven is heating, gather your ingredients and enjoy the anticipation of that mouthwatering aroma soon to fill your kitchen.
Step 2: Prepare the Rolls
Carefully slice the Italian sub rolls in half lengthwise, ensuring they remain hinged at the back. This keeps the sandwiches intact and makes for easier assembly. Place the rolls on a baking sheet, cut side up, without overcrowding them. You want each sandwich to have enough space to crisp up nicely in the oven, leading to that perfect contrast of textures.
Step 3: Make the Seasoned Butter
In a small bowl, melt the unsalted butter until it’s liquid. Then, add the garlic powder, onion powder, dried oregano, dried basil, red pepper flakes, salt, and black pepper to the melted butter. Mix these ingredients thoroughly until the seasonings are well combined, creating a rich, aromatic butter that will elevate the flavors of your baked Italian grinder sandwiches.
Step 4: Butter the Rolls
Using a brush or spoon, generously apply the seasoned butter mixture over the cut sides of the rolls. Ensure every bit of the surface is coated to achieve that delicious golden crunch. This step not only adds flavor but also helps to create a beautifully crispy exterior while baking, inviting everyone to take a bite of your savory creation.
Step 5: Layer the Deli Meats
Begin layering the deli-sliced salami on the bottom halves of the rolls. Spread it out evenly to cover the surface, ensuring every bite is filled with this robust flavor. Follow this by adding a layer of deli-sliced ham on top of the salami, creating a delightful balance of sweetness and savory goodness for your baked Italian grinder sandwiches.
Step 6: Add More Flavor
Next, evenly distribute the deli-sliced pepperoni over the ham layer. This spicy, tangy addition pairs perfectly with the other meats and enhances the Italian flavor profile. Then, pile on the deli-sliced mozzarella cheese, ensuring a generous layer that will melt beautifully, creating that gooey comfort everyone loves in a sandwich.
Step 7: Add Provolone and Parmesan
Now, add another layer of provolone cheese on top of the mozzarella, allowing the sharpness to shine through as it melts. Finally, sprinkle grated Parmesan cheese evenly across the top to create a savory, crispy layer when baked. This combination of cheeses will result in a melty, delicious filling for your baked Italian grinder sandwiches.
Step 8: Layer the Veggies
Scatter the sliced roasted red peppers over the cheese layers. Their sweetness brightens the flavor, adding color and vibrancy. Next, distribute the sliced black olives over the peppers for a briny contrast. Lastly, layer on the banana peppers, which bring a tangy crunch that ties the whole sandwich together beautifully.
Step 9: Add Fresh Basil
Finish off the assembly by topping all the layers with fresh basil leaves. This adds a burst of freshness and visually appealing green color to your baked Italian grinder sandwiches. The lively aroma of basil will blend fantastically with the other ingredients as they bake, making your kitchen feel even more inviting.
Step 10: Bake the Sandwiches
Place the baking sheet with the assembled sandwiches in the preheated oven. Bake for 10-12 minutes, or until the cheese is melted and bubbly, and the bread is crisp and golden. Keep an eye on them as they bake to ensure you achieve that perfect crispy crust without overdoing it.
Step 11: Cool and Serve
After baking, carefully remove the sandwiches from the oven and let them cool for about a minute. This brief cooling period allows the filling to set slightly, making them easier to cut. Then, slice the sandwiches into portions, revealing the deliciously melty interior, and serve them warm for an irresistible treat.
Make Ahead Options
These baked Italian grinder sandwiches are perfect for meal prep enthusiasts! You can assemble the sandwiches and wrap them tightly, refrigerating them for up to 24 hours before serving. To maintain quality, brush the cut sides of the rolls with the seasoned butter mixture and layer the ingredients as instructed, ensuring each component is evenly distributed. When you’re ready to bake, simply preheat your oven and place the sandwiches in a baking dish. Bake as directed for 10-12 minutes, and you’ll enjoy the same delicious, gooey goodness with minimal effort. Perfect for busy weeknights or entertaining friends, these sandwiches make it easy to enjoy a homemade meal!
Expert Tips for Baked Italian Grinder Sandwiches
• Even Butter Distribution: Ensure the butter mixture is evenly spread on the rolls; this is crucial for achieving that irresistible golden crust.
• Avoid Overbaking: Check sandwiches frequently to prevent overbaking, which can cause the filling to spill out when sliced.
• Use the Right Knife: Utilize a serrated knife for cutting; it helps you slice through without squishing the gooey layers of your baked Italian grinder sandwiches.
• Don’t Overcrowd the Pan: Give each sandwich enough room on the baking sheet to crisp up properly, enhancing the overall texture.
• Watch the Cheese Melt: Keep an eye on the baking for that perfect moment when the cheese is bubbly; this ensures a delightful melty interior.
What to Serve with Baked Italian Grinder Sandwiches
Elevate your dining experience by pairing your sandwiches with delightful sides that enhance their warm, savory flavors.
- Crispy French Fries: The crunchiness of golden fries complements the gooey, cheesy interior of the sandwiches, creating a satisfying texture contrast.
- Zesty Coleslaw: A side of tangy coleslaw adds a refreshing crunch that perfectly balances the richness of the grinders.
- Garlic Butter Roasted Vegetables: Roasted veggies drizzled in garlic butter harmonize with the Italian flavors, bringing a touch of freshness to the meal.
- Mediterranean Pasta Salad: This dish’s bright flavors and chewy pasta provide a light, pasta-based diversion that’s a great accompaniment to the hearty sandwiches.
- Steamed Broccoli: Simple yet vibrant, steamed broccoli offers a nutritious side that adds a pop of color and brings balance to the rich, meaty sandwiches.
- Italian Minestrone Soup: Serve alongside a warm bowl of minestrone. Its hearty broth and vegetable medley beautifully complement the sandwiches’ flavors.
- Crisp Pickles: A side of crunchy dill pickles introduces a vinegary zing that cuts through the richness, making every bite exciting.
- Red Wine: Pair with a glass of your favorite Italian red wine like Chianti. Its acidity will elevate the rich flavors of the baked Italian grinder sandwiches.
- Homemade Tiramisu: Finish the meal with a slice of creamy tiramisu. Its coffee and cocoa flavors provide a sweet note that rounds out the savory feast.
How to Store and Freeze Baked Italian Grinder Sandwiches
Fridge: Store leftovers in an airtight container in the fridge for up to 3 days. Make sure to let the sandwiches cool completely before sealing to prevent moisture buildup.
Freezer: For longer storage, wrap unbaked sandwiches tightly in plastic wrap, then foil, and freeze for up to 3 months. This makes for an easy meal on busy days!
Reheating: To reheat baked Italian grinder sandwiches, place them in a preheated oven at 375°F (190°C) for about 15-20 minutes until heated through and the cheese is bubbly.
Make-Ahead: Assemble and refrigerate uncooked sandwiches for up to 24 hours. This is perfect for quick preparation on game day or a busy weeknight meal!
Baked Italian Grinder Sandwiches Variations
Feel free to unleash your culinary creativity with these delicious twists on the traditional baked Italian grinder sandwiches!
-
Vegetarian Delight: Swap deli meats for an assortment of roasted vegetables like zucchini, eggplant, and bell peppers for a fresh, vibrant option. This variation still maintains the comforting flavors while catering to plant lovers.
-
Spicy Addition: For those who crave heat, add sliced jalapeños or switch out the banana peppers for spicy pepperoncini. These peppers will give your sandwiches a fiery kick, elevating your experience even further!
-
Cheese Lovers: Experiment with different cheeses! Swap in gouda or fontina for a unique twist on melty goodness. These cheeses provide a slightly different flavor profile while delivering that desirable gooey texture.
-
Herb-Infused: Try adding fresh herbs, such as thyme or rosemary, to your seasoned butter for an aromatic boost. This simple addition will enhance the overall taste, adding an enticing herbal quality.
-
Meat Swap: Use smoked turkey or grilled chicken as light, protein-packed alternatives to traditional meats. They’ll add a whole new dimension of flavor to your sandwich while keeping it hearty.
-
Italian Classic: Layer in some fresh pesto between the meats and cheeses for a burst of herbal, garlicky goodness. This variation celebrates classic Italian flavors in an exciting way.
-
Seafood Twist: For a different route, consider using slices of grilled shrimp or crab meat. These seafood options create a delightful coastal experience, especially when paired with a splash of lemon.
-
Bread Variety: Change the game by using different types of bread, like garlicky focaccia or crusty ciabatta, while ensuring they can hold the fillings without getting soggy. The bread choice can significantly alter the texture and flavor of your sandwiches.
No matter which variation you choose, you can’t go wrong! For more culinary inspirations, be sure to check out my Cheesecake Stuffed Baked Apples for a sweet treat to pair with your savory feast!

Baked Italian Grinder Sandwiches Recipe FAQs
What type of bread should I use for the sandwiches?
I recommend using Italian sub rolls for their perfect shape and texture. They provide a soft, pillowy base that crisps beautifully when baked, enhancing the overall experience. You can also try ciabatta or French baguettes, but make sure they can hold the fillings without getting soggy.
How long do leftovers last in the fridge?
The baked Italian grinder sandwiches can be stored in an airtight container in the fridge for up to 3 days. Just be sure to let them cool completely before sealing to avoid moisture buildup, which can make the bread soggy.
Can I freeze unbaked sandwiches?
Absolutely! Wrap unbaked sandwiches tightly in plastic wrap, then in foil, and freeze for up to 3 months. This way, you can have a delicious homemade meal ready to go on busy days! When you’re ready to bake, just pop them directly from the freezer into a preheated oven at 375°F (190°C) and let them bake for 15-20 minutes until heated through.
What if my sandwiches spill out when cutting?
To prevent this, avoid overbaking! Keep an eye on your sandwiches during the last few minutes of baking. If the cheese is bubbling and the bread is golden brown, it’s time to take them out. Additionally, let the sandwiches sit for a minute before slicing to help set the filling, making it easier to cut without everything spilling out.
Can I make these sandwiches vegetarian?
Certainly! You can easily adjust the baked Italian grinder sandwiches to be vegetarian by omitting the deli meats. Instead, try adding roasted veggies like zucchini and bell peppers, or opt for hearty ingredients like marinated artichokes. The robust flavors of the cheese and spices will still shine through, providing a satisfying meal.
How do I achieve a perfectly crispy crust?
For a golden, crispy crust, it’s key to ensure the seasoned butter is evenly distributed over the cut sides of the rolls. This not only adds flavor but also contributes to the crunch. Additionally, give each sandwich enough space on the baking sheet! Overcrowding can result in uneven baking and a softer texture.

Baked Italian Grinder Sandwiches for a Cozy Night In
Ingredients
Equipment
Method
- Preheat your oven to 375°F (190°C).
- Slice the Italian sub rolls in half lengthwise and place them on a baking sheet cut side up.
- Melt the unsalted butter, then mix in garlic powder, onion powder, dried oregano, dried basil, red pepper flakes, salt, and black pepper.
- Generously apply the seasoned butter mixture over the cut sides of the rolls.
- Layer the deli-sliced salami, followed by deli-sliced ham on the bottom halves of the rolls.
- Add deli-sliced pepperoni and then pile on the deli-sliced mozzarella cheese.
- Top with provolone cheese and sprinkle grated Parmesan cheese evenly across the top.
- Scatter sliced roasted red peppers, then sliced black olives, and lastly banana peppers over the cheese layers.
- Top with fresh basil leaves.
- Bake in the preheated oven for 10-12 minutes until the cheese is melted and bubbly.
- Remove from the oven, let cool for about a minute, then slice and serve warm.
Leave a Reply