
As I stood in the kitchen, the irresistible scent of chocolate wafted through the air, sweetly luring me into a moment of indulgence. That’s when it hit me—there’s nothing quite like a homemade Oreo Poke Cake to lift the spirits! This delightful dessert showcases layers of rich, moist chocolate cake, enveloping creamy Oreo pudding and topped with a fluffy whipped topping. It’s not just a treat; it’s the ultimate crowd-pleaser that makes any gathering unforgettable or simply brightens a cozy night in. Plus, it’s remarkably simple to put together, ensuring you spend less time in the kitchen and more time enjoying life’s sweet moments. Curious about how to whip up this chocolate lover’s dream? Let’s dive in!

Why is Oreo Poke Cake a must-try?
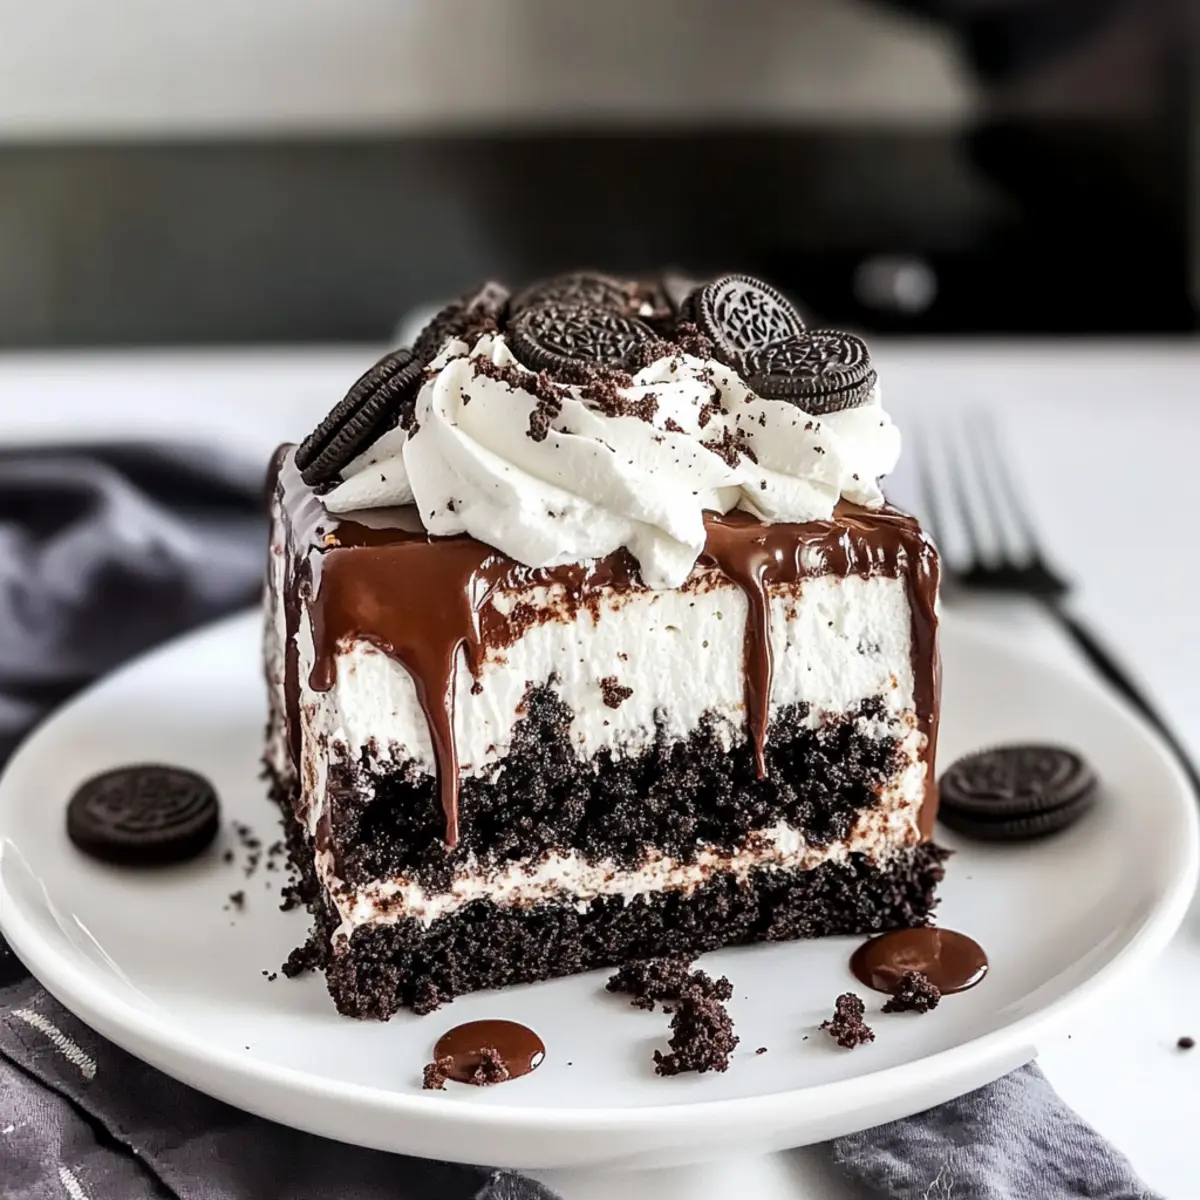
Decadent Layers: The combination of moist chocolate cake and creamy Oreo pudding creates a heavenly experience for your taste buds.
Effortless Preparation: With just a few simple ingredients, this recipe guarantees success even for novice bakers.
Ultimate Crowd-Pleaser: Perfect for parties or family dinners, everyone will want a slice of this chocolate delight.
Endless Variations: Feel free to experiment with different cookies or pudding flavors, making it your own signature dessert.
Visual Appeal: The beautiful layers and crushed Oreos on top make it photo-ready for social media sharing!
Ready for more scrumptious ideas? Try adding a layer of caramel sauce between the pudding and whipped topping for an extra indulgent touch with my Butter Pecan Cake, or combine these flavors with the warmth of fall in my Pumpkin Spice Roll Cake.
Oreo Poke Cake Ingredients
For the Cake
• Chocolate Cake Mix – Provides the base; offers sweetness and structure. Substitute with a gluten-free cake mix for a gluten-free option.
• Water – Hydrates the cake mix. Using milk instead can add richness.
• Vegetable Oil – Keeps the cake moist. Can be replaced with melted butter for added flavor.
• Eggs – Binds the ingredients and adds structure. No substitute recommended for best results.
For the Pudding Layer
• Instant Oreo Pudding Mix – Creates the signature Oreo flavor and creamy layer. Vanilla pudding can be used for a lighter taste.
• Cold Milk – Activates the pudding mix; use whole milk for creaminess or almond milk for a non-dairy alternative.
For Topping
• Whipped Topping – Adds fluffiness and sweetness to the cake. You can substitute with homemade whipped cream if desired.
• Oreos (Crushed) – Provides a crunchy topping and enhances the Oreo flavor. Use any cookies of your preference for variation.
• Optional: Chocolate Syrup – Adds extra sweetness and decoration.
Dive into these ingredients, and you’ll be well on your way to creating your very own Oreo Poke Cake, the ultimate treat for any chocolate lover!
Step‑by‑Step Instructions for Oreo Poke Cake
Step 1: Preheat Your Oven
Begin by preheating your oven to 350°F (175°C). While the oven is heating, generously grease a 9×13 inch baking pan with butter or cooking spray to ensure your Oreo Poke Cake releases easily after baking. This initial step sets the foundation for a perfectly baked cake that’s both moist and flavorful.
Step 2: Mix the Cake Batter
In a large mixing bowl, combine the chocolate cake mix, water, vegetable oil, and eggs. Using a hand mixer or whisk, blend everything together until the batter is smooth and free of lumps. This should take about 2-3 minutes. You will see a rich, dark mixture that promises deliciousness in every bite of your Oreo Poke Cake.
Step 3: Bake the Cake
Pour the cake batter into the prepared baking pan, spreading it evenly with a spatula. Place the pan in the preheated oven and bake for 25 minutes, or until a toothpick inserted in the center comes out clean. Keep an eye on the cake as it bakes; it should rise beautifully and have a slightly firm top when done.
Step 4: Cool & Poke Holes
Once baked, remove the cake from the oven and let it cool in the pan for about 10-15 minutes. After it’s cooled slightly, use the handle of a wooden spoon to poke holes about 1 inch apart all over the top of the cake. This is an essential step for your Oreo Poke Cake, allowing the creamy pudding to seep into the delicious chocolate cake.
Step 5: Prepare the Pudding Layer
In a medium-sized bowl, whisk together the instant Oreo pudding mix and cold milk until smooth and thickened, about 2 minutes. You’ll notice a creamy consistency emerging—this is what makes your Oreo Poke Cake truly indulgent. Make sure to incorporate all the pudding mix for an even flavor throughout the cake.
Step 6: Layer the Pudding
Carefully pour the prepared Oreo pudding over the cooled cake, ensuring you spread it evenly across the surface, filling in all those delightful holes. Gently shake the pan to help the pudding settle into the cake. Afterward, cover the cake with plastic wrap and refrigerate for about 1 hour to allow the pudding to set and soak in.
Step 7: Add the Whipped Topping
After the pudding has chilled, take the cake out of the refrigerator. Spread a generous layer of whipped topping over the pudding, smoothing it out with a spatula for an even finish. This fluffy layer beautifully complements the rich pudding, making your Oreo Poke Cake a feast for the eyes as well as the taste buds!
Step 8: Top with Crushed Oreos
Finish off your Oreo Poke Cake by sprinkling a handful of crushed Oreos on top of the whipped topping. This step adds a delightful crunch and an extra burst of Oreo flavor. For an optional garnish, drizzle chocolate syrup over the top to create an eye-catching dessert that’s sure to impress your family and friends.
Step 9: Serve and Enjoy
Before serving, refrigerate the finished Oreo Poke Cake for at least 1 hour, or longer if possible. This chilling time helps the flavors meld together beautifully. When ready to serve, slice into squares, ensuring each piece gets its share of the delightful layers. Your Oreo Poke Cake is now ready to be enjoyed!

What to Serve with Oreo Poke Cake?
Elevate your dessert experience by complementing your sweet indulgence with delightful pairings that enhance the joy of each bite.
-
Vanilla Ice Cream: The creamy, cool texture of vanilla ice cream offers a refreshing contrast to the richness of the Oreo Poke Cake. A scoop on top brings a delightful melty experience.
-
Fresh Berries: A medley of strawberries, blueberries, or raspberries adds a bright burst of freshness and a splash of color, cutting through the heaviness while enhancing the cake’s sweetness.
-
Chocolate Milkshake: For the ultimate chocolate lover’s treat, a thick chocolate milkshake is a dreamy match alongside this decadent dessert, further satisfying those chocolate cravings.
-
Espresso or Coffee: A rich cup of espresso or dark coffee will perfectly balance the sweet flavors, enhancing the cake’s chocolate richness while offering a warm, cozy touch.
-
Pecan Pie Bars: Pairing the Oreo Poke Cake with a slice of pecan pie bars introduces a nutty crunch and caramel flavor, creating a delightful contrast of textures and tastes.
-
Chocolate-Covered Strawberries: These elegant treats add a romantic flair, with their fruity freshness and rich chocolate coating mirroring the sweet indulgence of the Oreo Poke Cake.
-
Creamy Banana Pudding: The soft, creamy texture of banana pudding layered with vanilla wafers provides a comforting and nostalgic touch, perfect for a cozy dessert spread that will delight everyone.
-
Mint Tea: A soothing cup of mint tea can cleanse the palate after the sugary sweetness, refreshing the senses and providing a light finish to your dessert experience.
-
Fruit Salad: A light and zesty fruit salad filled with citrus notes and juicy fruits can balance the richness of the cake. Plus, it adds a vibrant, colorful appeal to your dessert table!
Oreo Poke Cake Variations & Substitutions
Feel free to explore these delightful twists on the classic Oreo Poke Cake, allowing you to personalize it for any occasion!
-
Gluten-Free: Use a gluten-free chocolate cake mix for a cake that everyone can enjoy without missing out on flavor.
-
Milk for Water: Substitute water with whole milk in the cake batter to create an even richer, creamier texture in every bite.
-
Buttery Goodness: Replace vegetable oil with melted butter for a more robust buttery flavor that enhances the cake’s richness.
-
Pudding Flavor Twists: Swap the Oreo pudding with instant vanilla or chocolate pudding for a lighter variation that still satisfies your sweet tooth.
-
Non-Dairy Delight: Use almond milk or coconut milk instead of regular milk for a delicious non-dairy option that keeps the creamy layer intact.
-
Homemade Whipped Cream: Ditch the store-bought whipped topping and make your own! A splash of vanilla and some powdered sugar will elevate the flavor immensely.
-
Cookie Alternatives: Mix in crushed chocolate chip cookies or peanut butter cookies instead of Oreos for an exciting new flavor profile. Imagine a luscious peanut butter cookie poke cake—yum!
-
Drizzle of Decadence: Top the cake with a rich chocolate ganache or a layer of caramel sauce between the pudding and whipped topping for added indulgence.
Ready to expand your dessert repertoire? Don’t forget to check out my Butter Pecan Cake for a nutty twist, or enjoy the cozy flavors in my Pumpkin Spice Roll Cake this fall!
How to Store and Freeze Oreo Poke Cake
Fridge: Keep your Oreo Poke Cake covered in an airtight container in the fridge for up to 3 days to maintain its freshness and creamy texture.
Freezer: If you want to extend its life, freeze individual slices wrapped tightly in plastic wrap and then aluminum foil for up to 2 months. Thaw in the fridge overnight before serving.
Reheating: This cake is best enjoyed cold, but if you prefer it slightly warm, reheat individual slices in the microwave for about 10-15 seconds.
Storage Note: To preserve the layers and prevent sogginess, avoid adding crushed Oreos on top until just before serving your Oreo Poke Cake.
Expert Tips for Oreo Poke Cake
-
Perfect Cooling: Ensure the cake is completely cooled before poking holes. If you don’t wait long enough, the pudding might leak out, creating a mess.
-
Chilling Time: For the most irresistible flavor, let your Oreo Poke Cake chill in the fridge for at least 3 hours, or overnight if possible, to allow all the ingredients to meld beautifully.
-
Pudding Consistency: Whisk the pudding mix and milk thoroughly until it’s smooth and thickened. This step is crucial for a creamy layer that contrasts with the moist cake.
-
Generous Topping: Don’t skimp on the whipped topping! A thick layer not only enhances the flavor but also contributes to a beautiful presentation for your Oreo Poke Cake.
-
Variations Welcome: Feel free to experiment! Swap Oreos for other cookies or try flavored pudding mixes. Each choice can create a new twist on this classic dessert.
Make Ahead Options
These Oreo Poke Cakes are perfect for busy home cooks looking to save time during the week! You can prepare the chocolate cake base up to 24 hours in advance; simply bake, cool, and store the cake in an airtight container at room temperature. The pudding layer can also be made ahead—just whisk the Oreo pudding mix with cold milk and refrigerate for up to 3 days. To maintain quality, be sure to carefully cover the cake and pudding mixture to prevent drying out. When you’re ready to serve, simply layer the pudding over the cooled cake, top with whipped topping and crushed Oreos, and let it chill for at least 1 hour before indulging. Enjoy your effortlessly delightful Oreo Poke Cake with minimal effort!

Oreo Poke Cake Recipe FAQs
How do I choose the right chocolate cake mix?
When selecting a chocolate cake mix, look for a brand that has a rich chocolate flavor and doesn’t have too many additives. I often prefer mixes with natural ingredients. If you’re gluten-free, there are great GF cake mixes available that yield wonderful results!
How should I store my Oreo Poke Cake?
To keep your Oreo Poke Cake fresh, store it covered in an airtight container in the refrigerator. It will stay delicious for about 3 days. If you’re making it for a gathering, I recommend preparing it a day in advance to let those flavors meld beautifully!
Can I freeze Oreo Poke Cake?
Absolutely! To freeze, slice the cake into individual portions and wrap each slice tightly in plastic wrap, then in aluminum foil. You can freeze it for up to 2 months. When you’re ready to enjoy a slice, just thaw it in the refrigerator overnight for the best texture and flavor!
What should I do if my pudding layer is too runny?
If you find that your pudding layer is too runny, it’s likely that you didn’t whisk it long enough or didn’t use the right milk-to-pudding mix ratio. Make sure to mix it for at least 2 minutes until smooth and thick. If it’s still not thickening, adding a little more pudding mix can help achieve the desired consistency.
Is this recipe safe for those with allergies?
This Oreo Poke Cake includes common allergens like wheat (from the cake mix) and dairy (from the milk and whipped topping), so be cautious if you or your guests have allergies. You can easily make substitutions, like a gluten-free cake mix and almond milk, to cater to various dietary preferences.
How can I enhance the flavor of my Oreo Poke Cake?
For an extra burst of flavor, consider adding a layer of caramel sauce between the pudding and whipped topping or switching up the flavor of the pudding—try using vanilla or even white chocolate. Feel free to get creative with toppings or cookie combinations to make it truly your own!
Oreo Poke Cake: The Ultimate Chocolate Indulgence
Ingredients
Equipment
Method
- Preheat your oven to 350°F (175°C) and grease a 9x13 inch baking pan.
- In a large mixing bowl, combine the chocolate cake mix, water, vegetable oil, and eggs. Blend until smooth.
- Pour the cake batter into the prepared baking pan and bake for 25 minutes.
- Let the cake cool for 10-15 minutes, then poke holes in the top using a wooden spoon handle.
- Whisk together the instant Oreo pudding mix and cold milk until smooth and thickened.
- Pour the prepared pudding over the cooled cake, spreading it evenly and refrigerate for 1 hour.
- Spread whipped topping over the pudding and sprinkle with crushed Oreos.
- Optional: Drizzle chocolate syrup over the top for decoration.
- Refrigerate for at least 1 hour before serving, then slice and enjoy!
Leave a Reply