
As I stood in my kitchen with a growling stomach, an idea struck me: a Quick Oreo Cake that would not only silence those chocolate cravings but also bring a little joy to my day. This recipe transforms simple ingredients into a moist, fluffy cake generously dotted with Oreo bits, making it an irresistible treat for any occasion. The beauty of this Quick Oreo Cake recipe lies in its effortless preparation—perfect for busy home chefs looking to swap fast food for something homemade and heartwarming. Plus, with the option to use applesauce instead of oil, you can enjoy a slightly healthier twist while indulging! Curious about how to whip up this delicious dessert? Let’s dive in!

Why is this Oreo Cake a must-try?
Indulgent, Chocolate Delight: This Quick Oreo Cake is a decadent dream, perfect for satisfying all your chocolate cravings in no time.
Effortless Preparation: With simple steps and common ingredients, this recipe caters to busy individuals who cherish homemade goodness.
Healthier Option: Using applesauce as an oil substitute allows for a guilt-free indulgence without sacrificing flavor.
Customizable Fun: Switch up the cookie base or add chocolate chips for a fun twist, just like in our Pumpkin Spice Roll Cake!
Crowd-Pleasing Appeal: This cake is perfect for parties or cozy family gatherings, making it a standout dessert that everyone will love!
Leftover Bliss: Any remaining cake can be stored easily, allowing you to enjoy this treat over days—if it lasts that long!
Quick Oreo Cake Recipe Ingredients
For the Cake
• All-purpose flour – Provides structure to the cake.
• Sugar – Sweetens the cake and adds moisture; adjust for a less sweet cake if desired.
• Unsweetened cocoa powder – Enhances chocolate richness; ensure good quality for the best flavor.
• Milk – Keeps the batter smooth and adds moisture; substitute with almond milk for a dairy-free version.
• Vegetable oil – Adds moisture and richness; unsweetened applesauce can be used for a healthier alternative.
• Large eggs – Binds the ingredients together and adds richness; for an egg-free version, use flaxseed meal mixed with water.
• Vanilla extract – Adds warm, aromatic flavor; pure vanilla extract is recommended for the best taste.
• Crushed Oreo cookies – Adds delightful chunks of cookie goodness; feel free to substitute with any chocolate sandwich cookie.
For the Frosting
• Whipped cream – Lightens up the cake’s rich flavors; consider using stabilizer if making ahead.
• Chocolate ganache – Rich topping for indulgence; made with heavy cream and chocolate—adjust ratio for consistency.
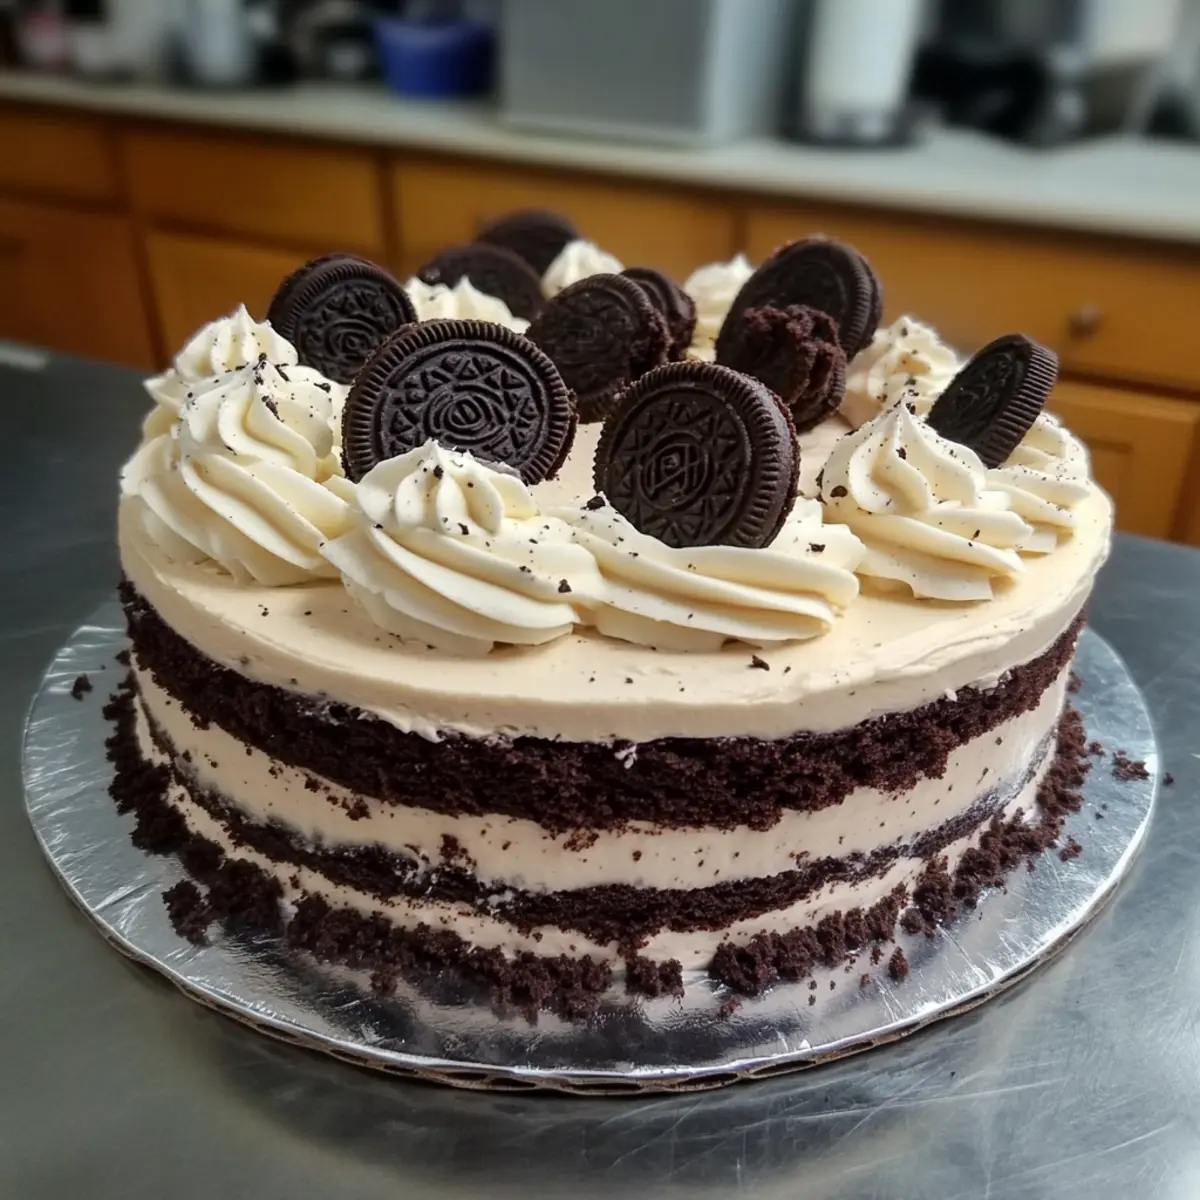
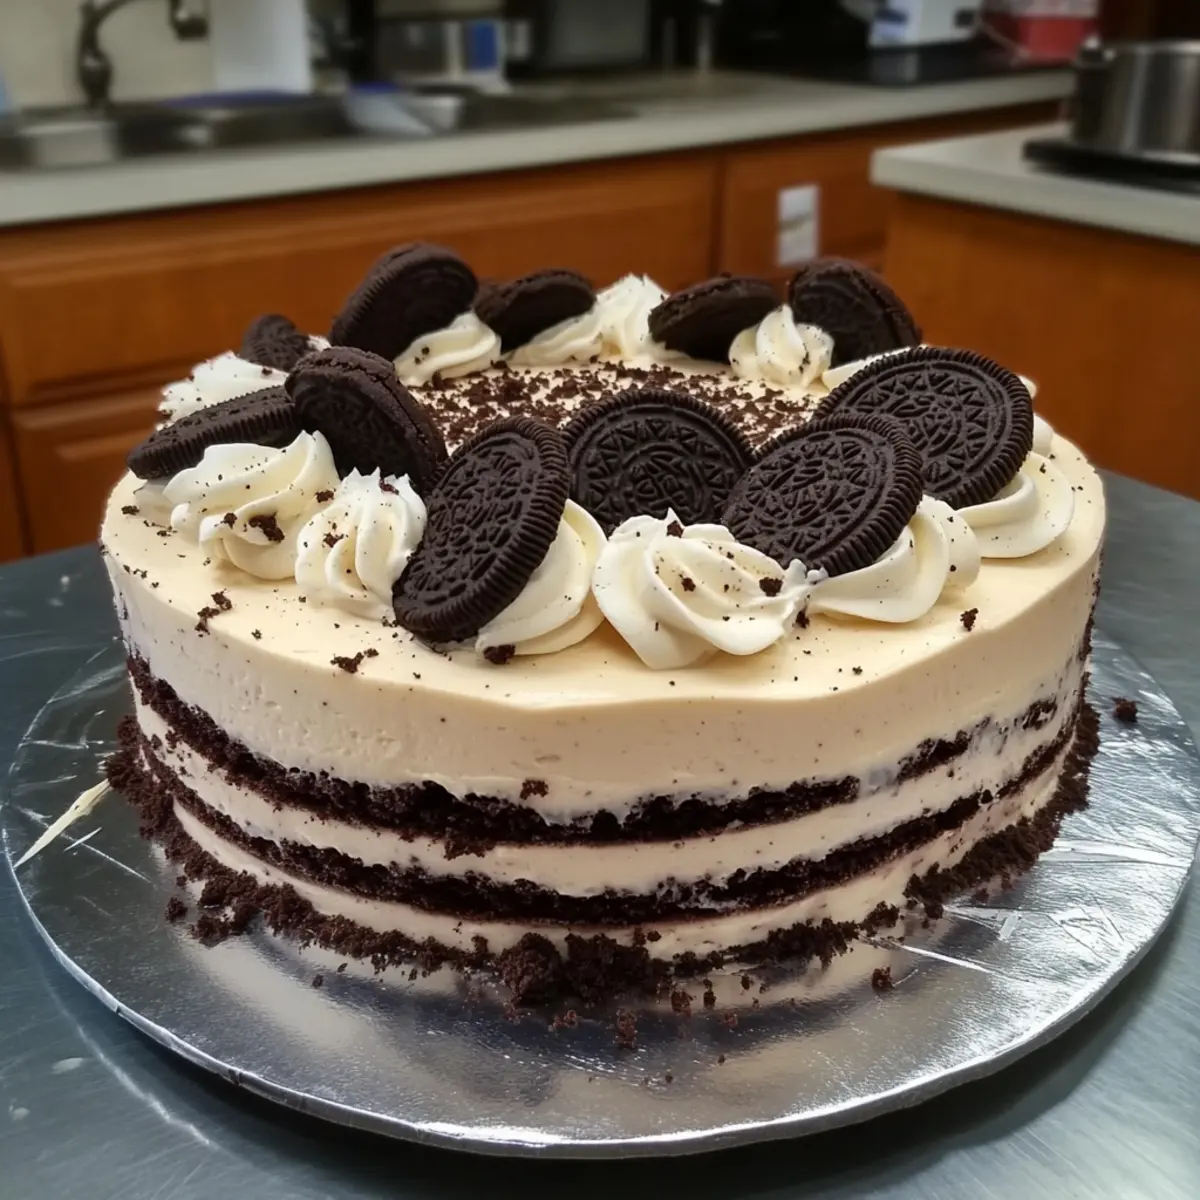
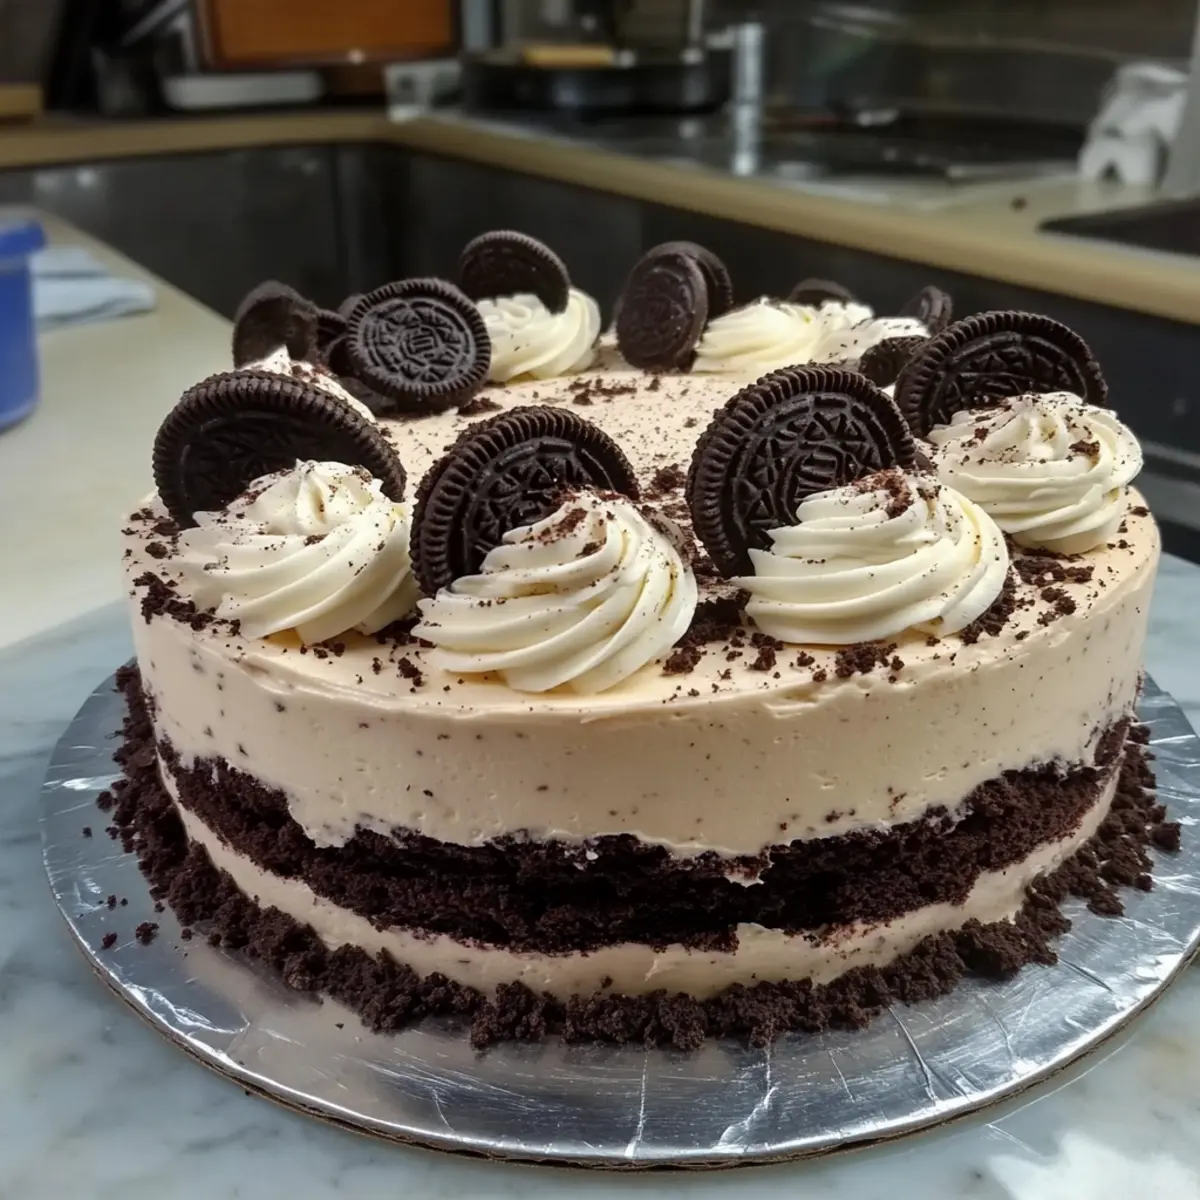
• Extra Oreo crumbs – For garnishing and added texture, and to make your Quick Oreo Cake even more appealing!
Step‑by‑Step Instructions for Quick Oreo Cake Recipe
Step 1: Gather Ingredients
Begin by collecting all your ingredients for the Quick Oreo Cake: all-purpose flour, sugar, cocoa powder, milk, vegetable oil, eggs, vanilla extract, and crushed Oreo cookies. Remember to have your whipped cream and chocolate ganache ready for frosting later. This way, everything is in one place, making your baking experience smooth and enjoyable.
Step 2: Preheat Oven
Preheat your oven to 350°F (175°C), allowing it to fully heat while you prepare your batter. This step is crucial for ensuring that your Quick Oreo Cake bakes evenly and achieves that perfect fluffy texture. As the oven warms up, you can move on to mixing your dry ingredients without losing any time.
Step 3: Mix Dry Ingredients
In a large mixing bowl, whisk together the all-purpose flour, sugar, unsweetened cocoa powder, baking powder, baking soda, and a pinch of salt. Blend these dry ingredients thoroughly until combined, ensuring no lumps remain. This will create a light base for your cake, enhancing the rich chocolate flavor of the Quick Oreo Cake.
Step 4: Combine Wet Ingredients
In a separate bowl, mix the milk, vegetable oil, eggs, and vanilla extract until the mixture is smooth and homogenous. This step brings together the wet elements that will add moisture and richness to your cake. Once well-combined, it’s time to merge these wet ingredients with the dry mix.
Step 5: Merge Mixtures
Gently fold the wet mixture into your dry ingredients using a spatula or wooden spoon. Stir until just combined, being careful not to overmix as this could affect the lightness of your Quick Oreo Cake. You want to create a batter that’s slightly lumpy, which will help keep it airy and delightful.
Step 6: Fold in Oreos
Carefully add the crushed Oreo cookies to the batter, folding them in gently to distribute evenly. The chunks of cookie will add texture and a burst of flavor throughout your Quick Oreo Cake. Ensure they are well incorporated without overmixing, preserving the light and fluffy consistency of the batter.
Step 7: Prepare Pan
Grease and flour a 9-inch round cake pan to prevent sticking. Use butter or a non-stick spray followed by a light dusting of flour, ensuring all sides are coated. This step is essential for easy removal after baking, ensuring your beautifully baked Quick Oreo Cake comes out intact and ready for frosting.
Step 8: Pour Batter
Pour the cake batter into your prepared pan, spreading it evenly with a spatula. Make sure the batter reaches all corners of the pan for a uniform bake. This will help your Quick Oreo Cake rise evenly and form a lovely, inviting shape that’s perfect for frosting later.
Step 9: Bake
Place the pan in the preheated oven and bake for 30-35 minutes. Use a toothpick to check for doneness; when inserted in the center, it should come out clean or with a few crumbs. The top should spring back when gently pressed, indicating that your Quick Oreo Cake is perfectly baked.
Step 10: Cool Cake
After baking, let the cake cool in the pan for about 10 minutes. Then, carefully transfer it to a wire rack to cool completely. This cooling period is crucial to avoid melting your frosting, allowing the layers of your Quick Oreo Cake to set up beautifully.
Step 11: Frost Cake
Once the cake is completely cool, frost the top with whipped cream, creating a luscious, airy layer that complements the richness of the cake. You can be generous here! Garnish with extra Oreo crumbs for added texture and appeal. This delightful topping makes your Quick Oreo Cake a showstopper.
Step 12: Serve
Slice the cake into generous pieces and serve with family and friends. This Quick Oreo Cake is perfect for any gathering, providing a sweet, chocolatey experience that’s hard to resist. Enjoy the smiles and satisfaction as you share this delightful creation—perfect for those cozy moments!
What to Serve with Quick Oreo Cake
Treat your taste buds to a delightful meal alongside this indulgent dessert that perfectly complements its rich flavors.
-
Creamy Vanilla Ice Cream: The cool, creamy texture of vanilla ice cream contrasts beautifully with the chocolatey richness of the cake, creating a blissful bite.
-
Fresh Berries: Sweet and slightly tart, a medley of fresh berries adds a vibrant, fresh element that balances the decadent cake.
-
Chocolate Sauce Drizzle: A warm drizzle of chocolate sauce elevates the dessert experience, enhancing its chocolatey flavors and adding a luscious touch.
-
Whipped Topping: A dollop of light whipped cream goes hand in hand with the cake, delivering a creamy, airy counterpoint to the dense chocolate dessert.
-
Espresso or Coffee: A strong cup of espresso or coffee offers an ideal pairing, with its bold flavors enhancing the cake’s richness and making for a delightful contrast.
-
Milkshake: A thick Oreo milkshake brings the flavors full circle, creating a fun and nostalgic pairing that will satisfy any sweet tooth.
-
Chocolate-Covered Strawberries: These elegant treats add a fun twist, marrying chocolate and fresh fruit that complements the cake indulgently while adding a touch of elegance.
-
Nutty Biscotti: Crunchy nut-based cookies or biscotti provide a delightful texture contrast, perfect for dipping while savoring each bite of your cake.
Expert Tips for Quick Oreo Cake
-
Don’t Overmix: Keep your mixing to a minimum after adding the wet ingredients to retain a light and fluffy texture in your Quick Oreo Cake.
-
Cooling is Key: Allow the cake to cool completely before frosting; this prevents the whipped cream from melting and losing its beautiful shape.
-
Test for Doneness: Always use a toothpick inserted in the center to check if the cake is done; it should come out clean for the perfect bake.
-
Frosting Fun: For a creative touch, experiment with flavored whipped cream or different types of frosting to enhance your Quick Oreo Cake!
-
Serving Temperature: Serve the cake at room temperature to allow the flavors to shine; cold cake can mute the rich chocolate taste.
Quick Oreo Cake Recipe Variations
Feel free to explore these delightful twists that will make your Quick Oreo Cake recipe even more exciting and satisfying!
-
Gluten-Free: Use gluten-free all-purpose flour for a cake anyone can enjoy without compromising on taste!
-
Dairy-Free: Substitute the milk with almond milk, coconut milk, or your favorite nut milk for a delicious dairy-free option.
-
Healthier Option: Swap vegetable oil for unsweetened applesauce, adding moisture while cutting down on fat. It’s a simple swap that makes a big difference.
-
Egg-Free: For a vegan cake, replace the eggs with flaxseed meal mixed with water to bind the ingredients while keeping that yummy texture.
-
Flavor Boost: Introduce your favorite flavor extract like almond or mint for a surprising twist that makes your cake stand out. Just a little can elevate the cake to the next level!
-
Chocolate Chip Delight: Add a generous handful of chocolate chips to the batter for extra melty goodness throughout—just imagine that gooey surprise with every bite!
-
Frosting Variations: Try cream cheese frosting or a rich chocolate ganache to take your cake to new heights. The luscious creaminess will sweep you off your feet!
-
Layer it Up: For a party-ready presentation, slice the cake into layers and add whipped cream and Oreos in between for an even more indulgent experience that everyone will love. For inspiration, check out our Butter Pecan Cake!
Whichever variation you choose, each offers a chance to tailor this quick recipe to suit your cravings and make it uniquely yours!
How to Store and Freeze Quick Oreo Cake
Room Temperature: Keep leftover cake in an airtight container for up to 3 days. This ensures it stays fresh and delicious, perfect for those late-night cravings.
Fridge: Store in the refrigerator for up to a week. Just make sure it’s well covered to maintain moisture and avoid absorbing odors from other foods.
Freezer: For long-term storage, wrap the cake tightly in plastic wrap and place it in a freezer-safe bag. It can be frozen for up to 3 months, preserving the rich flavors of the Quick Oreo Cake.
Thawing: To enjoy later, simply thaw in the refrigerator overnight before serving. This keeps it moist and rich, ready to delight your taste buds!
Make Ahead Options
These Quick Oreo Cake preparations are perfect for busy home cooks looking to save time during hectic weeks! You can prepare the cake batter up to 24 hours in advance by mixing and refrigerating it in an airtight container. Just ensure that the Oreo pieces are folded in gently to maintain the fluffy texture of the batter. The baked cake can also be made ahead and stored at room temperature for up to 3 days; simply cool completely before wrapping it tightly in plastic wrap. To serve, frost with whipped cream and garnish just before enjoying—this way, you’ll experience deliciously fresh homemade cake without the stress of last-minute prep!
Quick Oreo Cake Recipe FAQs
What kind of Oreos should I use?
Definitely go for classic Oreos for that delicious, iconic flavor! However, if you want to mix things up, feel free to substitute with chocolate or vanilla sandwich cookies. Just remember that it’ll change the taste slightly, but many variations can be tasty!
How do I know when my Quick Oreo Cake is done baking?
Great question! A toothpick or skewer inserted into the center should come out clean or with a few moist crumbs attached, not wet batter. The cake should also spring back when gently pressed. Follow the baking time of 30-35 minutes, but always keep an eye on it during the last few minutes for best results!
How should I store my leftover cake?
Absolutely! For leftovers, storing your Quick Oreo Cake in an airtight container at room temperature is perfect for up to 3 days. If you want it to last longer, place it in the fridge where it can stay fresh for up to a week. Be sure to cover it properly to prevent it from drying out!
Can I freeze the Quick Oreo Cake?
Yes! To freeze, wrap the cooled cake tightly in plastic wrap and place it in a freezer-safe bag. It can be frozen for up to 3 months. When you’re ready to enjoy it again, just thaw it overnight in the fridge before serving—this ensures it retains its moistness and flavor!
What if my cake turns out dense? Any troubleshooting tips?
If your cake ends up dense, it could be due to overmixing the batter, so mix gently when combining your wet and dry ingredients. Additionally, make sure you’re measuring your flour correctly—too much flour can lead to a heavy cake! For a lighter texture, rely on minimal mixing once you combine the ingredients.
Is this cake suitable for dietary restrictions?
Very! You can easily modify this Quick Oreo Cake to meet certain dietary needs. Replace the vegetable oil with unsweetened applesauce for a healthier twist, or use flaxseed meal mixed with water instead of eggs for an egg-free version. If you’re looking for dairy-free, swap out cow’s milk for almond milk or any nut milk, and you’ll still get a delicious cake!
Quick Oreo Cake Recipe – A Chocolate Dream Come True
Ingredients
Equipment
Method
- Gather all ingredients for the Quick Oreo Cake.
- Preheat your oven to 350°F (175°C).
- Mix all-purpose flour, sugar, cocoa powder, baking powder, baking soda, and salt in a bowl.
- Combine milk, vegetable oil, eggs, and vanilla extract in a separate bowl.
- Fold wet mixture into dry ingredients until just combined.
- Fold in crushed Oreo cookies gently.
- Grease and flour a 9-inch round cake pan.
- Pour the batter into the prepared pan.
- Bake for 30-35 minutes and check for doneness.
- Let the cake cool in the pan for 10 minutes, then transfer to a wire rack.
- Frost the cooled cake with whipped cream and garnish with Oreo crumbs.
- Slice and serve to family and friends.
Leave a Reply